Monitor Inspera Assessment (Original)
The Monitor area of Inspera allows you to get a live insight into the progress and status of students completing an assessment. You can also perform a range of actions from this area.
Accessing Monitor
Staff who have been given one of the following roles will be able to access the Monitor area for an assessment:
- Planner
- Chief Invigilator
- Invigilator
- Grader
To access Monitor:
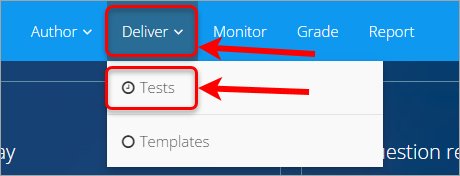
- Select Tests from the Deliver drop-down menu.
- Locate the assessment you wish to monitor from the list and click to open it.
- From the Deliver settings, click on the circular icon in the top-right corner to access Monitor for this assessment

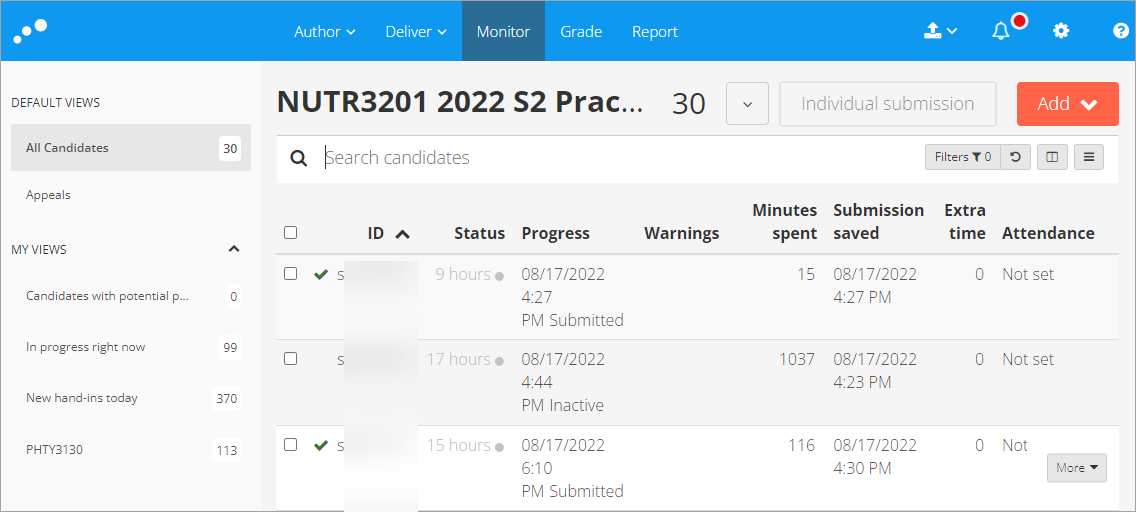
- The Monitor screen will open showing the students for the selected assessment.
Columns in Monitor
Columns can be displayed, hidden and re-arranged in Monitor depending on what information you would like to focus on. The table below describes each column.
Note: Not all roles in Inspera have access to all columns.
| Column | Description |
|---|---|
| 1st column (unnamed) | Indicates submission status:
|
| ID | The student’s s-number (e.g., s1234567) |
| Status | Shows the status on the student’s connection: Online/Inactive. |
| Progress | Indicates the student progress:
For further information, refer to the Candidate progress in Monitor guide by Inspera. |
| Warnings | Displays warnings (only for assessments with a duration of less than 24 hours):
|
| Minutes spent | The number of minutes since the assessment was started by the student, up until the point they click submit, or the assessment time has finished. |
| Minutes remaining | How many minutes the student has remaining on the assessment. |
| Type | Assessment types:
|
| Test | Name of the assessment |
| Test start time | Start date and time |
| Test status | Status of the assessment:
|
| Test end time | End date and time |
| Submission saved | Timestamp for last saved version of the submission |
| Candidate started | Timestamp for when the student started the assessment |
| Candidate submitted | Timestamp for when the student submitted |
| Group name | Name of the group for Group assessment |
| Extra time | Number of planned extra time (minutes) |
| Incident time | Number of incident extra time (minutes) |
| Re-submission | Displays if resubmission is enabled/disabled |
| ID Check | Status on ID check:
|
| Attendance | Status on student attendance:
|
| Room | Information on student location. For further information, refer to the Candidate list - add location information to candidate guide by Inspera. |
| Building | Information on student location. For further information, refer to the Candidate list - add location information to candidate guide by Inspera. |
| Question set | Question set used in the assessment |
| Planner | Name of the Planner on the assessment |
| Spell Checker | Status on spell checker:
|
| Evaluation type | Information from an external system (requires integration) |
| Timeframe code | Information from an external system (requires integration) |
| Grades transferred | Shows as “enabled” if the final grade has been transferred to a connected external system or “disabled” if not. |
| Committee | Name of assigned marking committee |
| Confidence level (Events) | Only applicable to assessments using Inspera Exam Portal with Smarter Proctoring. The confidence level is calculated based on flagged events and face detection that has occurred during an exam that uses Inspera Exam Portal with Smarter Proctoring. The Events in parentheses are the number of events that have been flagged by Inspera Exam Portal. |
| Device Security Flags | Only applicable to assessments using Inspera Exam Portal with Smarter Proctoring. Indicates any processes that were blocked on the student’s computer and the security level applied to the assessment in Inspera Exam Portal. |
| Authentication type | Name of authentication type:
|
| Flag | Shows if a student is flagged. |
| Restrict publishing until | Date for allowed publishing of submission, usually a thesis that is restricted for a period of time. |
| Submission | Shows if the submission is available, or the time stamp for when the student chose to remove the submission. The column will only contain information if this feature is enabled on the assessment. |
Choosing columns to display
Choose columns to display
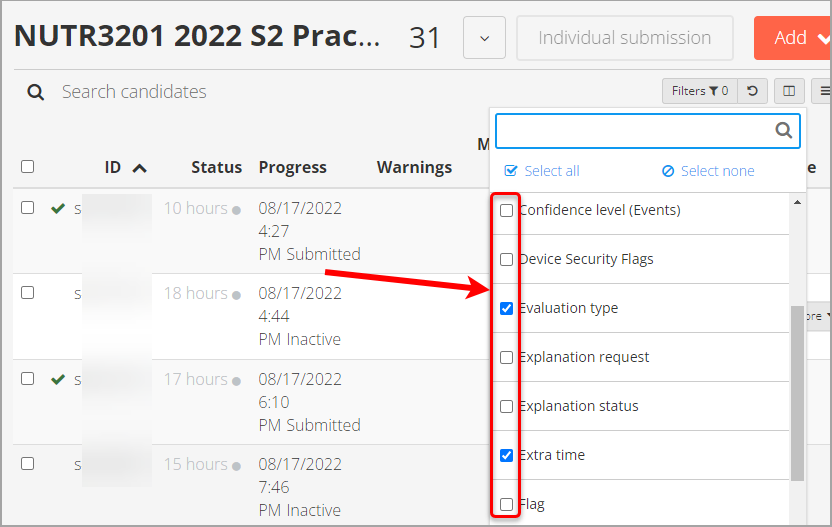
- Click the Column button.

- Check/uncheck the checkboxes next to the columns you wish to display/hide.
Recommended columns
The following columns are recommended for monitoring assessments:
- ID
- Status
- Progress
- Warnings
- Minutes spent
- Submission saved
- Extra Time
- Candidate started
- Candidate submitted
- Flag
- Incident time
- Individual end time
- Test start time
- Test end time
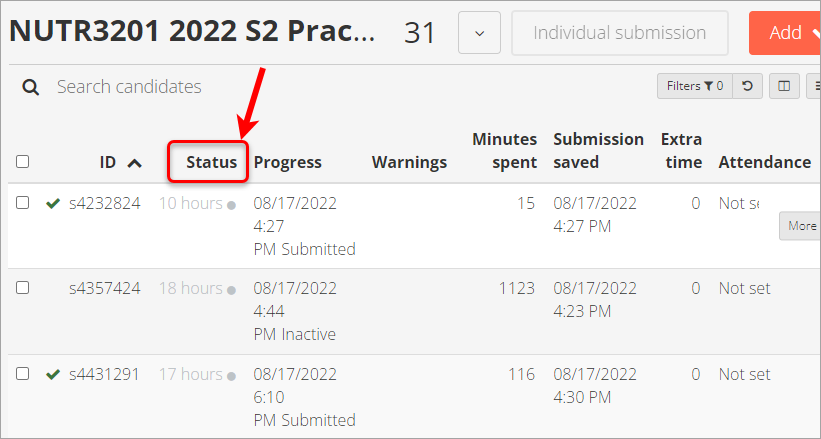
Re-ordering columns
You can re-order the columns in Monitor by clicking and dragging the column header to the position you’d like them.
Saving a view
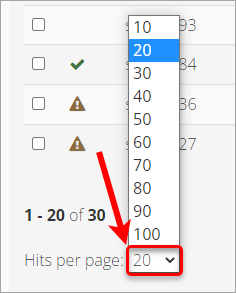
If you have upcoming assessments that you will need to monitor, you may wish to set up your desired “Views” ahead of time. A “View” saves the columns and hits per page you can see for a certain assessment for easy access.
Note: A saved view is unique to the assessment it is related to, you will need to setup a new view for each assessment you intend to monitor.
- After displaying the desired columns and hits per page on an assessment in Monitor, click the hamburger button in the top-right corner.

- Select Save as View.

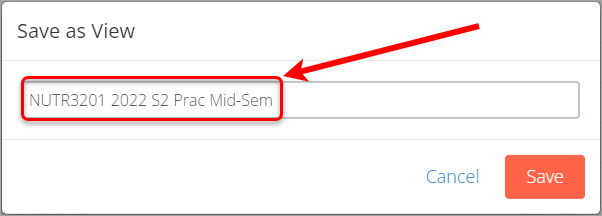
- The Save as View dialogue box appears. Give the View a meaningful name in the textbox.
Note: There is a 29-character limit on the name for the saved view.
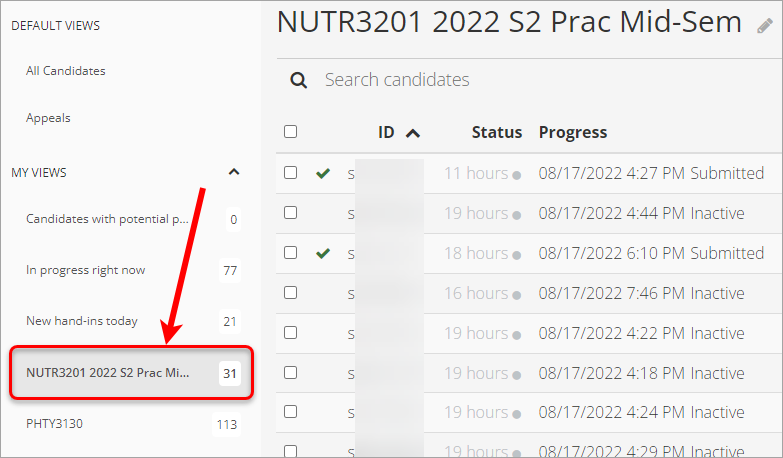
- The View appears in the left menu of Monitor and can be clicked to easily access it later.
View student submission from Monitor
There are many actions that can be performed in Monitor. Instructions for common use cases are detailed below.
Viewing a student’s submission
After a student has submitted an assessment, the submission can be viewed from Monitor. This may be useful if you wish to show a student their submission in a private setting without releasing submissions to all students to view independently.
- Move your mouse cursor over the row containing the student whose submission you wish to view.
- Click on the More button.

- Select View submission from the dropdown menu.
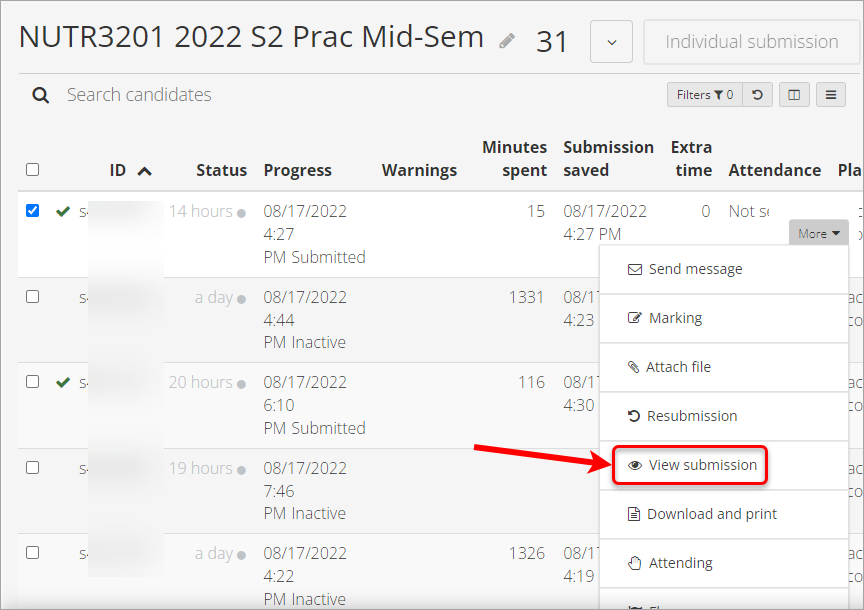
- The student’s submission will open in a new window/tab, showing the responses they provided to the questions in the assessment.
Pausing/resuming a student’s timer
There may be situations during a timed assessment (like an on-campus exam) when a student’s timer needs to be paused, for example:
- The student has an alternative exam arrangement for rest breaks that have not already been built in as planned extra time.
- A student experiences a technical issue outside of their control after starting their exam and needs to switch to using a different device.
To pause a student’s timer:
- Move your mouse cursor over the row containing the student whose submission you wish to view
- Click on the More button.

- Select Pause from the dropdown menu.
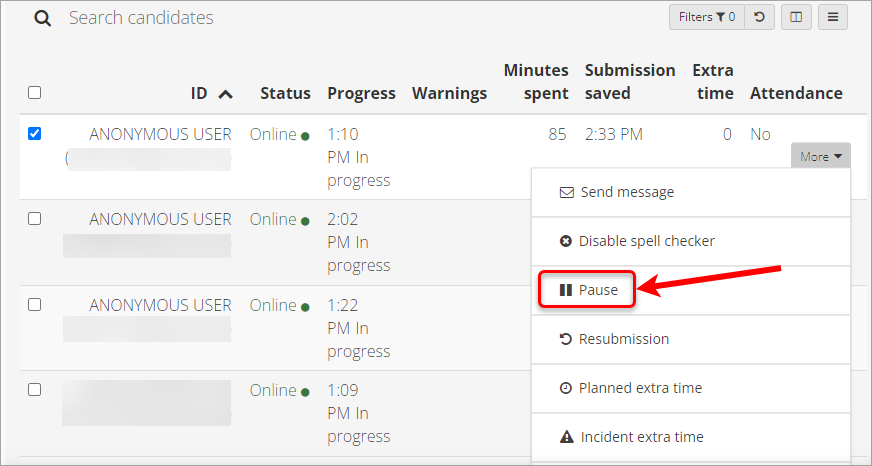
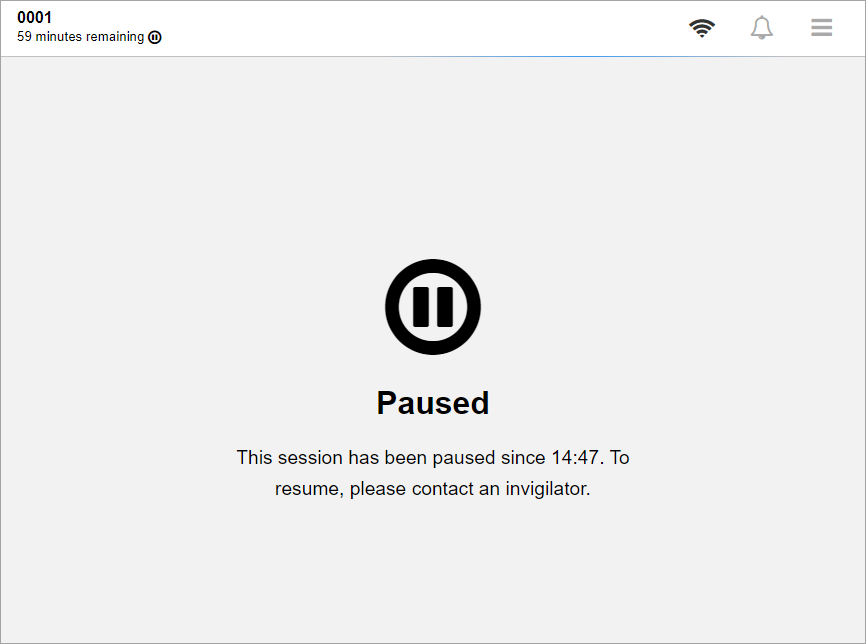
- The student’s countdown timer will pause. From the student’s perspective, a pause icon will appear on the screen and the student cannot respond to any questions or navigate through the assessment until their timer has been resumed.
To resume a student’s timer:
- Move your mouse cursor over the row containing the student whose submission you wish to view
- Click on the More button.

- Select Resume from the dropdown menu.
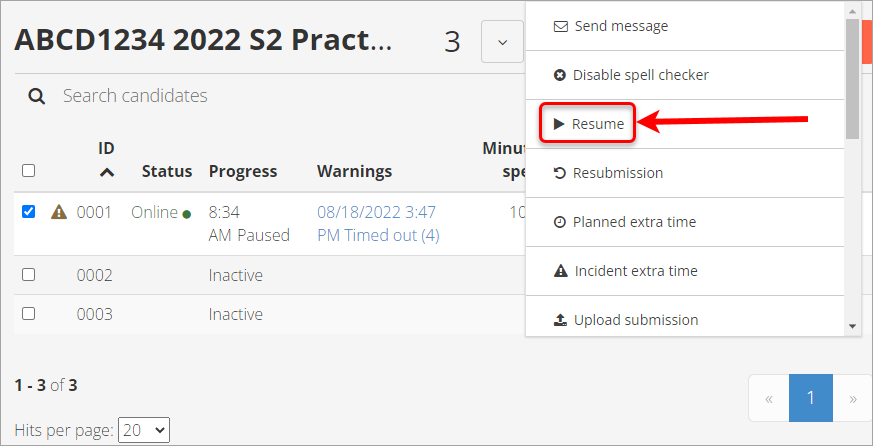
- The student's screen will automatically refresh allowing them to continue working.
Flag a student
You may wish to flag a student to keep an eye on them in Monitor in cases where you may be concerned about their progress or Warning messages that have appeared for them. Flagging provides a quick visual cue to help find students in Monitor.
To flag a student:
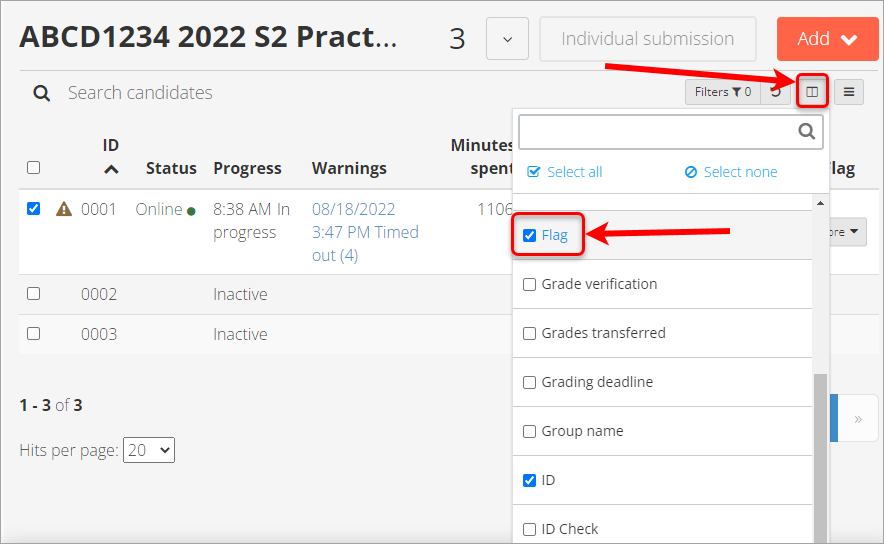
- Ensure that the Flag column is visible by clicking on the Columns button and selecting Flag from the drop-down menu.
- Move your mouse cursor over the row containing the student whose submission you wish to view
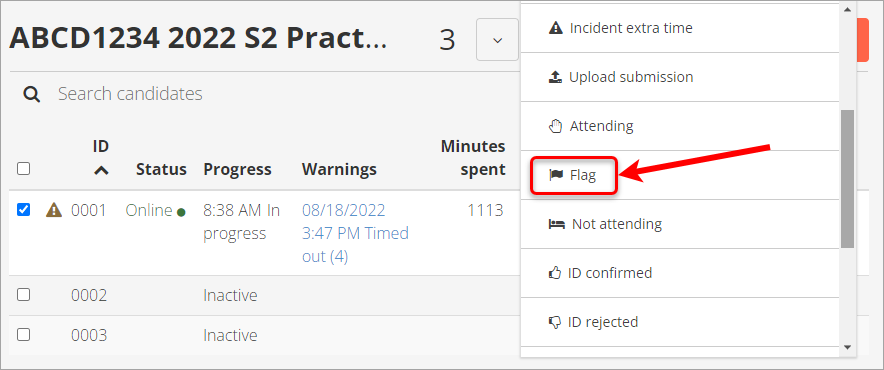
- Click on the More button.

- Select Flag from the dropdown menu.
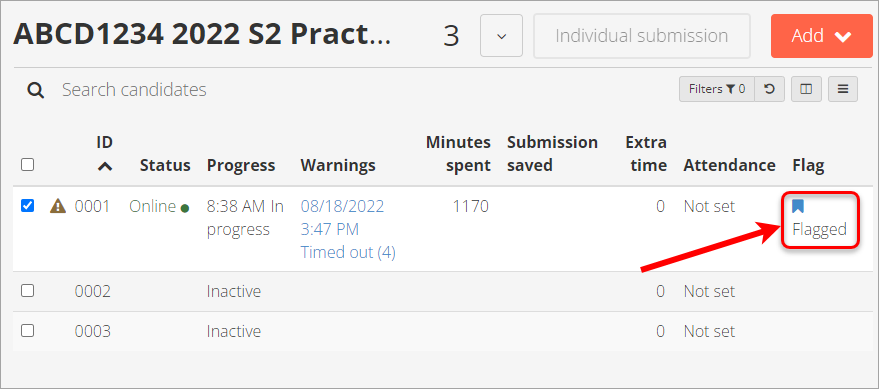
- A flag icon appears in the student’s Flag column.
Remove the flag from a student:
- Move your mouse cursor over the row containing the student whose submission you wish to view
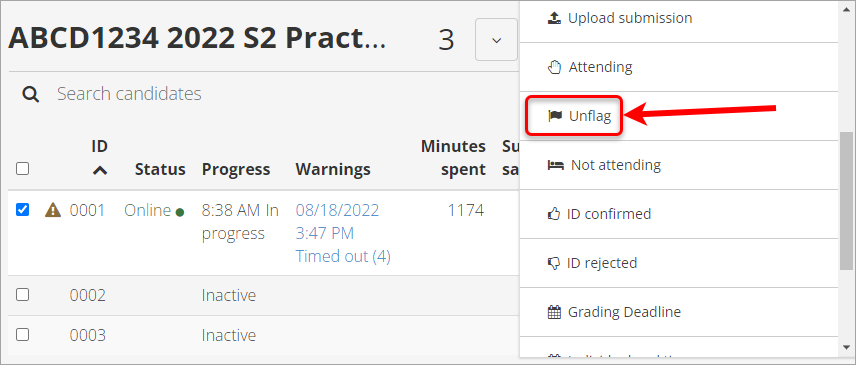
- Click on the More button.

- Select Unflag from the dropdown menu.
Adding extra time to deal with unforeseen incidents
There may be instances when a student experiences lost time while taking an assessment through no fault of their own (e.g., computer/connection failure). If the student has already commenced the assessment and their timer has started counting down, the time continues to count down even while they are not in the assessment. As such, time the student has lost while disconnected from the assessment can be added back onto the student’s countdown timer using Incident extra time.
To apply incident extra time to a student:
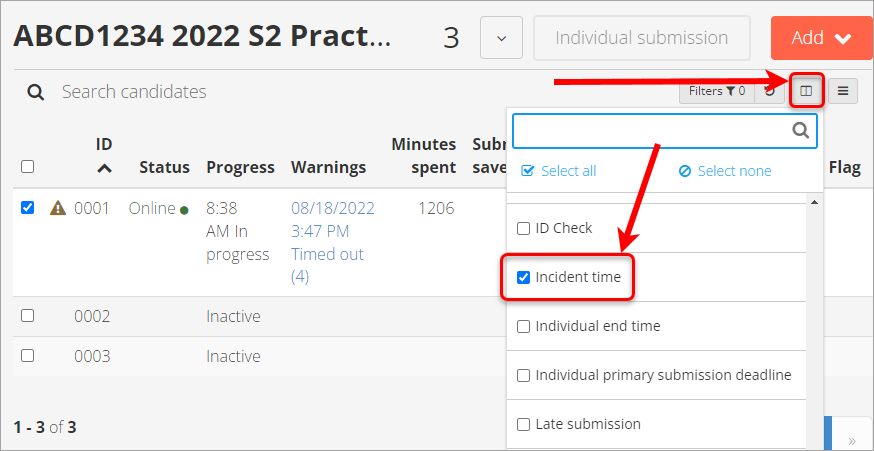
- Ensure that the Incident time column is visible by clicking on the Columns button and selecting Incident time from the drop-down menu.
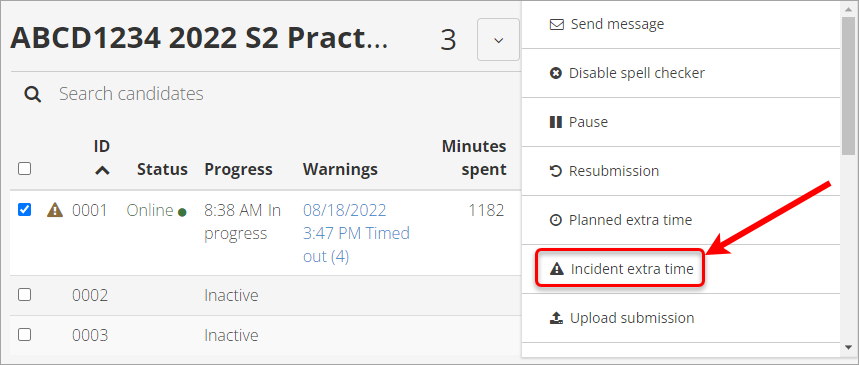
- Move your mouse cursor over the row containing the student whose submission you wish to view
- Click on the More button.

- Select Incident extra time from the drop-down menu.
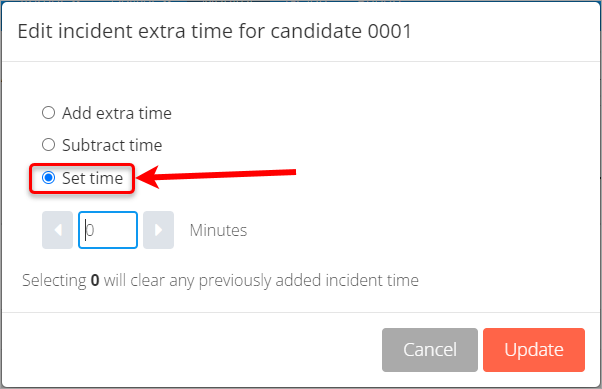
- The Edit incident extra time dialogue box appears. Set time is selected by default.
- Add minutes into the minute's field either by typing or using the arrows.
- Click the Update button to add the extra time for the student.
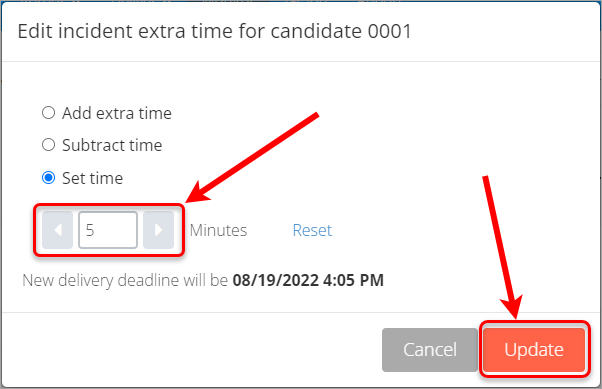
- The extra time appears in the Incident time column in Monitor (you may need to make this column visible if it is not already)
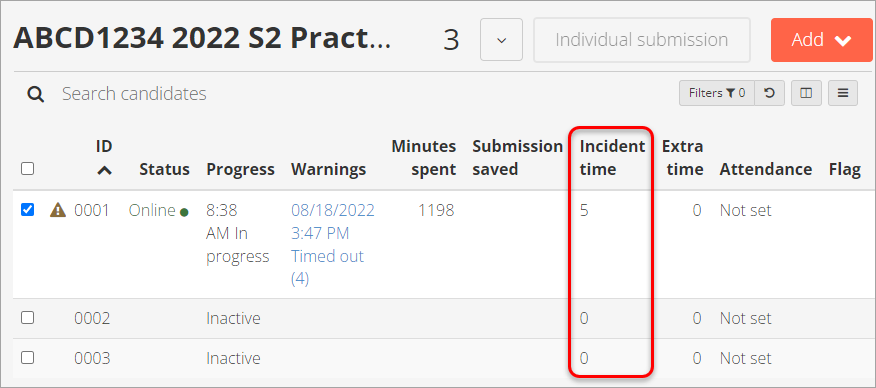
Tip: If you need to modify the Incident time again, follow the instructions above, noting the following:
- If you use the Add extra time option, this will add more time in addition to what has already been applied (in the example above, the existing 5 minutes will remain and you will add more time)
- If you use the Subtract time option, you can deduct any time you have already added (in the above example, you would be able to subtract up to 5 minutes)
- If you use the Set time option, this will override what was previously added. In the above example setting this to 0 would remove the 5 minutes previously added.
For further information, refer to the Add extra time to candidates guide by Inspera.
Sending a message to a student
Sometimes there is a need to send a message to a student while they are completing an assessment. For example, you may want to alert the student to an update to some content in the assessment or inform them of the incident time that has been applied.
To send a message to a student:
- Move your mouse cursor over the row containing the student whose submission you wish to view
- Click on the More button.

- Select Send message from the drop-down menu.
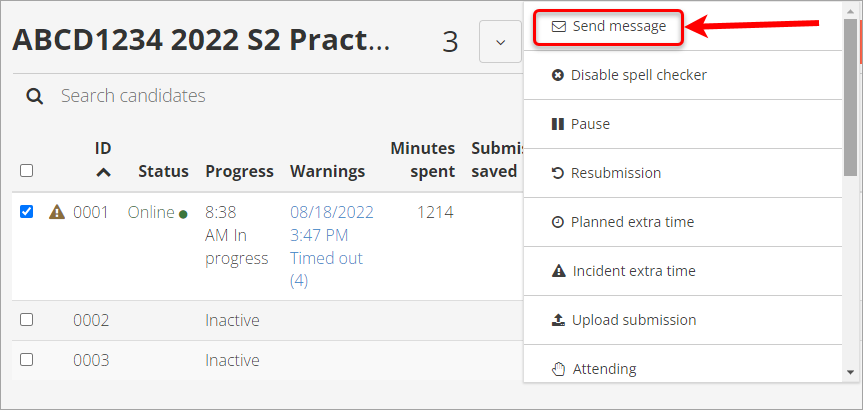
- The message dialogue box will appear.
- Enter a subject into the Subject textbox and the message into the Message textbox.
- Click on the Send button to send the message to the student.
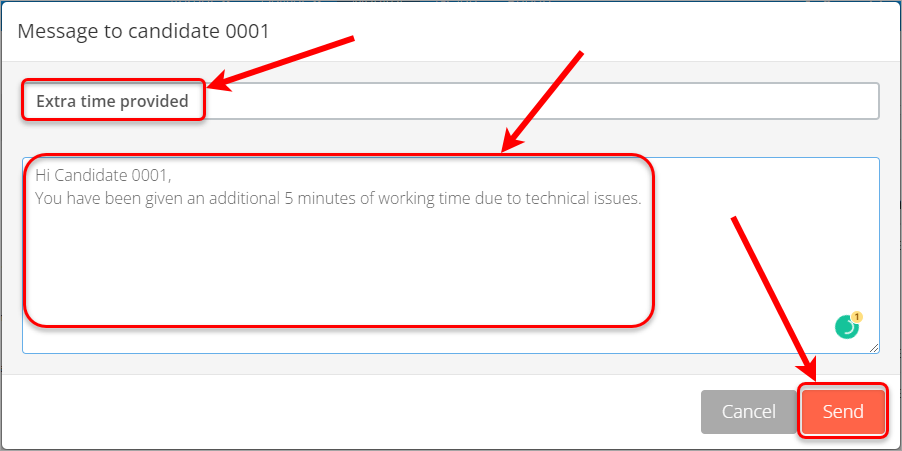
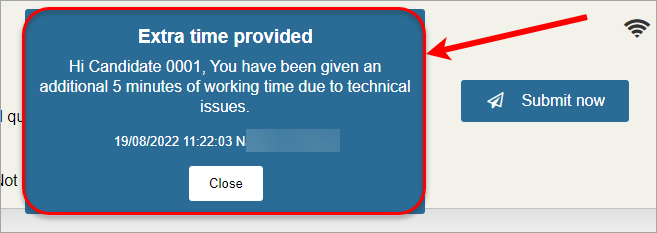
- From the student’s perspective, the message appears in a box over the top of their assessment.
Assignment File Upload Question
When checking the status of an upload for the assignment upload question, it is important to note the following:
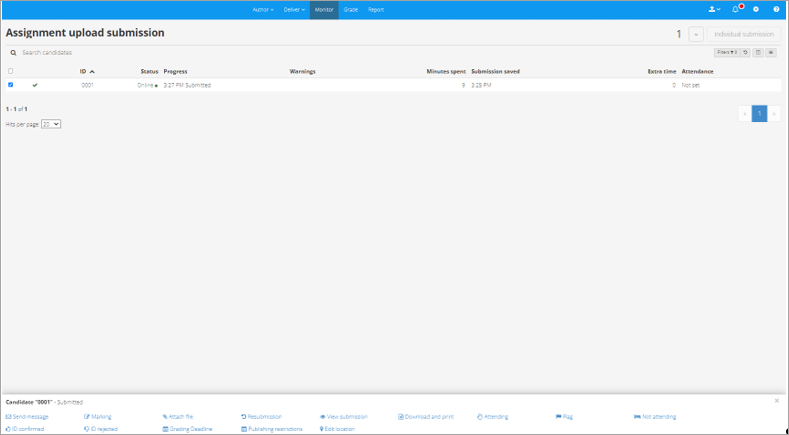
- Submission saved or Candidate submitted status does not indicate if a file upload has been successful.
- The Assignment upload question can only be checked after the test end time by Viewing a student’s submission. Once you select View Submission, navigate to the Assignment upload question.
Successful upload
The following confirmation verifies that the upload was successful: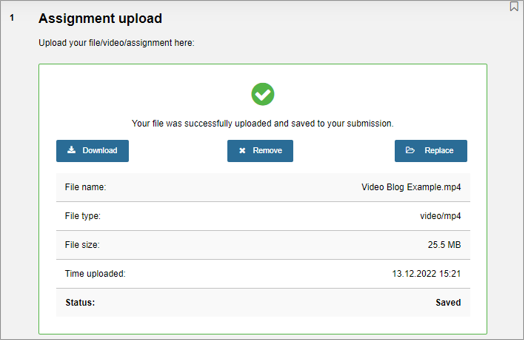
Unsuccessful upload
If the upload was unsuccessful and the student is eligible to resubmit, the student’s submission can be re-opened to allow for them to re-upload a file. Please refer to Reopening for individual students guide.
- Academic Integrity & Assessment Security in Inspera
- Access Inspera
- Access your Inspera test for marking
- Add graders to an Inspera test
- Add media content to questions in Inspera
- Add one-time users to an Inspera test
- Add the Assumption and Queries question in an Inspera exam
- Adding Resources (pdf files, links) to a Question Set
- Adding staff (contributors) to an Inspera assessment
- Adding the Academic Integrity Statement to your assessment
- Additional pages required for Inspera exams
- Alternative method for downloading Final Marks from Inspera
- Answer key corrections - MCQ
- Apply Alternative Exam Arrangements (AEAs) and Time Zone Adjustments in Inspera
- Assign questions to graders in Inspera
- Complete an Inspera test as a student
- Confirm grades in Inspera
- Copy a question set from Inspera Training to Inspera Admin (Original)
- Create Inspera practice exam with Safe Exam Browser
- Create an Inspera submission link in Learn.UQ
- Create an Inspera test in Deliver
- Create bands and criteria
- Create marking committees in Inspera
- Create marking committees using CSV
- Creating Questions
- Downloading responses to Assumptions and Queries
- Edit question weight in Inspera
- Enable After-test settings in Inspera
- Enrol students in Inspera test using CSV file
- Explanations on student responses
- Export questions from Blackboard to Inspera (Original)
- Exporting a Question Set to PDF
- False Start
- Filter functionality in Inspera marking
- Flag students in Inspera test
- Getting started with Inspera
- Grading workflow for Planners and Graders
- Incident Adjustments for students who experience technical delays
- Inspera Assessment Design Settings
- Inspera Assessment Environments and their Purposes
- Inspera Assessment User Roles
- Inspera Assessment access methods for students
- Inspera Exam Requests
- Inspera Grade Workspaces
- Inspera Observed User Testing
- Inspera Question Set Version Control
- Inspera Recommended Assessment - Standard (non-exam) assessment - webpage
- Inspera Rubrics
- Inspera School-based Exams
- Inspera Test settings
- Inspera analytics
- Inspera central on-campus and non-invigilated exams (Original)
- Inspera marking navigation
- Inviting students to an assessment via Test Code
- Late submissions and extensions in Inspera Assessment
- Manually marked questions: Mark and feedback
- Monitor Assessment
- Name and label questions in Inspera Assessment
- Navigate Inspera
- Override scoring of questions in Inspera
- Pilot an Inspera assessment
- Question sets in Inspera Assessment
- Sections in Question Sets
- Sharing a question set in Inspera Assessment
- Student Arrives Late
- Supporting students to use Inspera Assessment
- Things to look for in review
- Transfer results from Inspera to your Learn.UQ course
- Turnitin similarity report in Inspera
- View student responses in Inspera

