Add media content to questions (Original)
Different media contents can be added to a question in Inspera.
- Within the question text area, you can add: Files, Links, PDF, Images, Audios, Videos
- Within the Main Illustration, you can: Add an image, Embed a video or audio clip from an external source
Video Guide
Add file as link in question text area
- Navigate to the required question.
- Highlight the text you want to add a file as a hyperlink.
- Select the file icon from the menu.

- Click on the Browse button.

- Select the required file from your device.
- Click on the Open button.

- The file name is auto-populated from your file name.
- Edit the file name to be displayed in your question text (Link text) if needed.
- Click on the Insert button.

- Click on the Save button.
- Click on the Preview button.

The file will be added to the question text as a visible hyperlink. When students click on the link, the document will be downloaded to their device.

Add hyperlinks in question text area
- Locate the link you would like to add to the text.
- Copy the link URL.

- Navigate to the required question.
- Highlight the text to which you want to add a hyperlink.
- Select the link icon from the menu.

- Paste the link on the URL link box.
- Click on the Target tab.

- Select the New Window (_blank) option so that the link will be opened on a new window when students click on it while doing the test.
- Click on the OK button.

- Click on the Save button.
- Click on the Preview button.

The link will be displayed visibly within the question text. When students click on the link, it will be opened on a new tab on their browser.

Add PDF panel to question
- Navigate to the required question.
- Click on the PDF icon from the text editor toolbar or the PDF panel.

- Click on the Browse button.

- Select the required PDF from your device.
- Click on the Open button.

- The file name will be auto-populated on the file name textbox.
- Click on the Insert button.

- Click on the Save button.
- Click on the Preview button.

The question will display a PDF panel on the left and the question on the right.

Add images in question text area
Images can be placed inline with the question text and as part of the interactive elements of the question. For example:
- alternatives (e.g. multiple choice, multiple response)
- tables (e.g. matching / pairing)
- backgrounds (e.g. graphic text entry, graphic gap match, drag and drop, hotspot)
Note: The default width for inline images is 800 pixels, but you should test viewing your question on a laptop screen to ensure it can be viewed by students using similar devices.
Tips for using images in Inspera:
- use images that are small in file size so they will load quickly for students using shared internet connections
- Inspera does not reduce image file sizes after they are uploaded, so this needs to be done before uploading them to Inspera
- check the UQ software catalogue for graphics software that can assist with resizing images.
- Navigate to the required question.
- Make a space underneath the question text (the image will be added to the spot of your cursor).
- Click on the picture icon in the text editor area
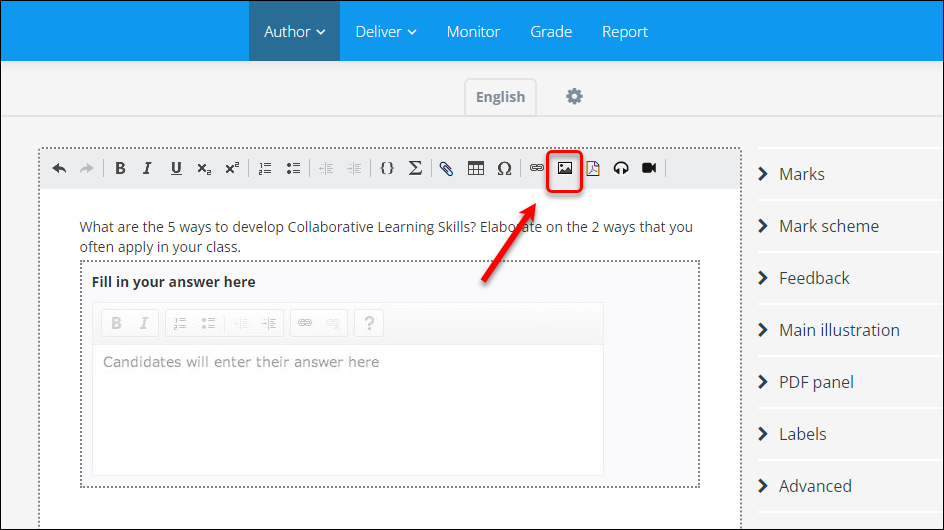
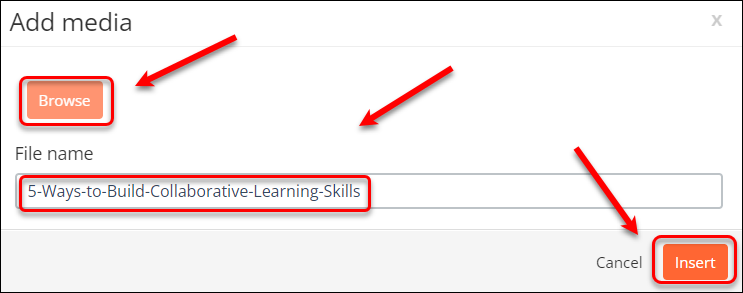
- Click on Browse and locate the image file from your device (jpeg, gif, png and SVG).
- Click on the Insert button.
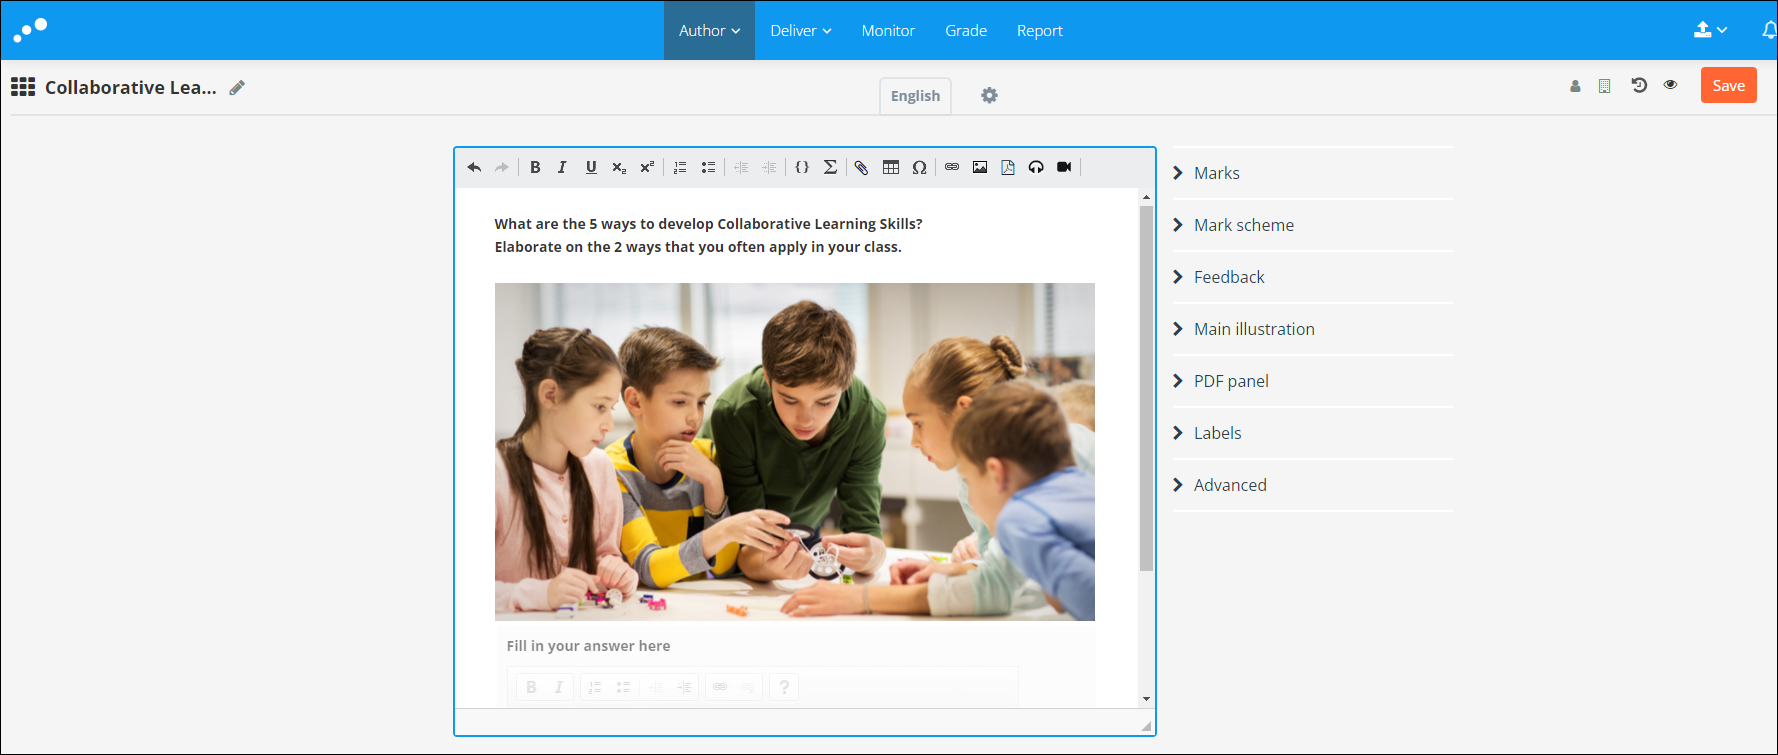
- The image will be displayed in the question text area.
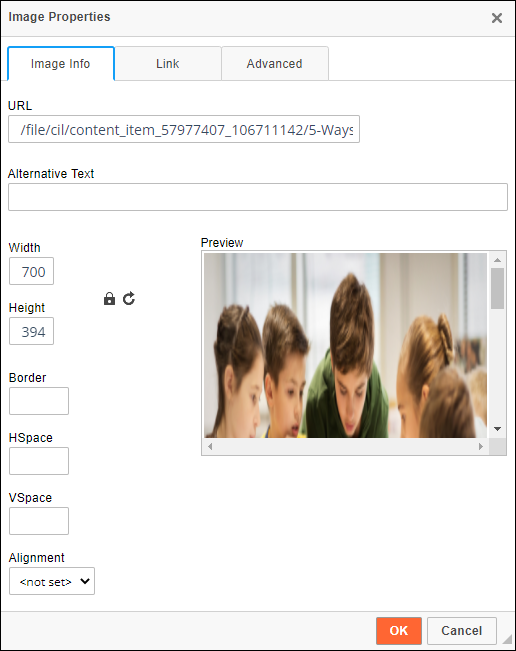
- Optionally, double-click on the image to open the Image Properties dialogue box to make any required adjustments. e.g. Alternative Text for accessibility.
- Click on the Save button.
- Click on the Preview button.

Add audio in question text area
- Navigate to the required question
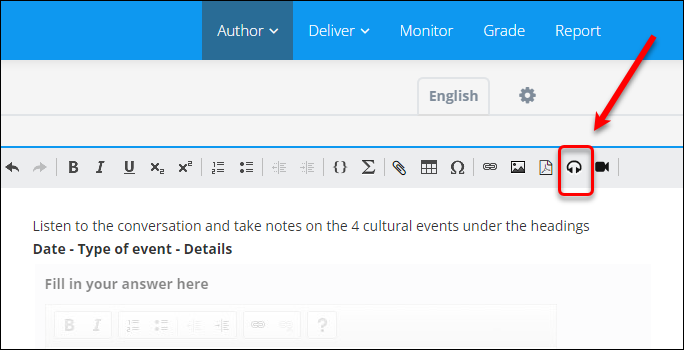
- Click on the headphones icon.
Note: This option is not available for not-marked Document type questions.
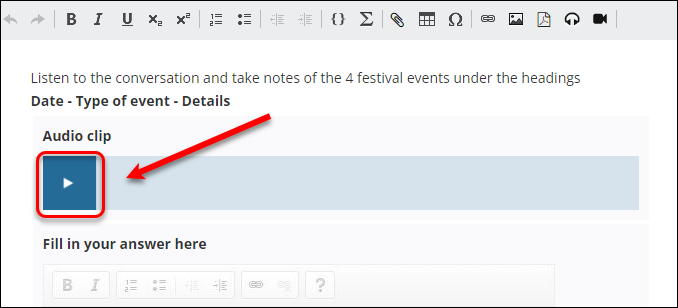
- Click on the play symbol.
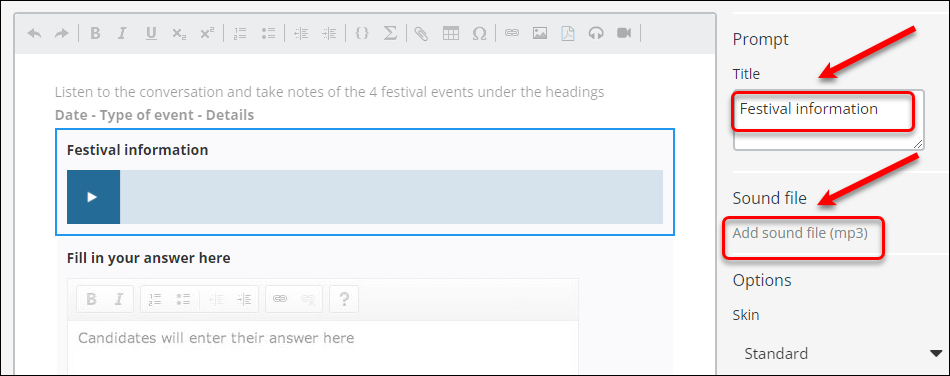
- Enter the title of the audio file.
- Click on the Add sound file button.
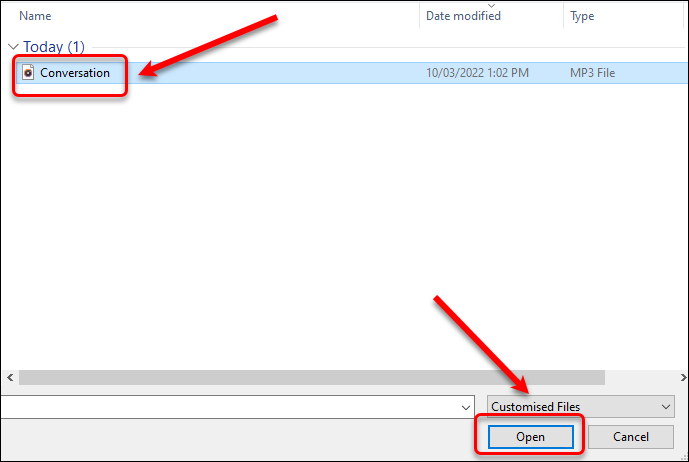
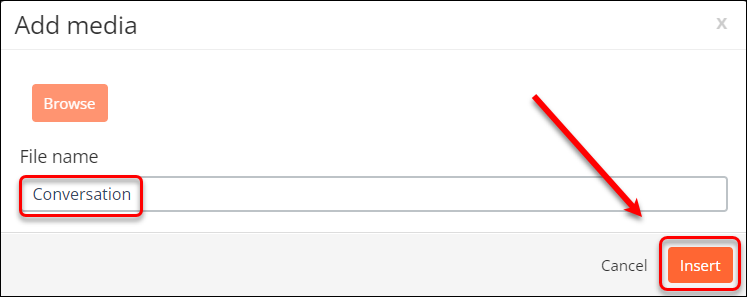
- Click on the Browse button.

- Locate the audio file on your device (only mp3 files are accepted).
- Click on the Open button.
- Click on the Insert button.
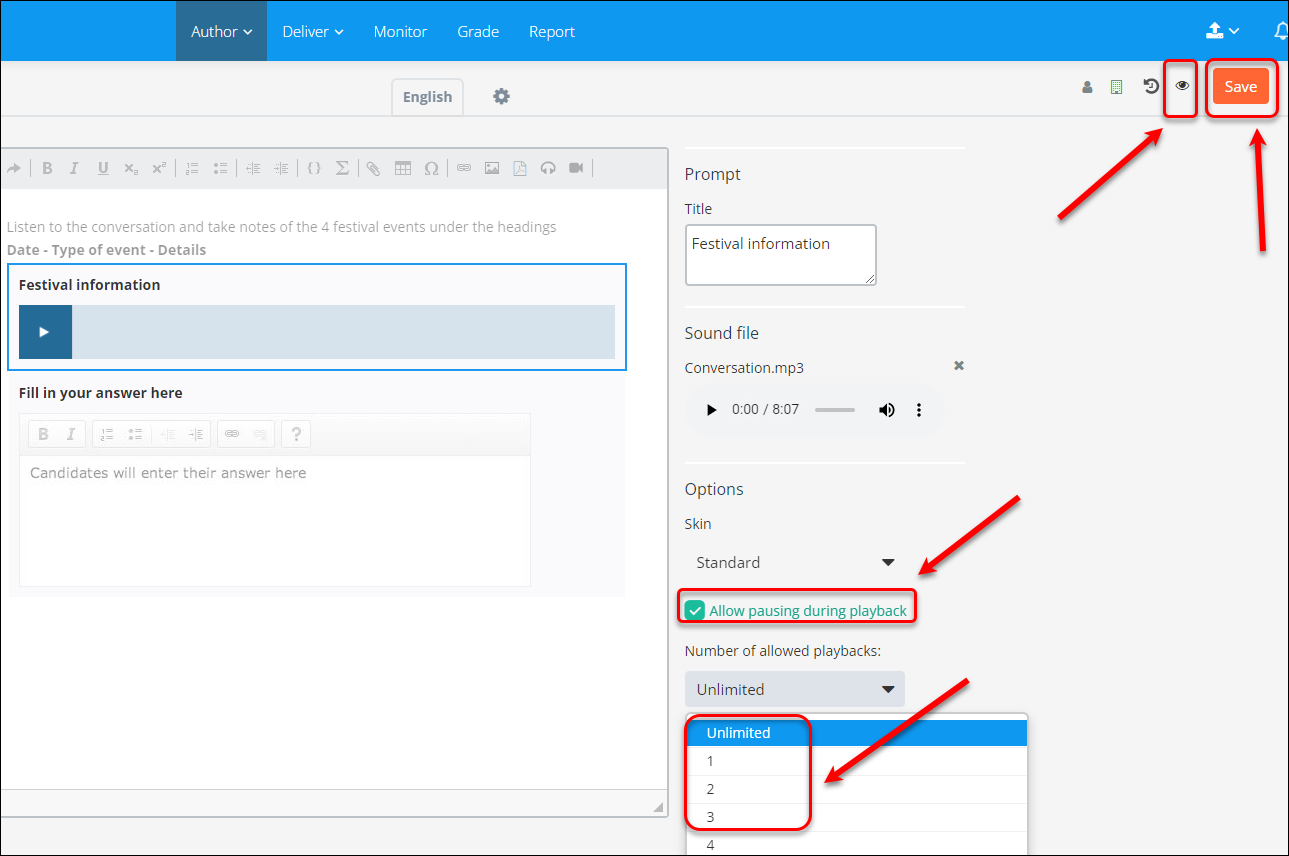
- Under Options:
- (un)check Allow pausing during playbacks
- select the required Number of allow playbacks
- Click on the Save button.
- Click on the Preview button.
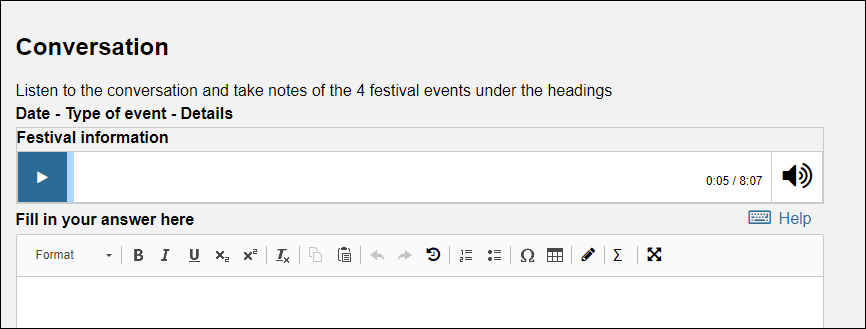
- Preview of the complete question in the question text area
Add video in question text area
- Access the Inspera admin site
- Follow the steps to create a question
- Click on the camera icon in the author tool bar
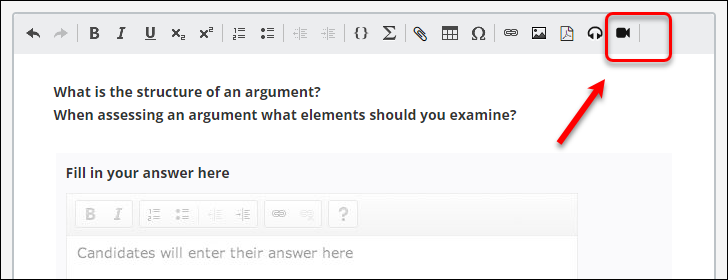
- Click on the play icon.
- Enter the video title.
- Click on the Upload button.
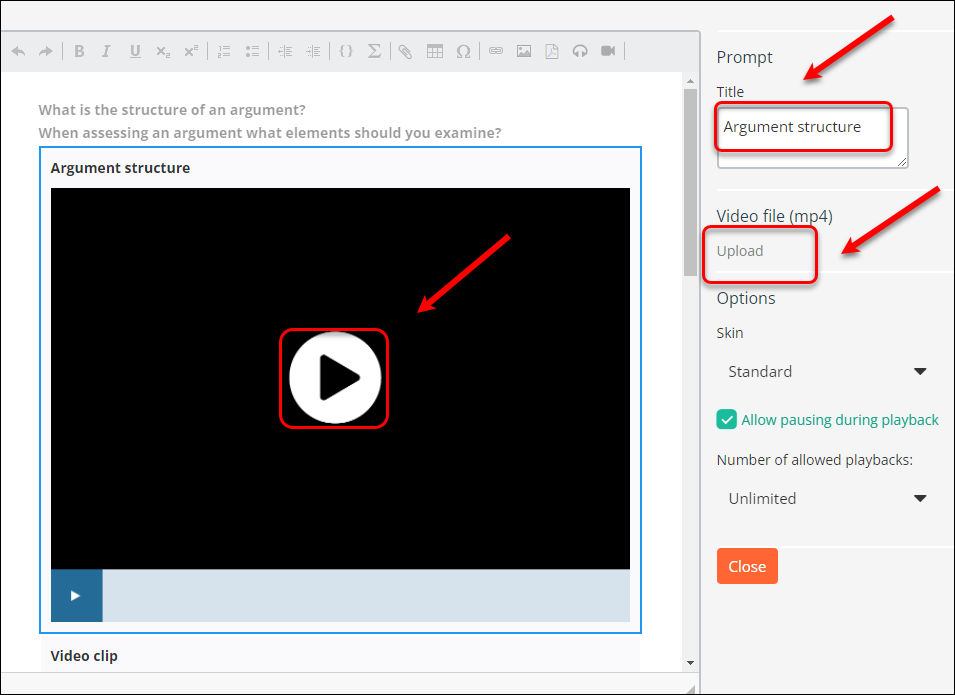
- Click on the Browse butoon.
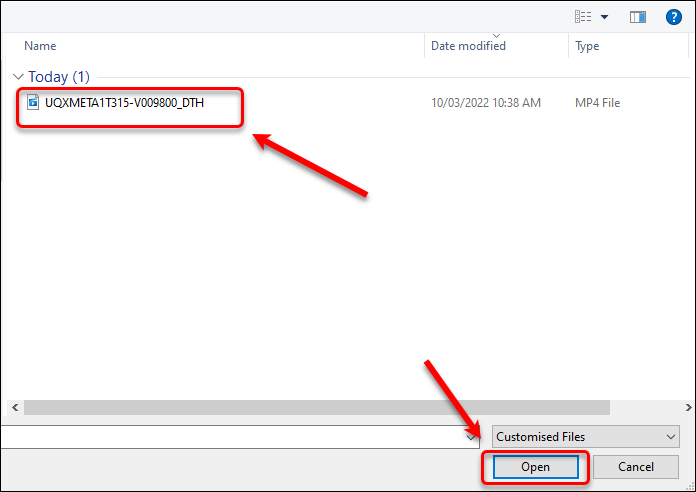
- Locate the MP4 file from your device and click on the Open button.
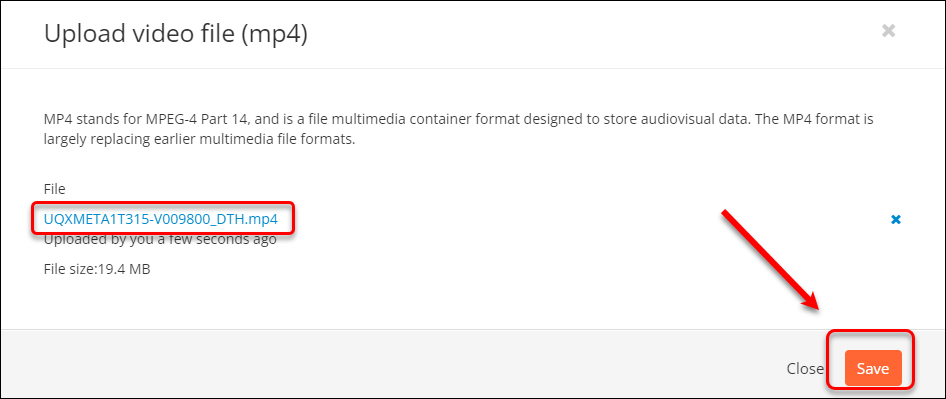
- Click on the Save button.
- Under Options:
- (un)check Allow pausing during playbacks
- select the required Number of allow playbacks
- Click on the Save button.
- Click on the Preview button.
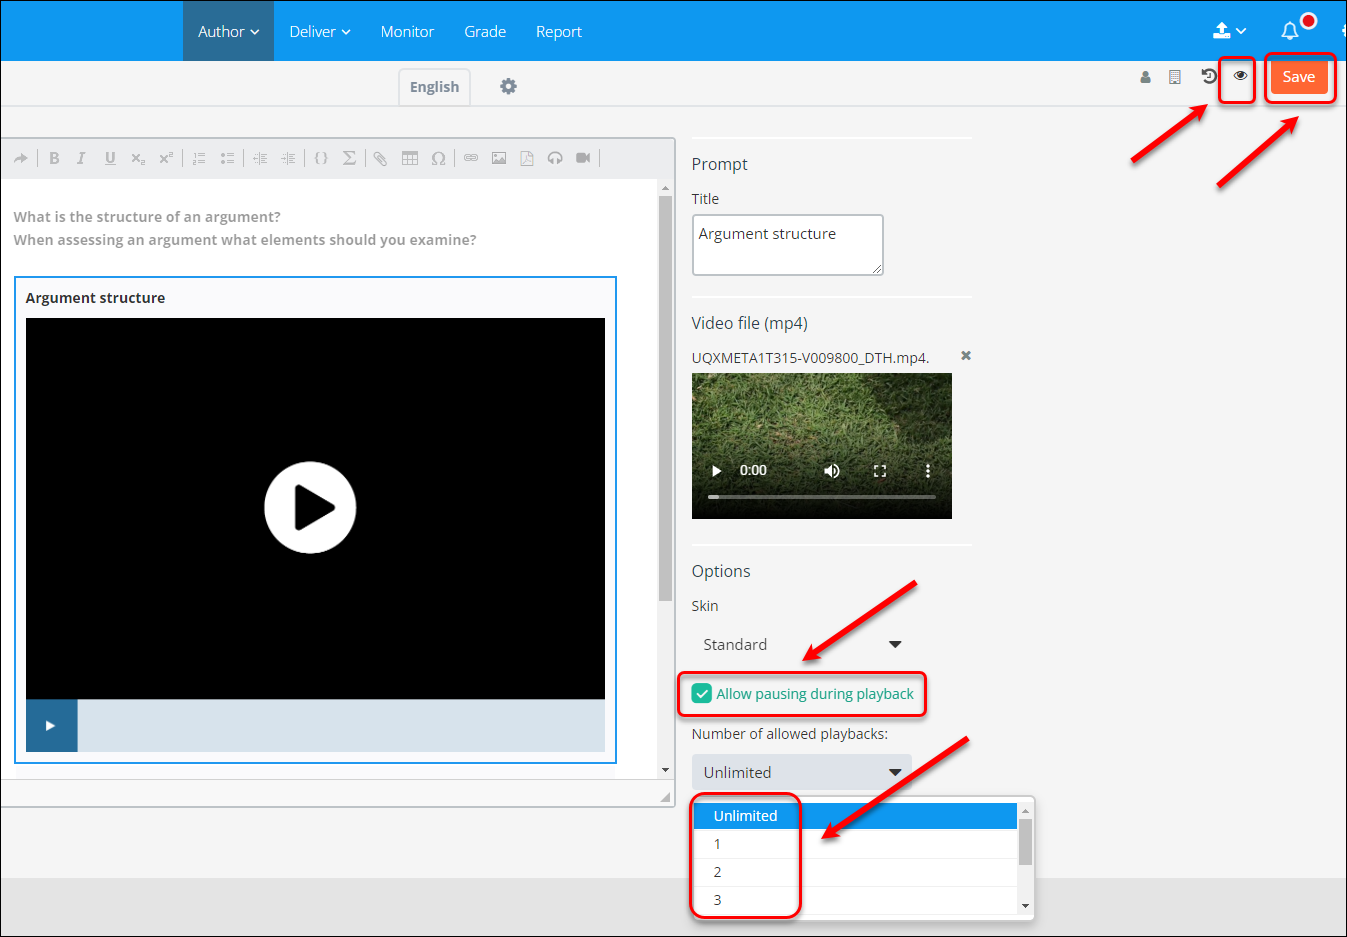
- Preview of the complete question in the question text area.
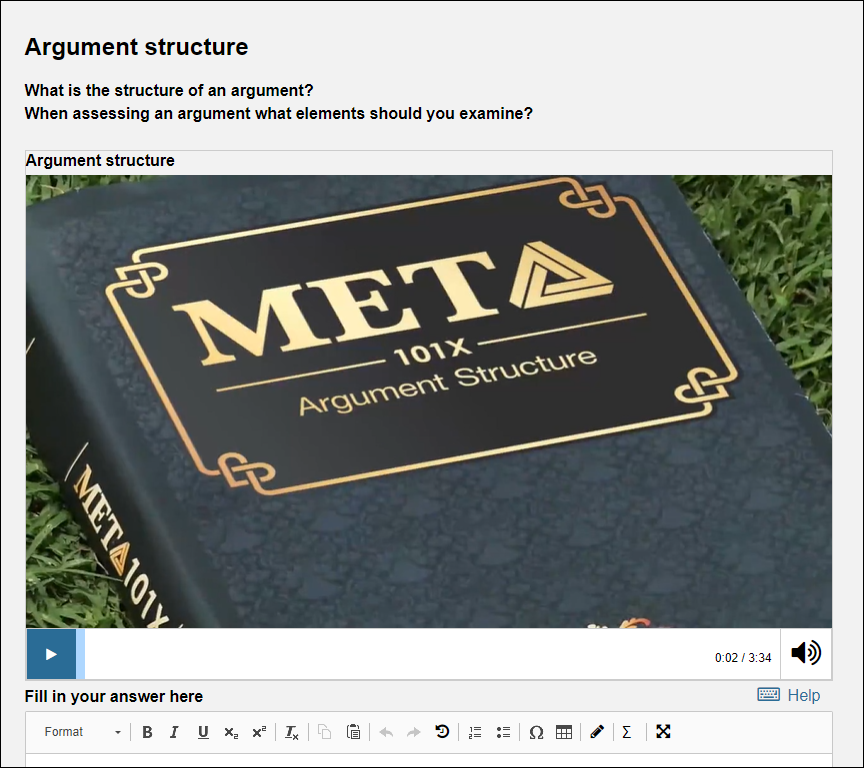
Add image to question in Main Illustration
Note: Before adding an image as a main illustration, crop it to 806 x 335 pixels to prevent white space at either side and the associated stretching that occurs when it loads.
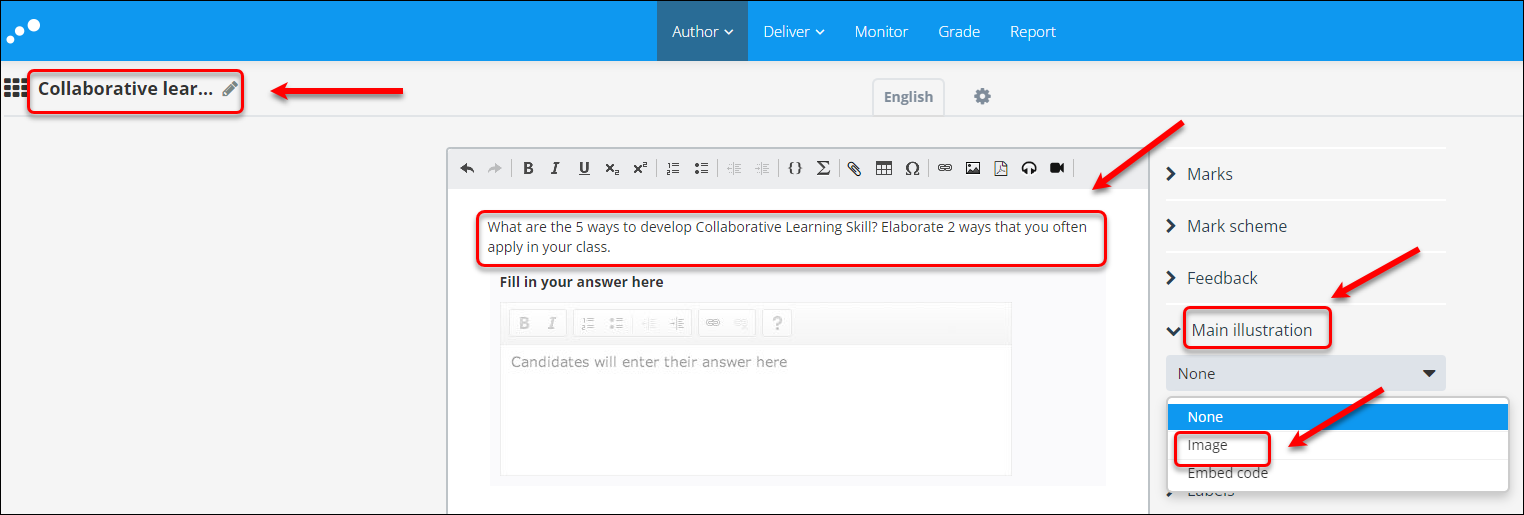
- Navigate to the required question.
- Select Image from the Main illustration drop-down menu.
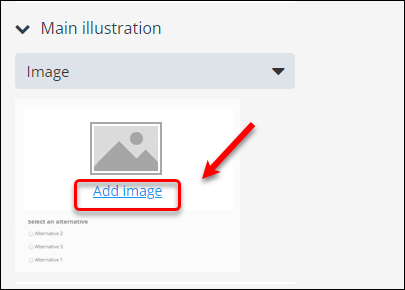
- Click on the Add image button.
- Click on the Browse button and locate the image file from your device (jpeg, gif, png and SVG).
- Click on the Insert button.

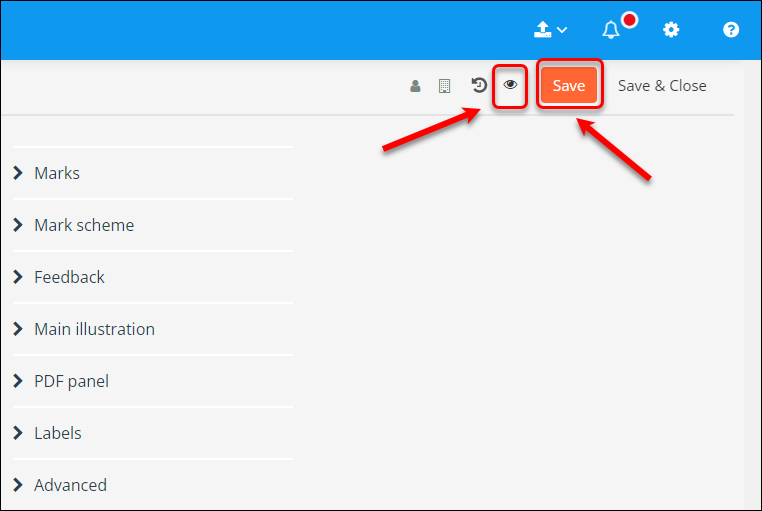
- Click on the Save button.
- Click on the eye icon to preview the complete question.
- Preview of the complete question in the question text area
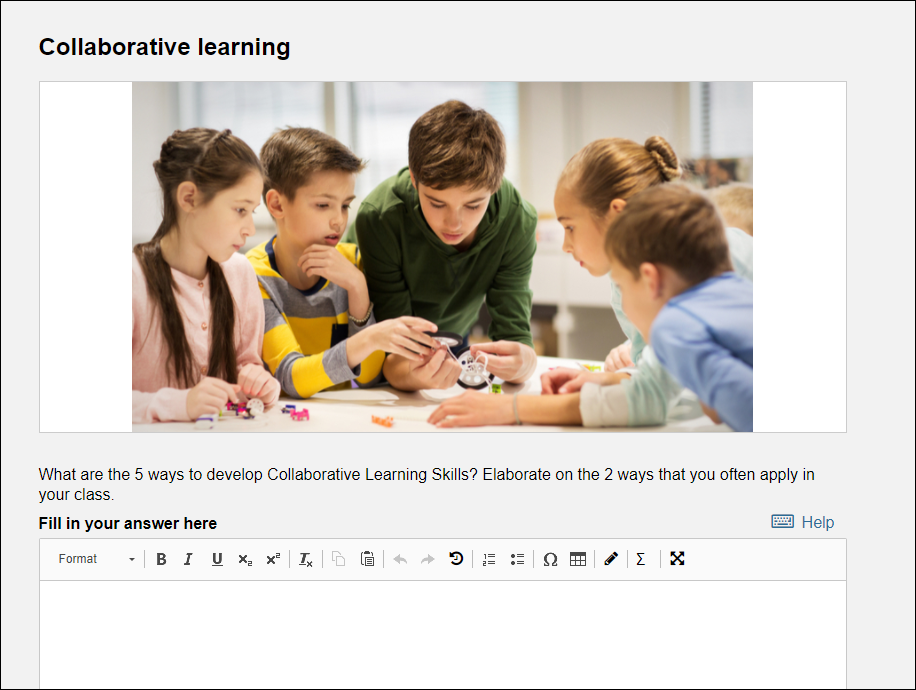
Embed video or audio to question in Main Illustration
Note: Embedded videos and audio can be accessed with SEB.
- Locate the required YouTube video.
- Click on the SHARE button.
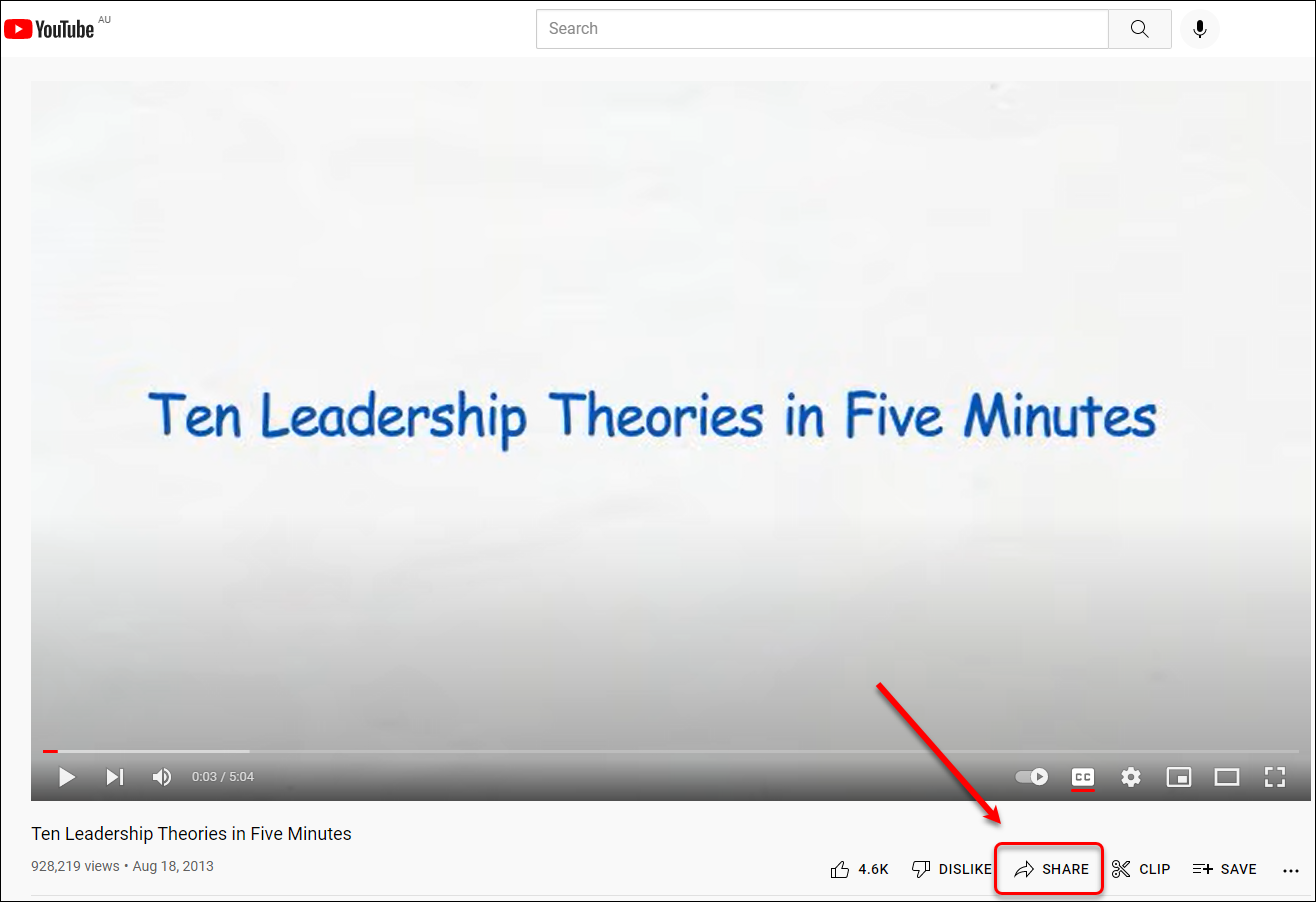
- Select the code < > icon.
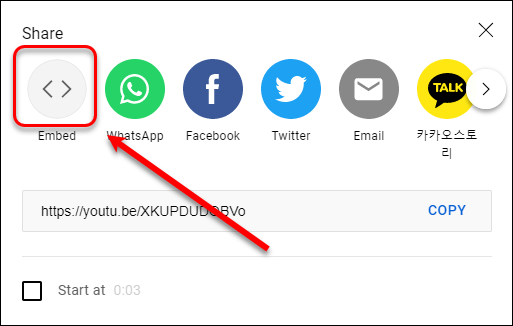
- Click on the COPY button.
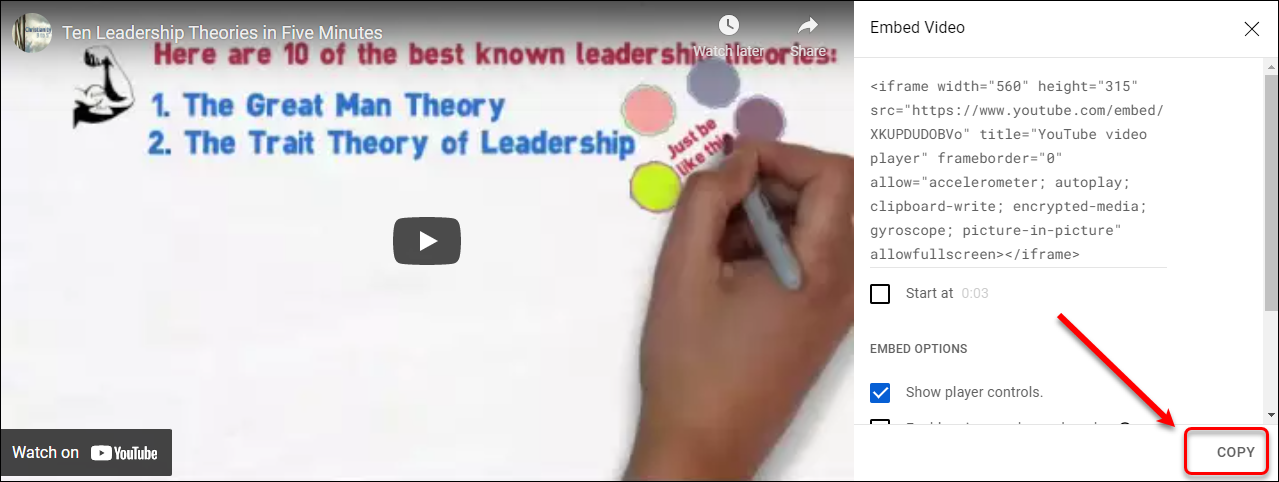
- Navigate to your question in Inspera.
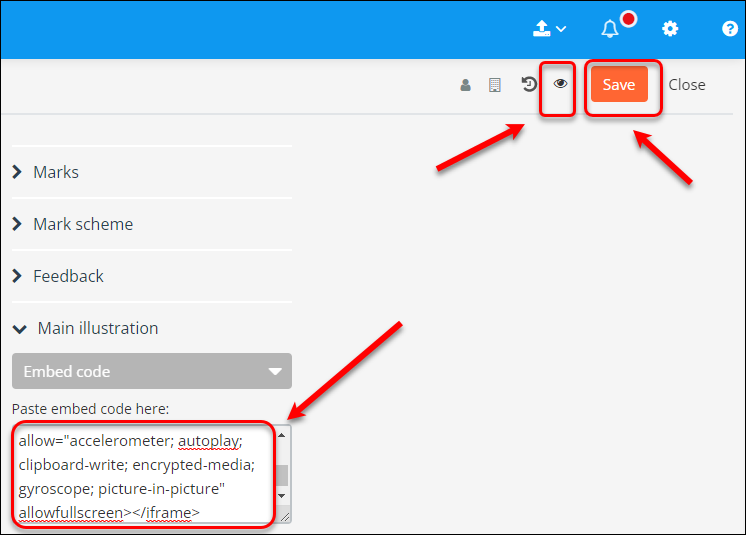
- Select Embed code from the Main illustration drop-down menu.

- Paste the embed code onto the dialogue box.
- Click on the Save button.
- Click on the Preview button.
- Preview of the complete question.
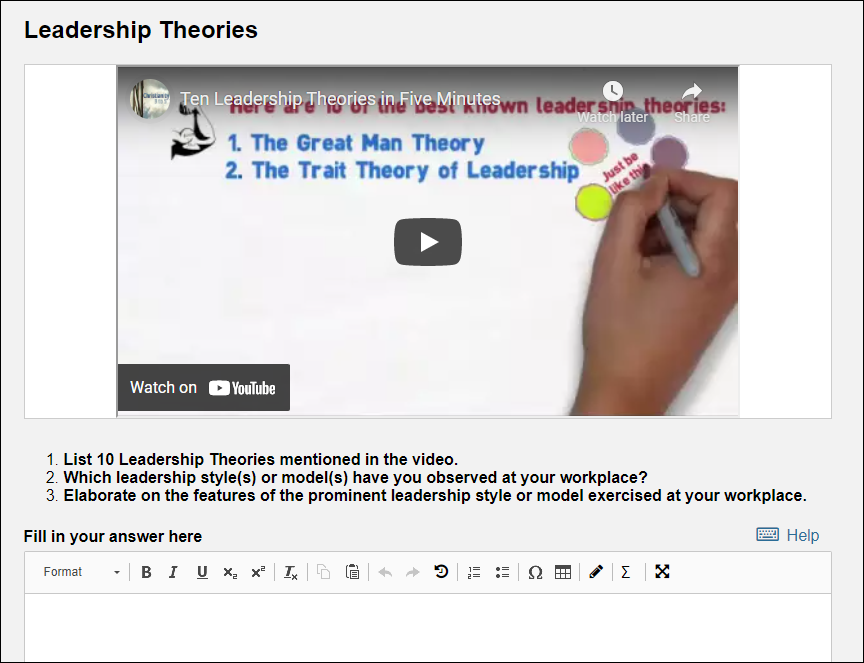
Note: You can use the same steps to embed an audio clip or Vimeo videos or any service that provides the embed code.
- Academic Integrity & Assessment Security in Inspera
- Access Inspera
- Access your Inspera test for marking
- Add graders to an Inspera test
- Add media content to questions in Inspera
- Add one-time users to an Inspera test
- Add the Assumption and Queries question in an Inspera exam
- Adding Resources (pdf files, links) to a Question Set
- Adding staff (contributors) to an Inspera assessment
- Adding the Academic Integrity Statement to your assessment
- Additional pages required for Inspera exams
- Alternative method for downloading Final Marks from Inspera
- Answer key corrections - MCQ
- Apply Alternative Exam Arrangements (AEAs) and Time Zone Adjustments in Inspera
- Assign questions to graders in Inspera
- Complete an Inspera test as a student
- Confirm grades in Inspera
- Copy a question set from Inspera Training to Inspera Admin (Original)
- Create Inspera practice exam with Safe Exam Browser
- Create an Inspera submission link in Learn.UQ
- Create an Inspera test in Deliver
- Create bands and criteria
- Create marking committees in Inspera
- Create marking committees using CSV
- Creating Questions
- Downloading responses to Assumptions and Queries
- Edit question weight in Inspera
- Enable After-test settings in Inspera
- Enrol students in Inspera test using CSV file
- Explanations on student responses
- Export questions from Blackboard to Inspera (Original)
- Exporting a Question Set to PDF
- False Start
- Filter functionality in Inspera marking
- Flag students in Inspera test
- Getting started with Inspera
- Grading workflow for Planners and Graders
- Incident Adjustments for students who experience technical delays
- Inspera Assessment Design Settings
- Inspera Assessment Environments and their Purposes
- Inspera Assessment User Roles
- Inspera Assessment access methods for students
- Inspera Exam Requests
- Inspera Grade Workspaces
- Inspera Observed User Testing
- Inspera Question Set Version Control
- Inspera Recommended Assessment - Standard (non-exam) assessment - webpage
- Inspera Rubrics
- Inspera School-based Exams
- Inspera Test settings
- Inspera analytics
- Inspera central on-campus and non-invigilated exams (Original)
- Inspera marking navigation
- Inviting students to an assessment via Test Code
- Late submissions and extensions in Inspera Assessment
- Manually marked questions: Mark and feedback
- Monitor Assessment
- Name and label questions in Inspera Assessment
- Navigate Inspera
- Override scoring of questions in Inspera
- Pilot an Inspera assessment
- Question sets in Inspera Assessment
- Sections in Question Sets
- Sharing a question set in Inspera Assessment
- Student Arrives Late
- Supporting students to use Inspera Assessment
- Things to look for in review
- Transfer results from Inspera to your Learn.UQ course
- Turnitin similarity report in Inspera
- View student responses in Inspera
