Inspera Rubrics (Original)
A rubric clarifies expectations for an assessment task by helping the course team, students and markers develop a shared understanding of a task’s most important aspects and the standards expected.
You can use rubrics to prepare assessment tasks, mark them and provide feedback. Students also use rubrics to guide their completion of assessments. More information on rubrics.
In Inspera, rubrics are attached to individual questions, not the entire assessment. They can be used for manually marked questions only, namely:
- Essay
- Text Area
- Upload Assignment
- Programming
- Math working
- Audio Record.
Three types of rubrics in Inspera are:
- Points-based
- Points-range
- Percentage-range.
You can easily convert from one rubric type to another.
Create Points-based rubric
With point-based rubrics, you can allocate a single point value to each Level of Performance/Criteria. Once a max score is decided on, points are automatically divided across the number of Levels of Performance. The total number of max points determines how many points total the rubric is worth.
The following limitations apply to point-based rubrics:
- Points can have up to two decimal places
- You cannot have a negative point.
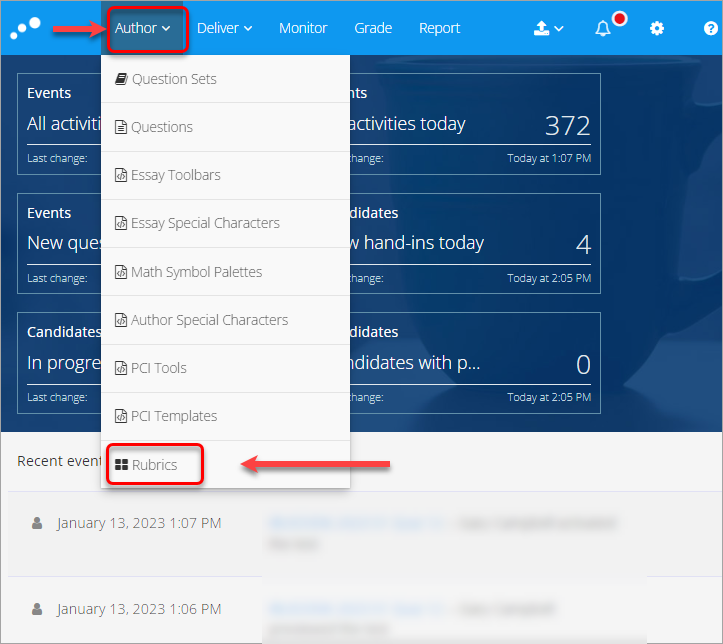
- In Inspera, from Author drop-down list select Rubrics.
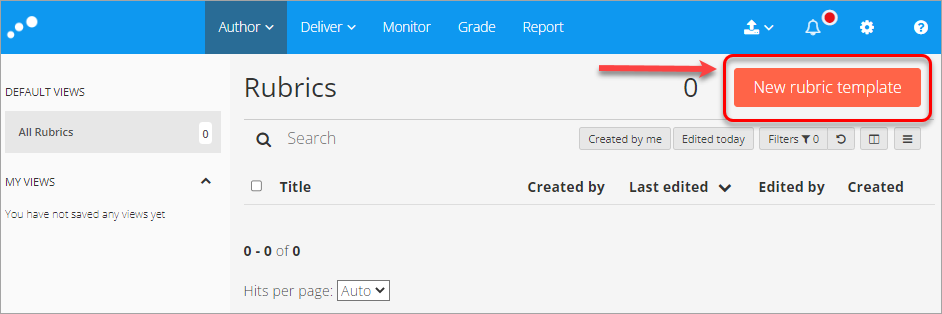
- Click on the New rubric template button.
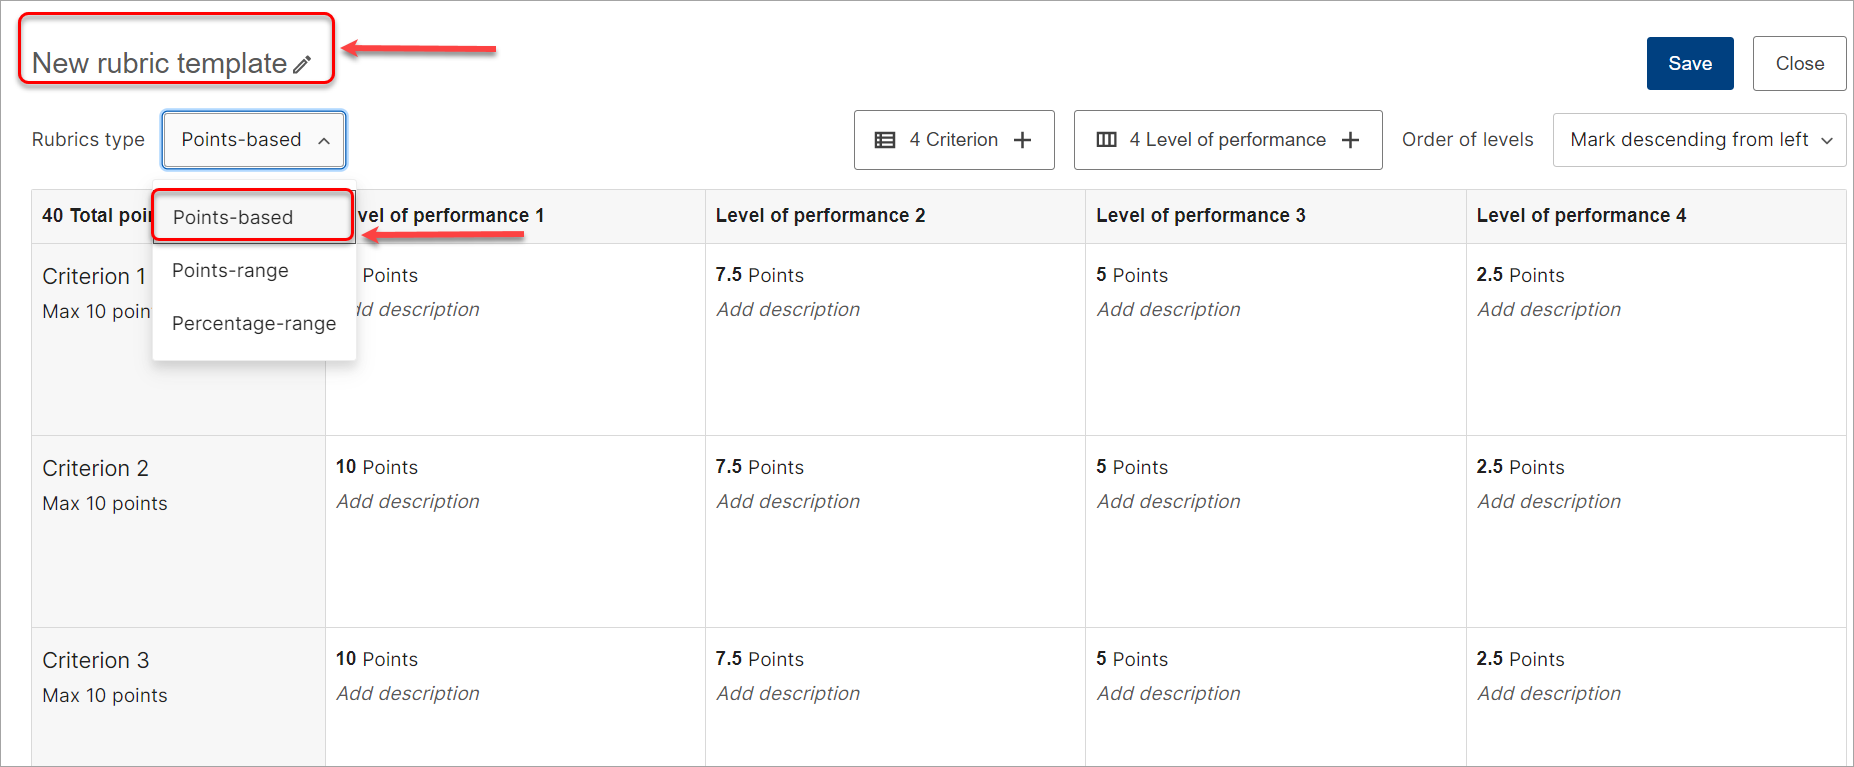
- In the New rubric template textbox, type the rubric title.
Recommendation: course code + assignment title + SX YYYY.
- From Rubrics type drop-down list, select Points-based rubric.
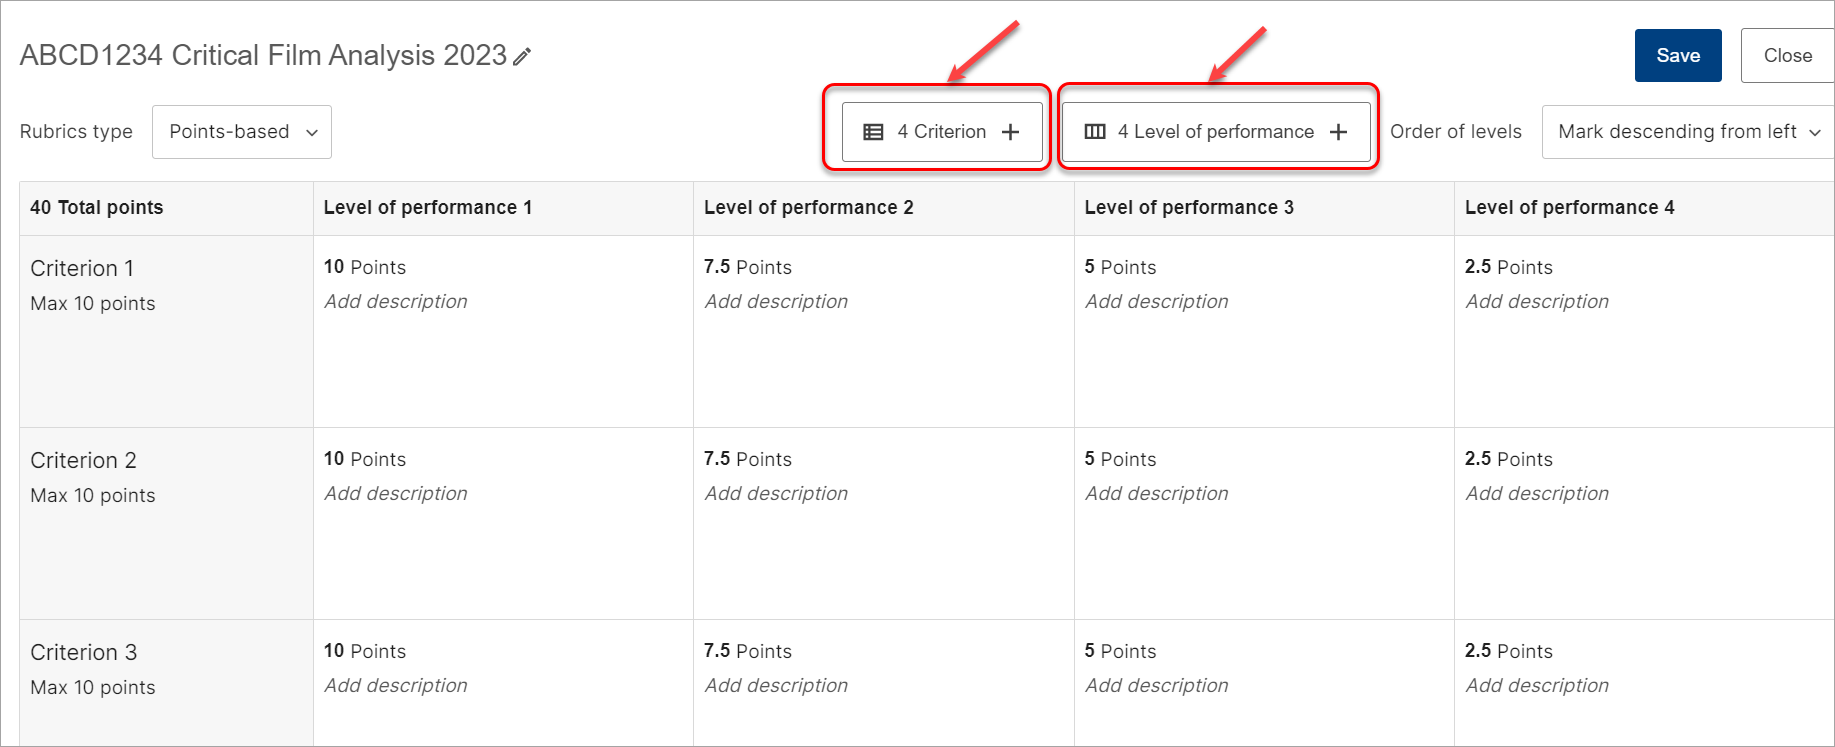
- Add/remove the required number of Criteria and Levels of performance by clicking on 4 Criterion + and 4 Level of performance + buttons.
Note: the default setting is 40 Total points and points are equally distributed across levels of performance and criteria. When you add/remove levels of performance, the points will adjust automatically. You can manually override the numbers.
- Click on the Max points number to change the points value in each level of performance and each criterion.
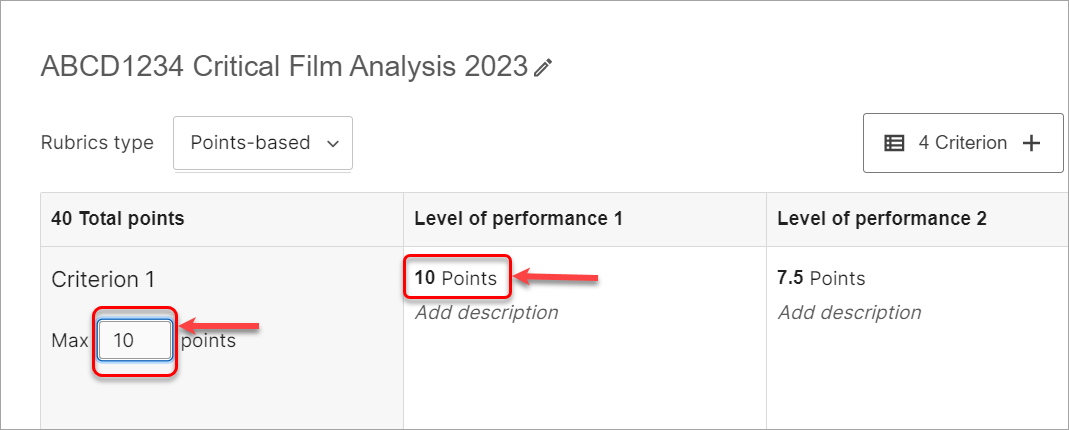
- Click on Level of performance 1 button to change the title. Add the descriptor to the relevant box.
- Click on Criterion 1 textbox to change the title.

8. Click on the Save button. The rubric will be saved in the Author>Rubrics templates.
Create Points-range rubric
With points range rubrics, a range of points is allocated to each Level of Performance. Once a max score is decided on, points are automatically divided across the number of Levels of Performance.
- In Inspera, from Author drop-down list select Rubrics.

- Click on the New rubric template button.

- In the New rubric template textbox, type the rubric title.
Recommendation: course code + assignment title + SX YYYY.
- From Rubrics type drop-down list, select Points-range rubric.
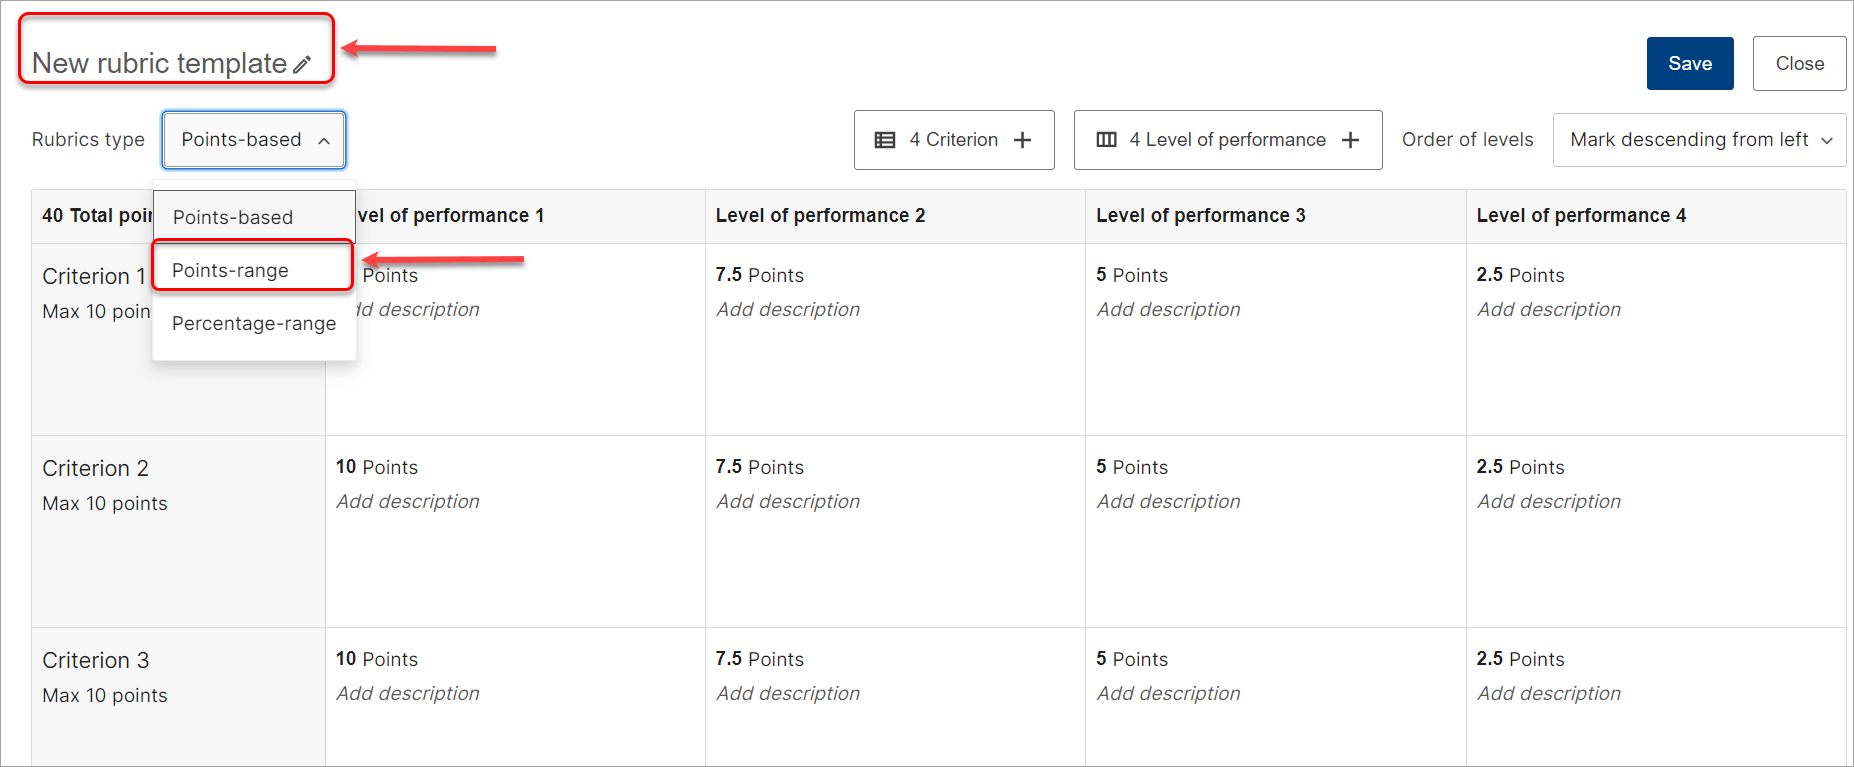
- Add/remove the required number of Criteria and Levels of performance by clicking on 4 Criterion + and 4 Level of performance + buttons.

- Click on Level of performance 1 button to change the title. Add the descriptor to the relevant box.
- Click on Criterion 1 textbox to change the title.
- The default setting is 40 Total points and points are equally distributed across levels of performance and criteria. When you add/remove levels of performance, the points will adjust automatically. You can manually override the upper limit and the Max points and all points will be re-calculated automatically.

- Click on the Save button. The rubric will be saved in the Author > Rubrics templates.
Create Percentage-range rubric
With percentage rubrics, a percentage is allocated to each Level of Performance. Once a max percentage is decided on, a range of percentages is automatically divided across the number of Levels of Performance.
- In Inspera, from Author drop-down list select Rubrics.

- Click on the New rubric template button.

- In the New rubric template textbox, type the rubric title.
Recommendation: course code + assignment title + SX YYYY.
- From Rubrics type drop-down list, select Percentage-range rubric.

- Add/remove the required number of Criteria and Levels of performance by clicking on 4 Criterion + and 4 Level of performance + buttons.
- Click on Level of performance 1 button to change the title. Add the descriptor to the relevant box.
- Click on Criterion 1 textbox to change the title.
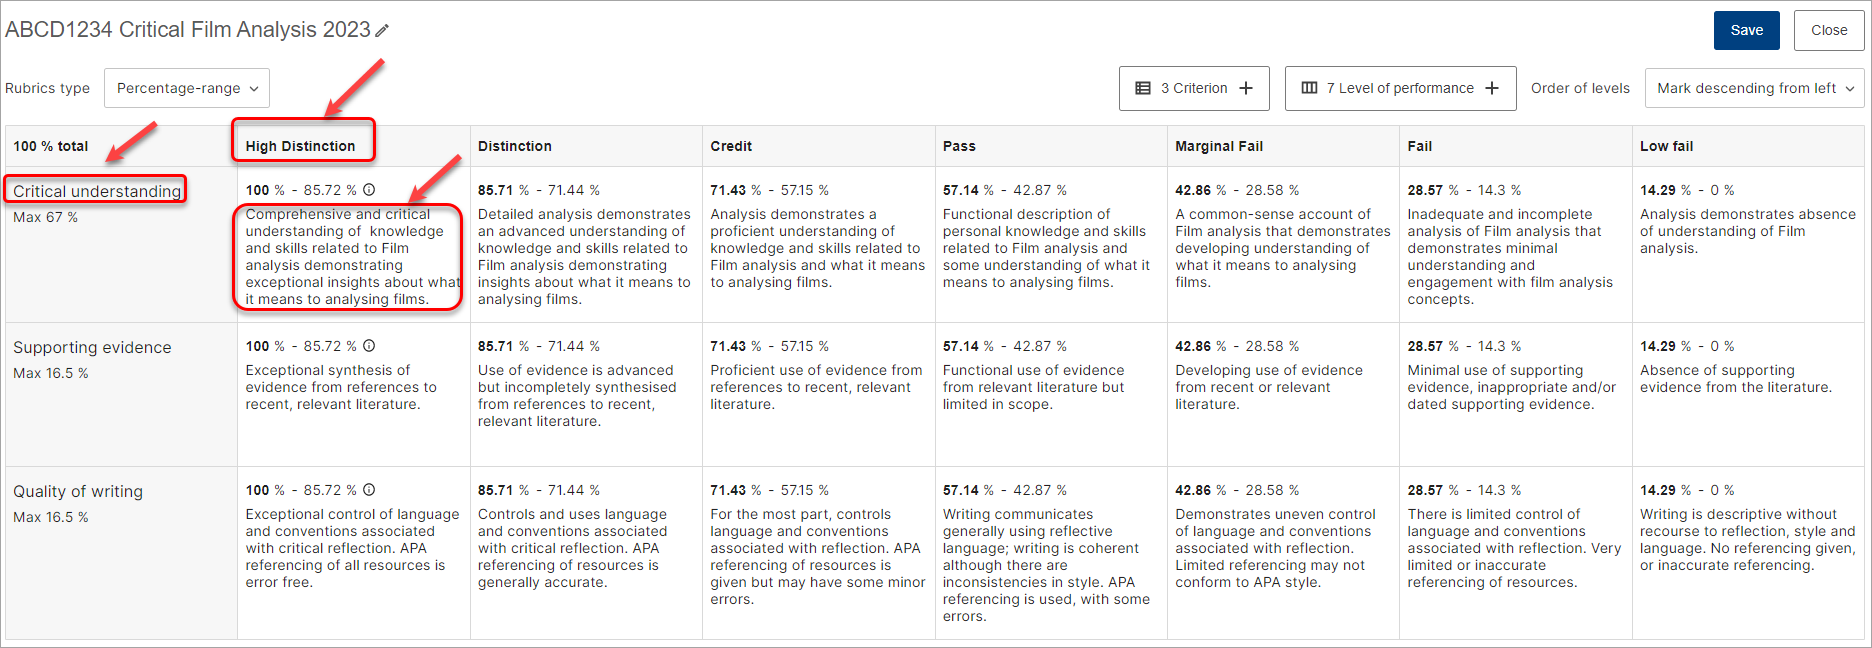
- The default setting is 100% total and points are equally distributed across levels of performance and criteria. When you add/remove levels of performance/criteria, the points will adjust automatically. You can manually override the upper limit and the Max %.
Note: to change the lower limit, you need to change the Max % of that criterion.

- Click on the Save button. The rubric will be saved in the Author>Rubrics templates.
Attach a Rubric to a Question
- From the Author drop-down list select Questions.
 .
.
- Click on Create new or select the existing question.

Reminder: rubrics can be used only with the following question types:
- Essay
- Text Area
- Upload Assignment
- Programming
- Math working
- Audio Record.
- Click on Marks > Maximum marks > Rubrics.

- From the Add rubric drop-down list select Start from template, as you have already created a rubric.
Note: if you have not created a rubric previously, click on Create new and follow the guides

- Click on the title of the rubric you wish to use and click click on Add to question button.
Note: you will be able to edit the rubric in the next step.
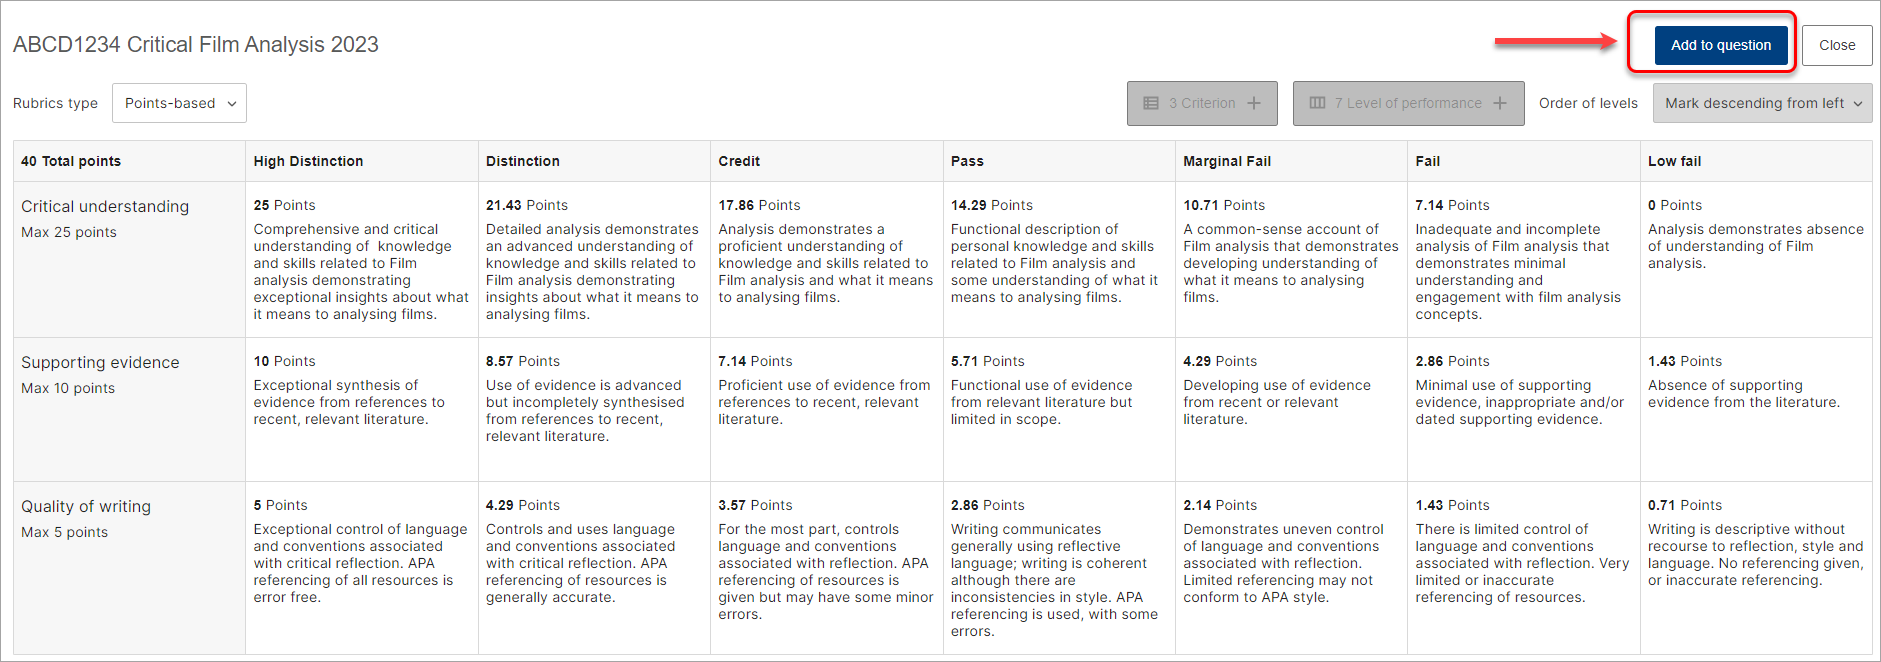
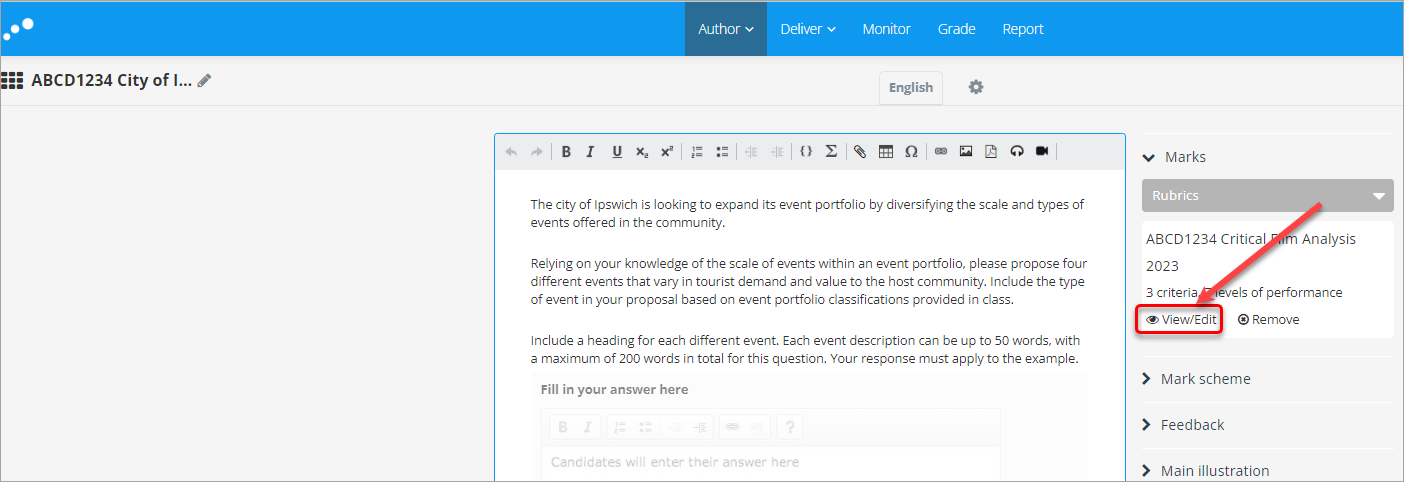
- Click on View/Edit button to edit the rubric if required.
Share a Rubric
To share a rubric, you will need to share the question with the attached rubric.
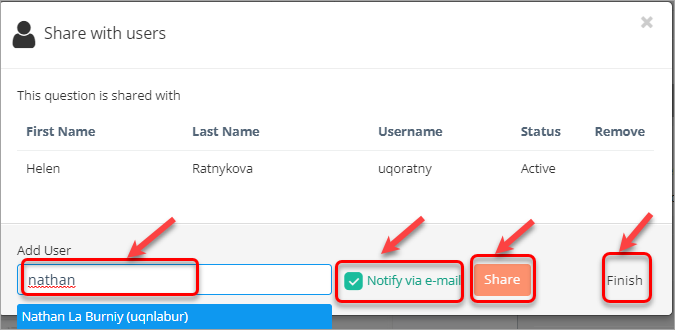
- In the question, click on the Share with users icon.

- In the Add user textbox, start typing the name of the required user.
- Select that person from the list.
- (Optionaly) check Notify via e-mail checkbox.
- Click on the Share button.
- Repeat steps 2-5 to share with more users.
- When finished, click on the Finish button.
Attach a shared Rubric to a different Question
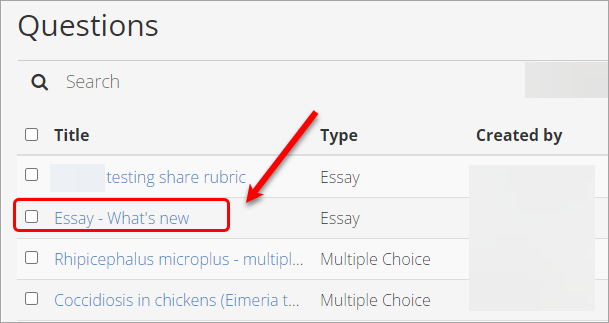
- Open the question that has been shared with you with the rubric attached.
- Click on the Marks button.
- Select Rubrics from the drop-down menu.
- Click on the Rubrics button.

- Click on the View/Edit button.

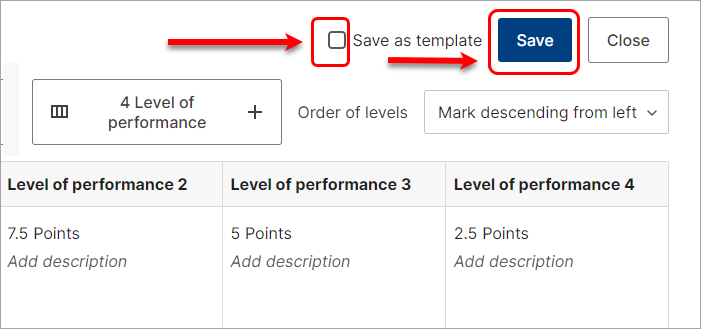
- Tick the Save as template box.
- Click on the Save button to save this rubric as a template for use on other questions.
- Follow the steps under the following sections to attach this rubric template to a different question:
- Academic Integrity & Assessment Security in Inspera
- Access Inspera
- Access your Inspera test for marking
- Add graders to an Inspera test
- Add media content to questions in Inspera
- Add one-time users to an Inspera test
- Add the Assumption and Queries question in an Inspera exam
- Adding Resources (pdf files, links) to a Question Set
- Adding staff (contributors) to an Inspera assessment
- Adding the Academic Integrity Statement to your assessment
- Additional pages required for Inspera exams
- Alternative method for downloading Final Marks from Inspera
- Answer key corrections - MCQ
- Apply Alternative Exam Arrangements (AEAs) and Time Zone Adjustments in Inspera
- Assign questions to graders in Inspera
- Complete an Inspera test as a student
- Confirm grades in Inspera
- Copy a question set from Inspera Training to Inspera Admin (Original)
- Create Inspera practice exam with Safe Exam Browser
- Create an Inspera submission link in Learn.UQ
- Create an Inspera test in Deliver
- Create bands and criteria
- Create marking committees in Inspera
- Create marking committees using CSV
- Creating Questions
- Downloading responses to Assumptions and Queries
- Edit question weight in Inspera
- Enable After-test settings in Inspera
- Enrol students in Inspera test using CSV file
- Explanations on student responses
- Export questions from Blackboard to Inspera (Original)
- Exporting a Question Set to PDF
- False Start
- Filter functionality in Inspera marking
- Flag students in Inspera test
- Getting started with Inspera
- Grading workflow for Planners and Graders
- Incident Adjustments for students who experience technical delays
- Inspera Assessment Design Settings
- Inspera Assessment Environments and their Purposes
- Inspera Assessment User Roles
- Inspera Assessment access methods for students
- Inspera Exam Requests
- Inspera Grade Workspaces
- Inspera Observed User Testing
- Inspera Question Set Version Control
- Inspera Recommended Assessment - Standard (non-exam) assessment - webpage
- Inspera Rubrics
- Inspera School-based Exams
- Inspera Test settings
- Inspera analytics
- Inspera central on-campus and non-invigilated exams (Original)
- Inspera marking navigation
- Inviting students to an assessment via Test Code
- Late submissions and extensions in Inspera Assessment
- Manually marked questions: Mark and feedback
- Monitor Assessment
- Name and label questions in Inspera Assessment
- Navigate Inspera
- Override scoring of questions in Inspera
- Pilot an Inspera assessment
- Question sets in Inspera Assessment
- Sections in Question Sets
- Sharing a question set in Inspera Assessment
- Student Arrives Late
- Supporting students to use Inspera Assessment
- Things to look for in review
- Transfer results from Inspera to your Learn.UQ course
- Turnitin similarity report in Inspera
- View student responses in Inspera
