Create an Inspera Question Set (Original)
The first step in creating an Inspera assessment is to create its content in a Question Set on the Author page.
- A Question Set contains a series of questions you create for an assessment.
- You have access to all the question sets you created and those shared with you by other authors.
- All questions in a question set are stored in your question bank for future use.
Tip: If you are responsible for part of an Inspera assessment (e.g. you create several questions in an exam), you should create a question set with the questions you develop for the assessment and add your colleagues (i.e. collaborators) to your question set.
The workflow in creating a question set includes:
- Creating a question set and questions
- Applying the required settings to the question set
Video Guide
Create a Question Set
- Log in to Inspera Admin (https://uqi.inspera.com/admin).
- Select Question Sets from the Author drop-down menu.

- Click on the Create new button.
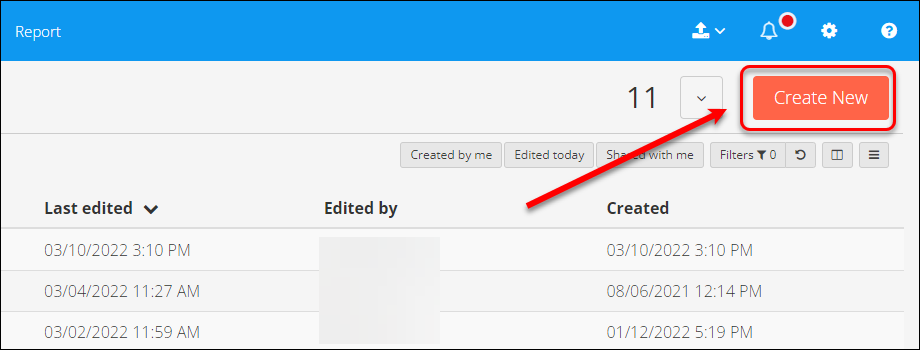
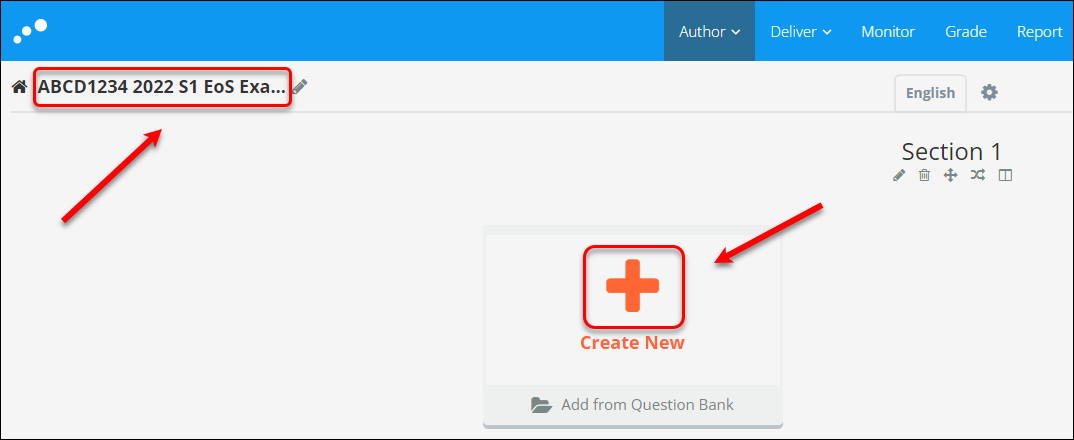
- Enter the name of the set (e.g. ABCD1234 2022 S1 EoS Exam).
Note: Follow the naming convention: Course code Year Semester Assessment Name
Create questions in a Question Set
- Click on the Create New button.
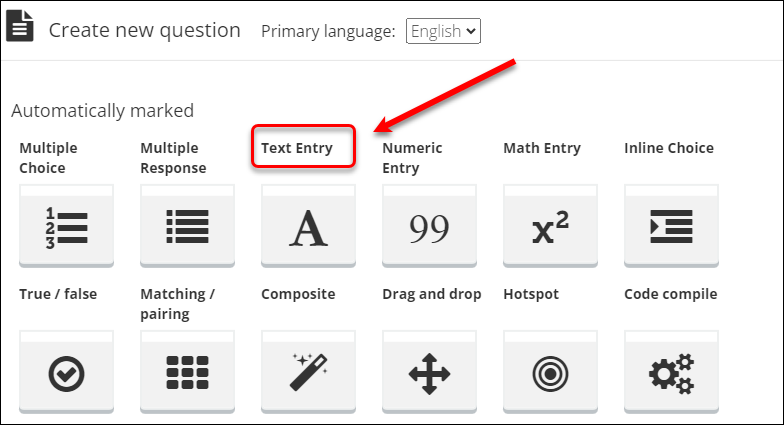
- Select the required question type (e.g. Text Entry).
- Enter a name for the question (e.g. Argument structure).
- Enter the question content to the textbox.
- Click on the preview button (eye).
- Click on the Save & Close button.

- The question is added to the question set.
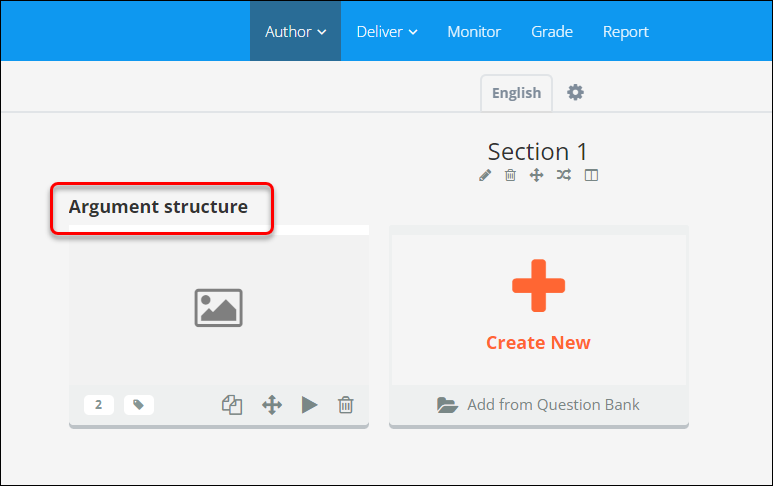
Refer to the Create questions guide for detailed instructions.
Create common question types in Inspera
- Create a not-marked document in Inspera (YouTube 1m 48s)
- Create MCQ (YouTube 4m 13s)
- Create multiple-response questions (YouTube, 2m07s)
- Create matching/pairing questions (YouTube 2m 58s)
- Create graphic gap match questions (YouTube 4m 37s)
- Create inline choice questions (YouTube 2m 07s)
- Create assumptions and queries question (YouTube 1m 54s)
Add questions from question bank to question set
Notes:
- You can add the questions you created or those shared with you by colleagues working on the same question set. If you edit the questions you added, the changes will be applied to the original questions.
- If you do not want to change the original question, you should duplicate the question before adding it to your question set.
- Click on the Add from Question Bank button.
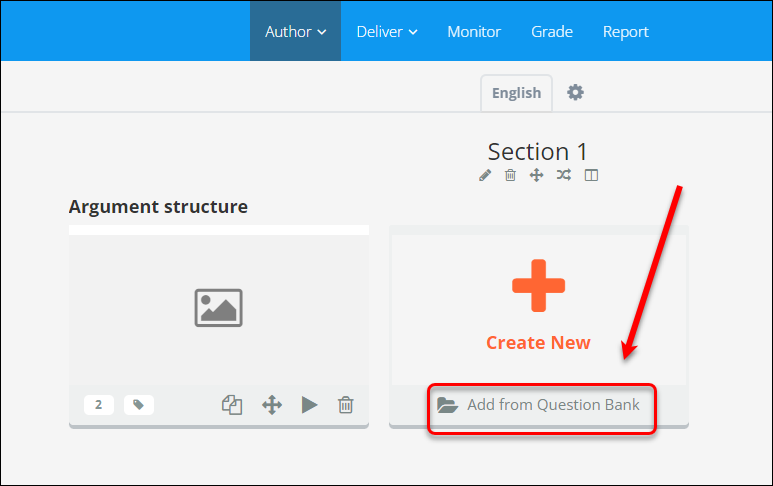
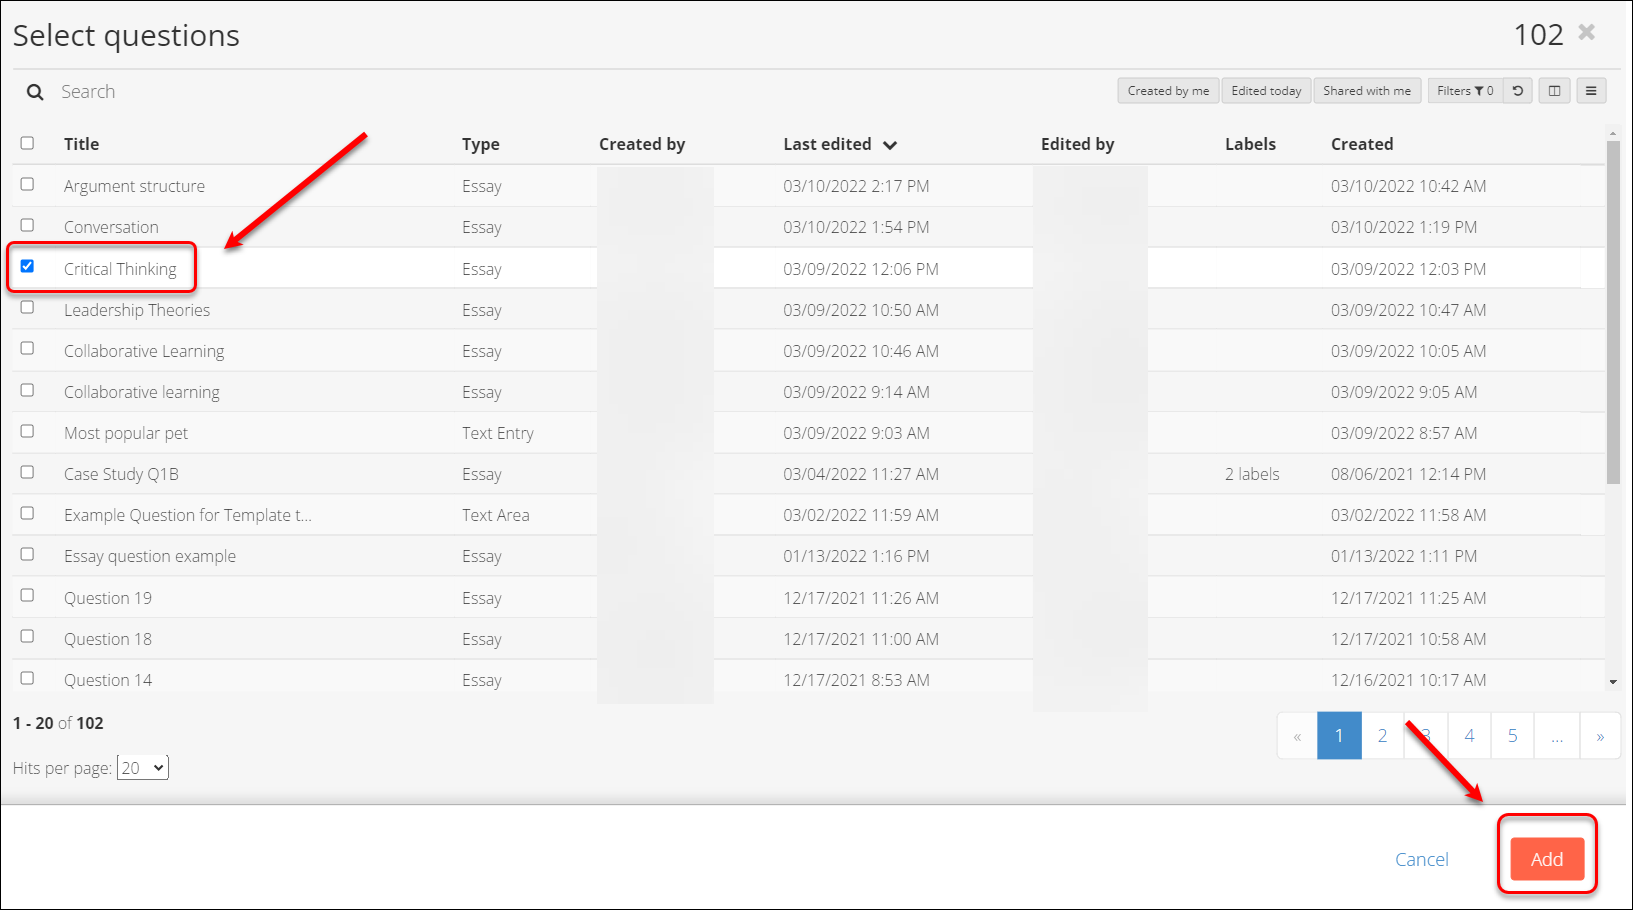
- Your questions bank is displayed.
- Check the relevant question checkbox.
- Click on the Add button.
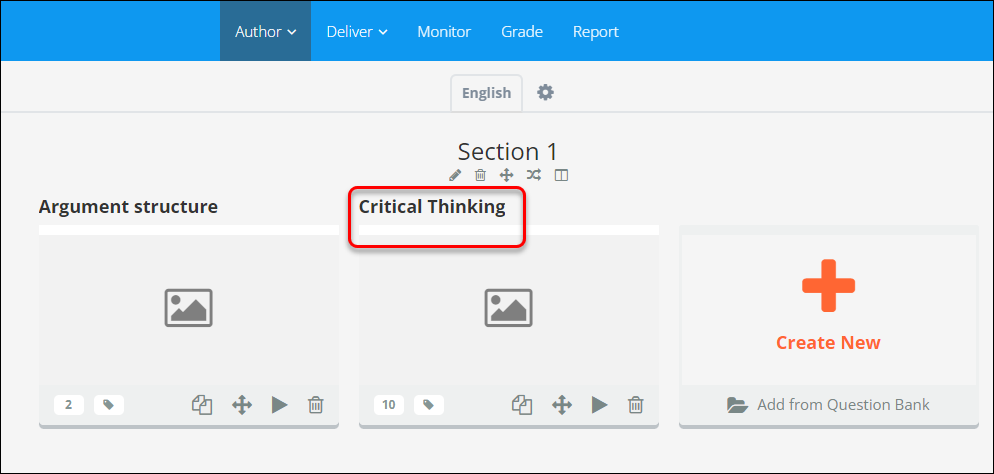
- The selected question is added to the question set.
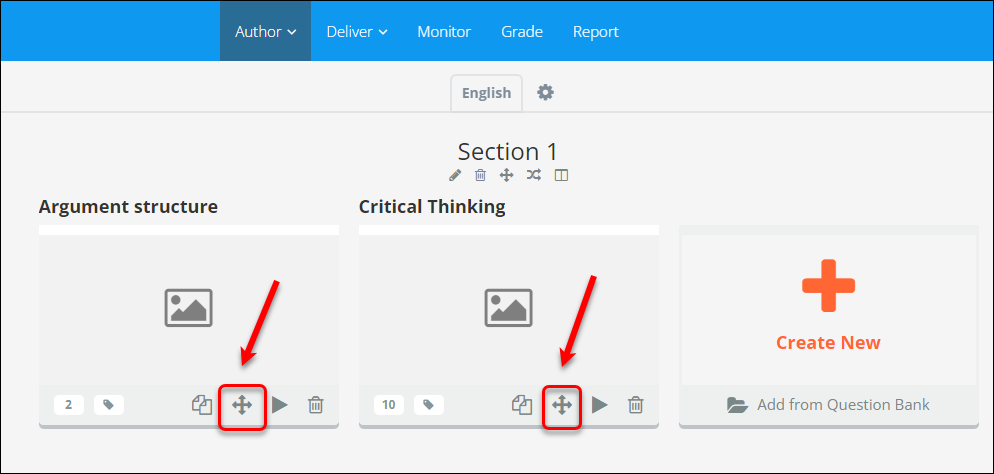
Delete a question from a question set
To delete a question from the Question Set, click on the bin icon on the question:
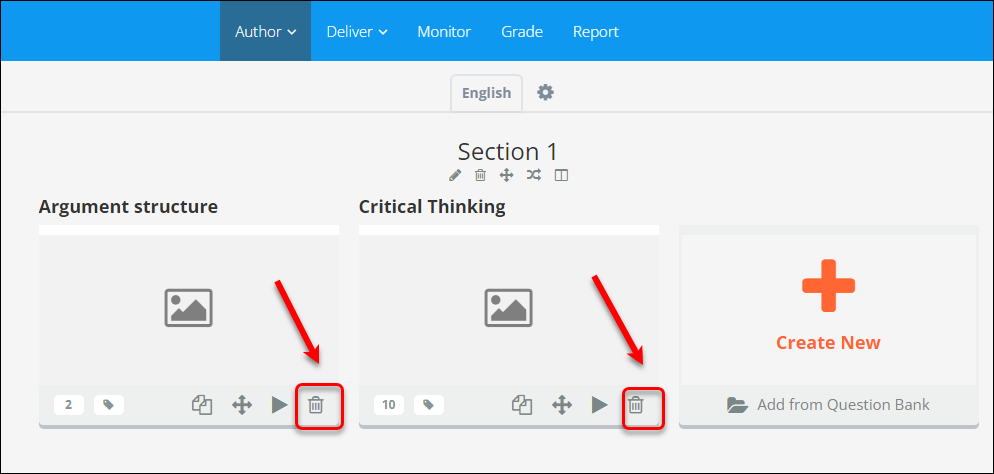
Note:
- the question will be deleted from the Question Set but will still be available in your Questions bank for later use.
- if you create a question by mistake, you should delete it by binning it from the question set and from Questions so that it is completely deleted from your bank.
Duplicate a question in a question set
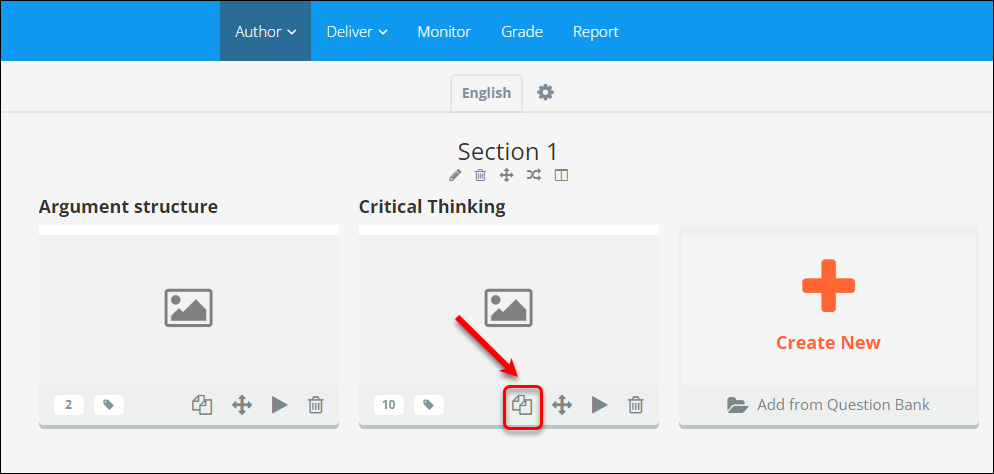
To duplicate a question within your Question Set:
- Click on the duplicate button on the question:
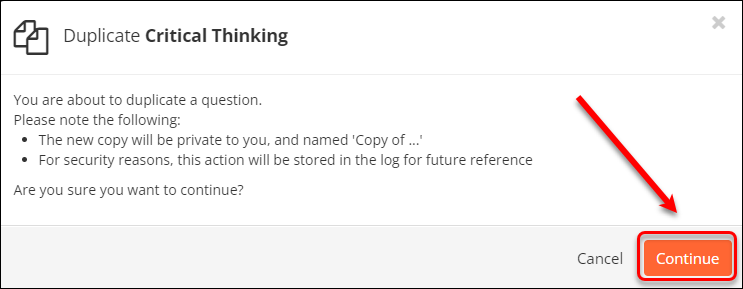
- Click on the Continue button.
- Select Questions from the Author drop-down menu.
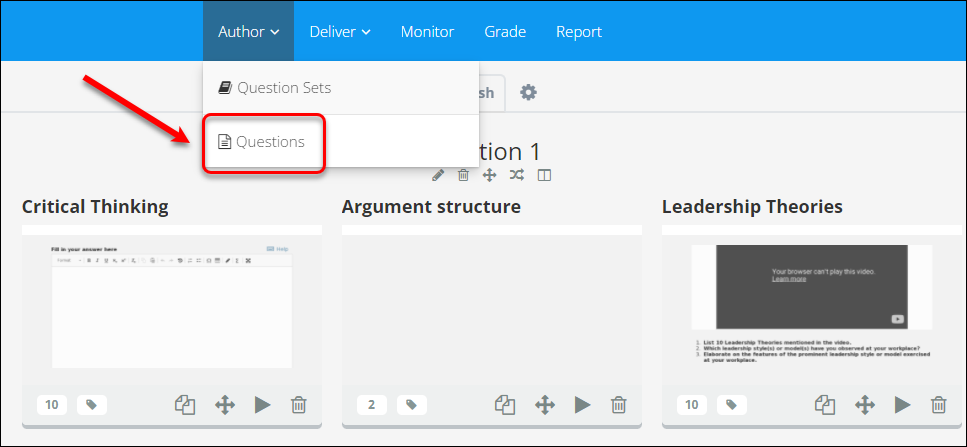
- The duplicate question is saved to your Question Bank (named “Copy of (your question name)”).
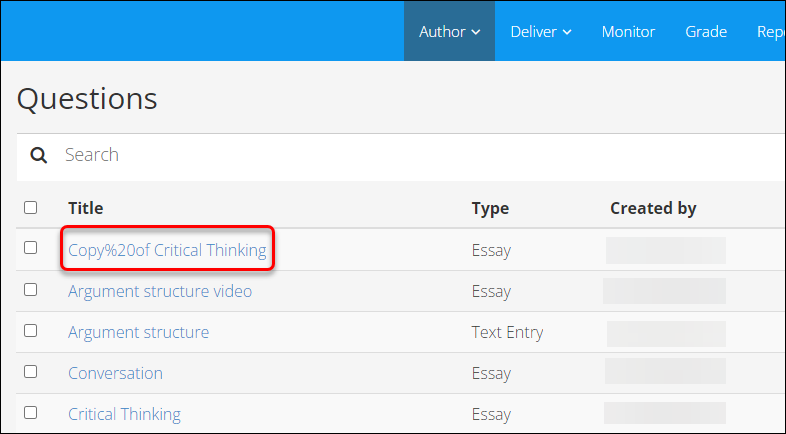
Export/Print a question set
If you would like to save your Question Set as a PDF or print it, please see the Exporting a Question Set PDF guide.
Preview a question set
Previewing of a Question Set displays all question from a student perspective.
- Click the preview button (eye) in the top-right corner of the Question Set.
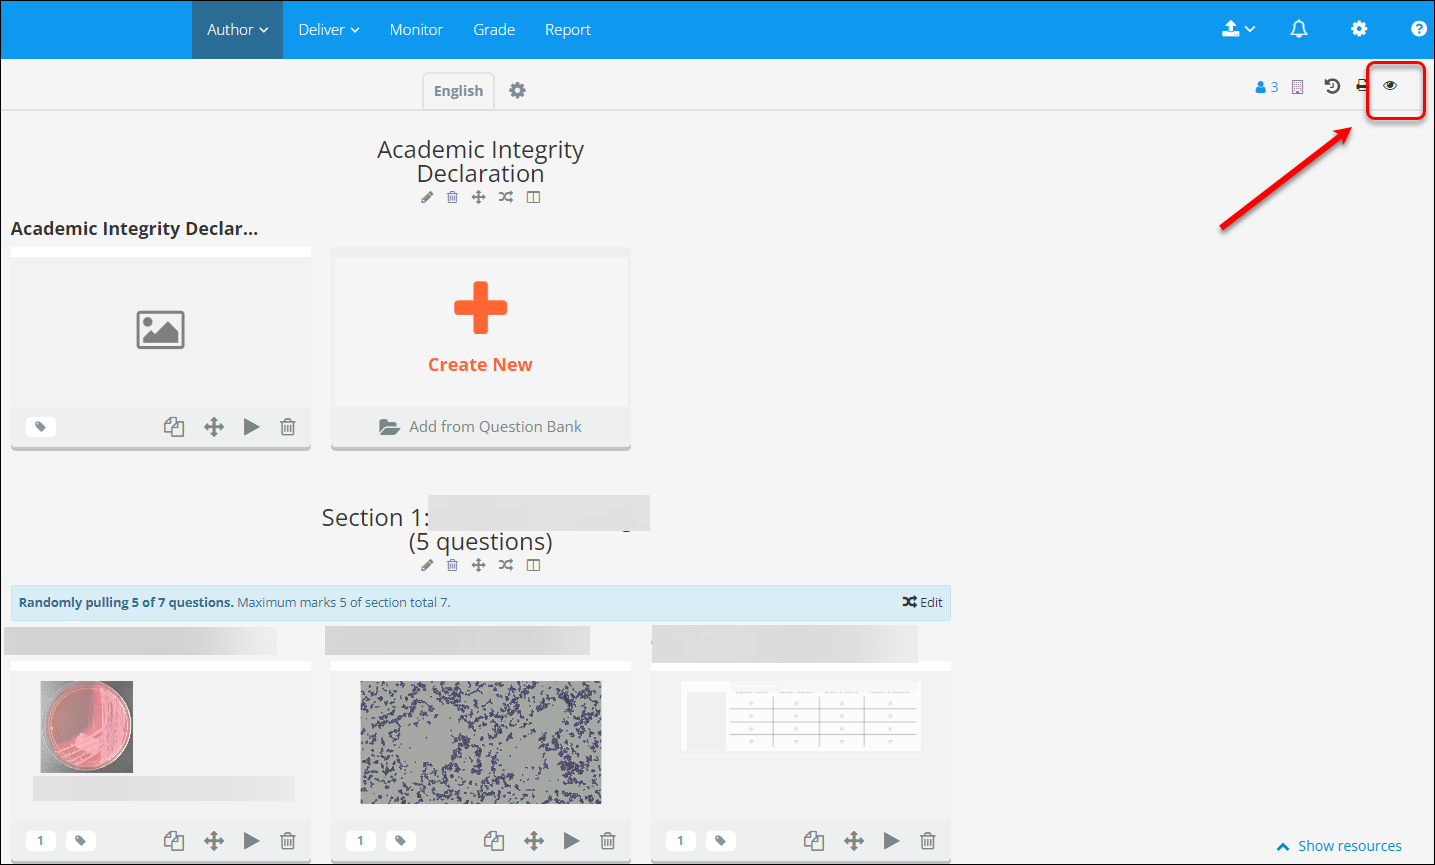
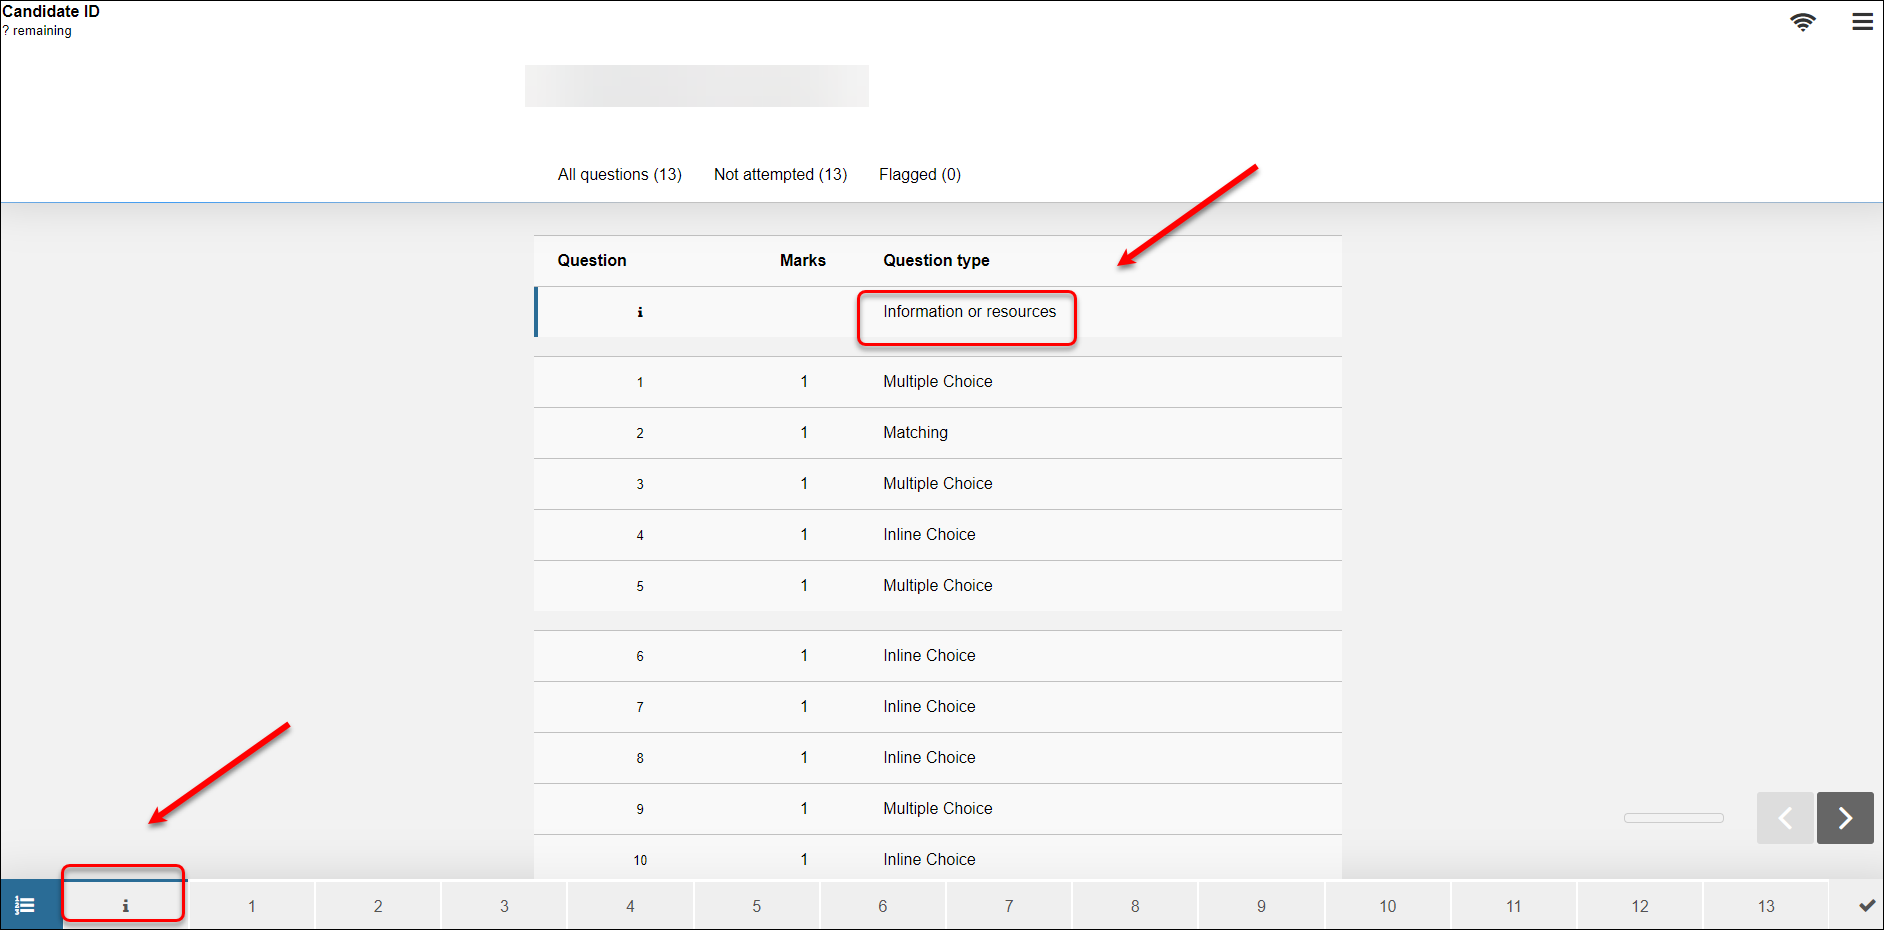
- All questions in the question set are displayed.
- Select a question to view by clicking on the question type or the number list.
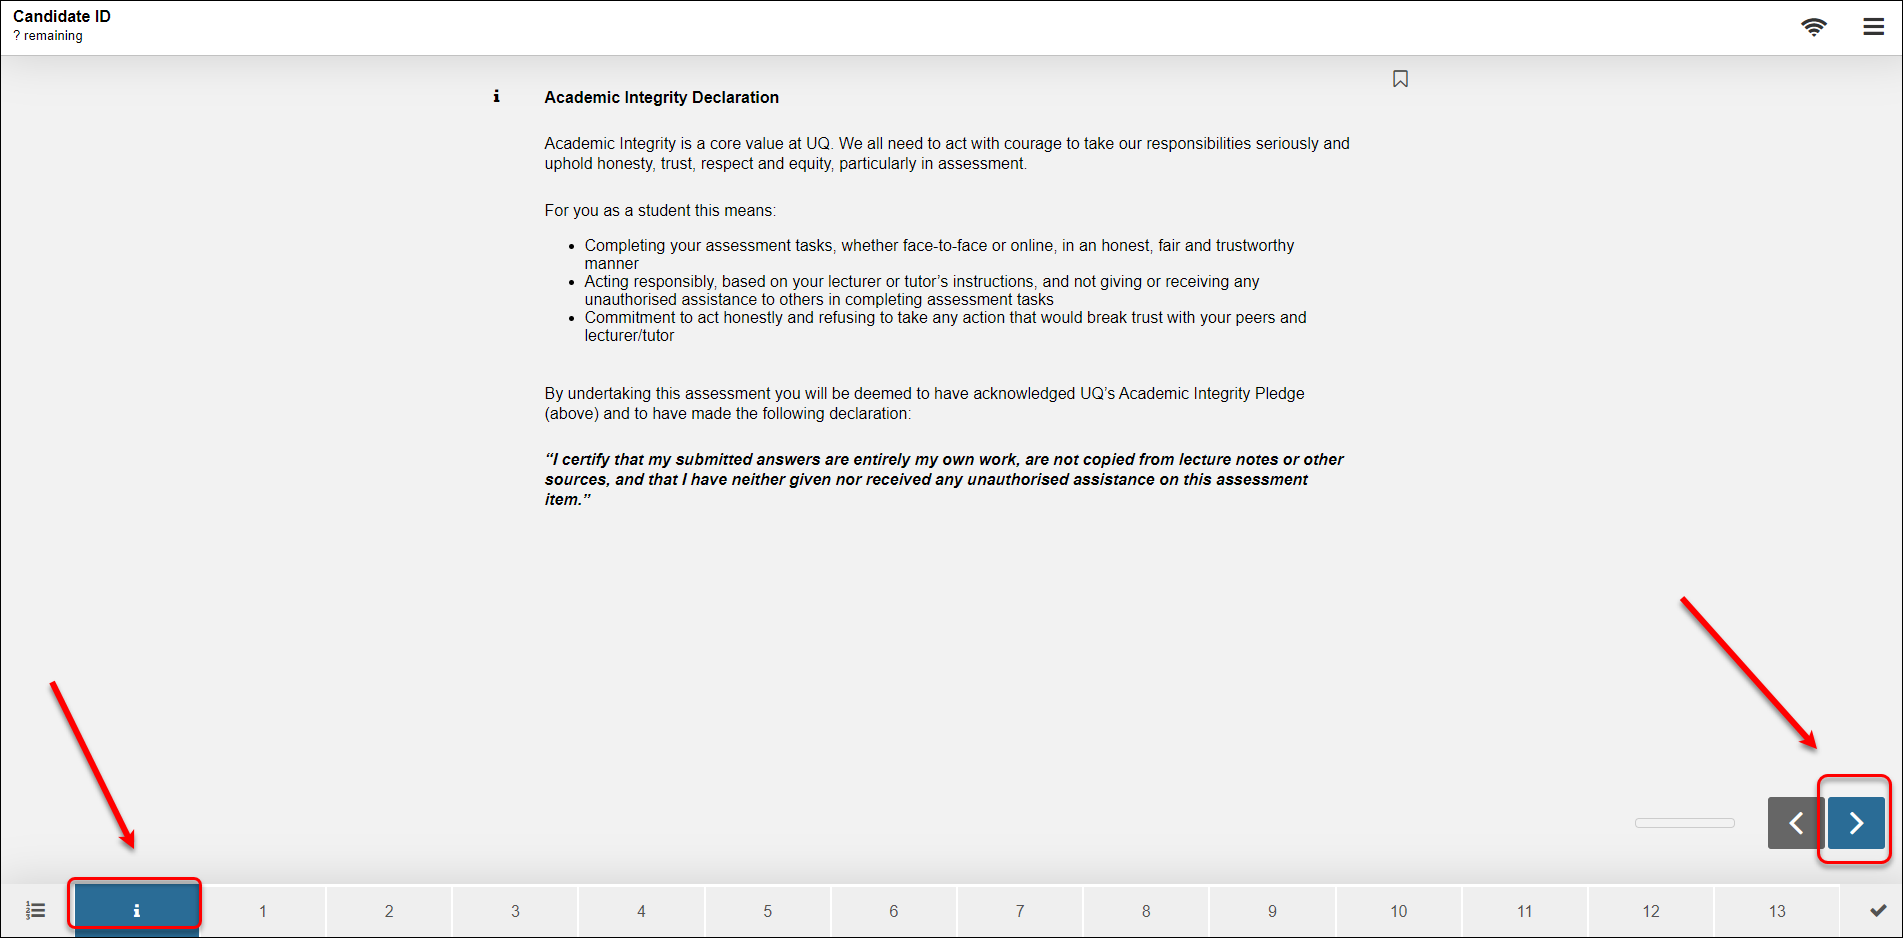
- The selected question content will be displayed.
- Click on the number list or the arrow to move to the next question to preview.
Other question set features
Question maximum marks
You can see the maximum marks available on a question from within the Question Set by looking at the number in the bottom left corner of the question.

Question labels
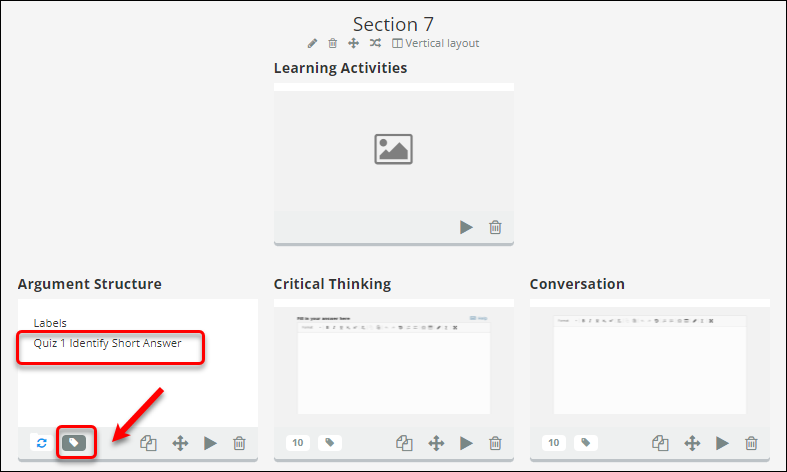
You can see the labels on a question by clicking on the label button at the bottom of the question in the Question Set.
Question set design settings
After you complete creating the questions in your question set, you should complete the design settings for your question set.
- Click on the Design tab (at the bottom of the screen).

Design settings will be displayed on the right panel.
You can have an overview of your question set:
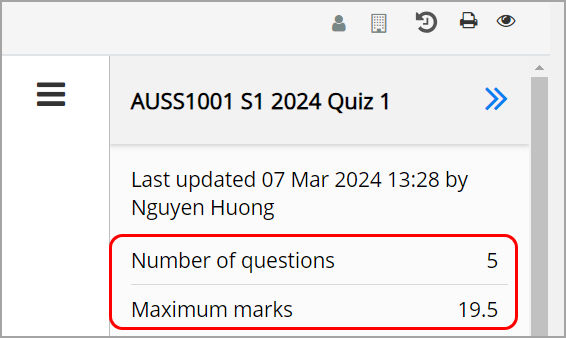
- Number of questions
- Maximum marks
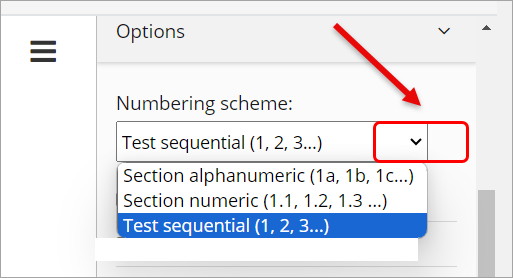
- Select the question set's required numbering scheme:
- Section alphanumeric (1a, 1b, 1c) is for a set with stimulus and sub-questions
- Section numeric (1.1, 1.2, 1.3): same as above.
- Test sequential (1, 2, 3) is for a set without sub-questions.
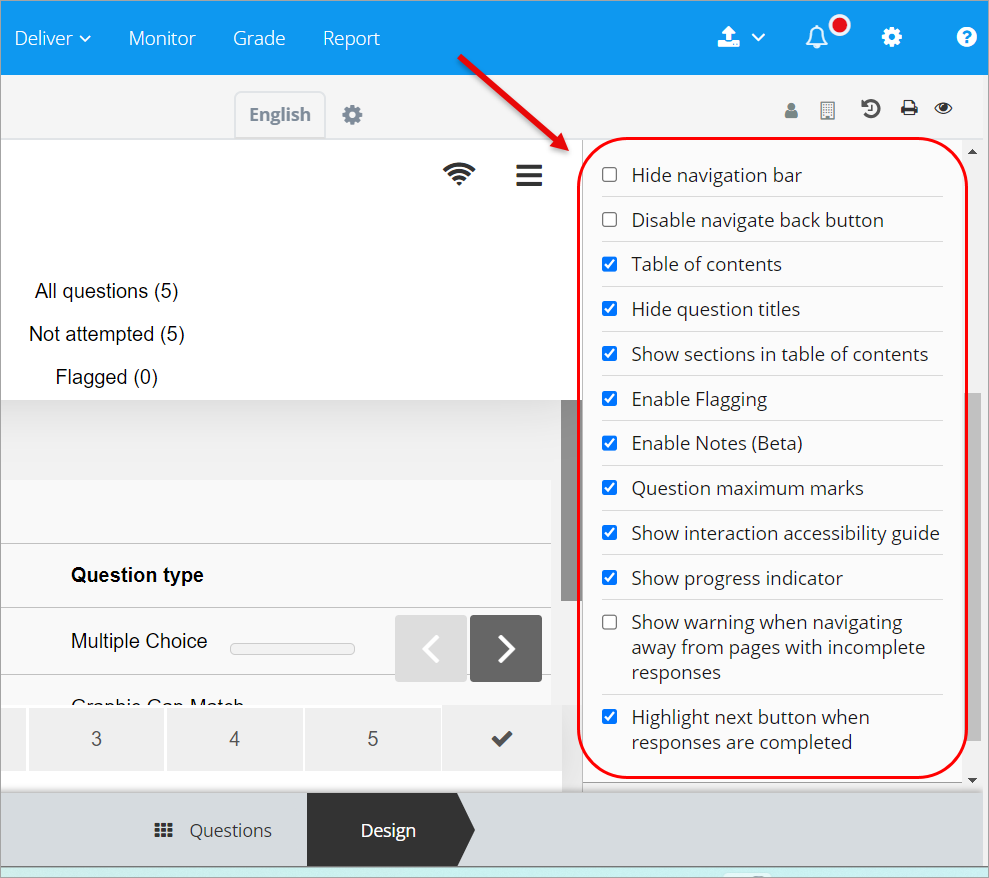
- Select the required settings for the question set.
Note: the image below shows the recommended settings for a question set.
Design setting explanations
| Setting Name | Setting function | Recommendation | Reasons |
|---|---|---|---|
| Hide navigation bar | Displays/hides numbered navigation at the bottom of the test page. | Unchecked | Displaying navigation assists students with planning their time and navigating more easily through the test |
| Disable navigate back button | Disabling the navigate back button removes the back button from the bottom-right corner. | Unchecked | Displaying navigate back button assists students with easier navigation between the test questions. |
| Table of contents | Displays a list of questions at the beginning of the test. | Checked | Displaying the table of contents allows students to see at a glance what questions they will need to answer, and the marks associated with them. |
| Hide question titles | Displays/hides question titles | Checked | Questions titles can potentially reveal answers. |
| Show sections in table of contents | Displays/hides sections of table of contents. | Checked | Displaying the sections in table of contents allows students to see the structure of the test, which is especially important when several questions are related to one topic or a case study. |
| Enable flagging | Allows students to flag questions they may wish to return to. | Checked | Enabling flagging allows students to manage their test time. |
| Enable Notes | Allows students to highlight question and stimulus text and write private notes (like digital scratch paper). | Checked | Assists students with a better comprehension of the question/task. |
| Question maximum marks | Indicates the maximum number of marks possible for a question. Shown on the question itself as well as the Table of Contents page. | Checked | Knowing question marks allows students to choose the questions they wish to attempt. |
| Show progress indicator | Displays a progress bar in the bottom-right corner of the screen, indicating how far a student has progressed through an assessment. | Checked | Assists students with staying on track with their test time. |
| Show warning when navigating away from pages with incomplete responses | If enabled, a dialogue box will display whenever a student tries to navigate away from a question without answering it. | Unchecked | It could disrupt a student’s flow during perusal time when students just go through questions without answering them. |
| Highlight next button when responses are completed | This makes the next button shake to draw the student’s attention to it once they have provided a response to the question. | Checked | To prompt students to proceed further. |
- Academic Integrity & Assessment Security in Inspera
- Access Inspera
- Access your Inspera test for marking
- Add graders to an Inspera test
- Add media content to questions in Inspera
- Add one-time users to an Inspera test
- Add the Assumption and Queries question in an Inspera exam
- Adding Resources (pdf files, links) to a Question Set
- Adding staff (contributors) to an Inspera assessment
- Adding the Academic Integrity Statement to your assessment
- Additional pages required for Inspera exams
- Alternative method for downloading Final Marks from Inspera
- Answer key corrections - MCQ
- Apply Alternative Exam Arrangements (AEAs) and Time Zone Adjustments in Inspera
- Assign questions to graders in Inspera
- Complete an Inspera test as a student
- Confirm grades in Inspera
- Copy a question set from Inspera Training to Inspera Admin (Original)
- Create Inspera practice exam with Safe Exam Browser
- Create an Inspera submission link in Learn.UQ
- Create an Inspera test in Deliver
- Create bands and criteria
- Create marking committees in Inspera
- Create marking committees using CSV
- Creating Questions
- Downloading responses to Assumptions and Queries
- Edit question weight in Inspera
- Enable After-test settings in Inspera
- Enrol students in Inspera test using CSV file
- Explanations on student responses
- Export questions from Blackboard to Inspera (Original)
- Exporting a Question Set to PDF
- False Start
- Filter functionality in Inspera marking
- Flag students in Inspera test
- Getting started with Inspera
- Grading workflow for Planners and Graders
- Incident Adjustments for students who experience technical delays
- Inspera Assessment Design Settings
- Inspera Assessment Environments and their Purposes
- Inspera Assessment User Roles
- Inspera Assessment access methods for students
- Inspera Exam Requests
- Inspera Grade Workspaces
- Inspera Observed User Testing
- Inspera Question Set Version Control
- Inspera Recommended Assessment - Standard (non-exam) assessment - webpage
- Inspera Rubrics
- Inspera School-based Exams
- Inspera Test settings
- Inspera analytics
- Inspera central on-campus and non-invigilated exams (Original)
- Inspera marking navigation
- Inviting students to an assessment via Test Code
- Late submissions and extensions in Inspera Assessment
- Manually marked questions: Mark and feedback
- Monitor Assessment
- Name and label questions in Inspera Assessment
- Navigate Inspera
- Override scoring of questions in Inspera
- Pilot an Inspera assessment
- Question sets in Inspera Assessment
- Sections in Question Sets
- Sharing a question set in Inspera Assessment
- Student Arrives Late
- Supporting students to use Inspera Assessment
- Things to look for in review
- Transfer results from Inspera to your Learn.UQ course
- Turnitin similarity report in Inspera
- View student responses in Inspera

