Oral exams via Zoom (Original)
Zoom can be used as an alternative to campus-based oral exams and is suitable for both individual or group exams.
Examples of oral exams that may be suitable via Zoom:
- OSCE's
- Individual presentations
- Group presentations
- Thesis reviews/ defences
For general Zoom meeting usage guides, refer to the Run a Zoom session section of the Virtual Classroom using Zoom guide.
Any issues relating to Zoom should be logged with AV services by submitting an IT request via the Request IT support webpage.
Compatible Zoom settings for oral exams
The following settings are recommended for oral type exams conducted via Zoom and only include settings that differ from the Recommended Settings for Using Zoom for Teaching guide.
Accessing and Editing Meeting Settings via the Zoom web interface
- Go to https://uqz.zoom.us
- Login with your UQ username and password.
- Select Settings from the side menu.
Note: The Settings page has three tabs (located at top of page): Meeting, Recording and Telephone.
- Click individual items on each page to toggle a setting On (coloured blue) or Off (coloured grey as in picture below).
 |
Note: Some settings may be locked by admin (ITS). This will be noted next to the setting (as shown below).
 |
Settings List
The following list includes possible settings available under Meeting Settings which we recommend changing from the default setting.
Meeting tab | ||
|---|---|---|
Schedule Meeting | ||
Mute participants automatically | Start with all students' microphone as automatically turned off to avoid background noise and allow you to advise students if/when to turn on their microphone. | Off |
In Meeting (Basic) | ||
| Private chat | Allow meeting participants to send a private 1:1 message to another participant. | Off |
For more information on individual functions: https://support.zoom.us/hc/en-us/articles/115005756143-My-Meeting-Settings
Editing meeting settings during a Zoom meeting
The recommended settings can also be edited while a meeting is in progress.
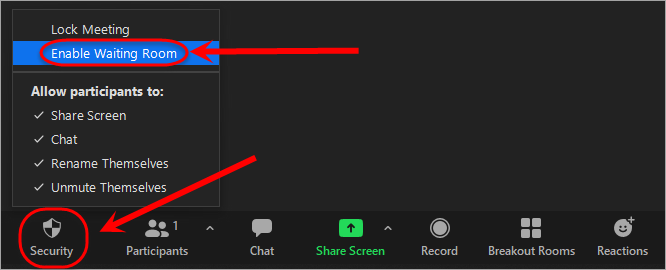
Enable Waiting Room
- Click on the Security button.
- Select Enable Waiting Room from the pop-up list.
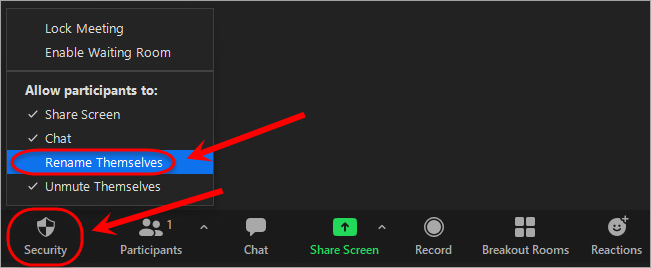
Stop participants from renaming themselves
- Click on the Security button.
- Select Rename Themselves from the pop-up list.
Schedule an oral exam via Zoom web interface
- Go to https://uqz.zoom.us
- Login with your UQ username and password.
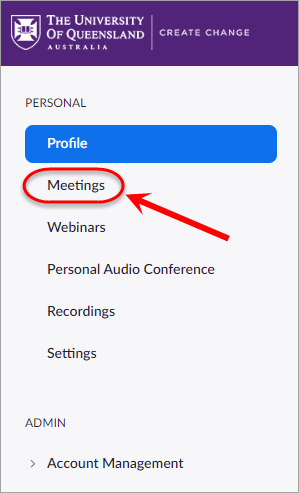
- Select Meetings from the side menu.
- Click on the Schedule a Meeting button.

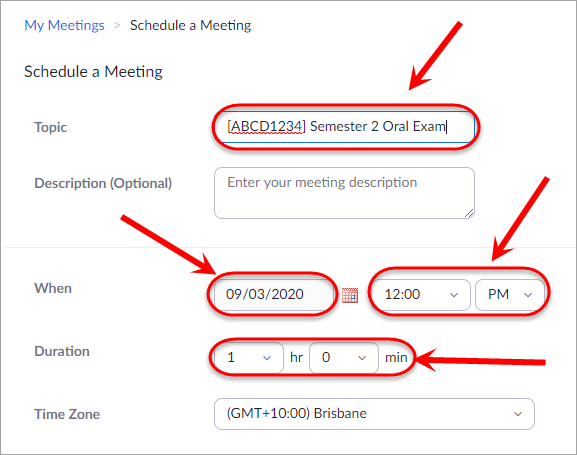
- Enter a title in the Topic textbox with the format [ABCD1234] Semester X Oral Exam.
- Select a time and date for the meeting.
- Select a duration for the meeting.
Tip: If the meeting continues past the anticipated duration time, the meeting does not end automatically.
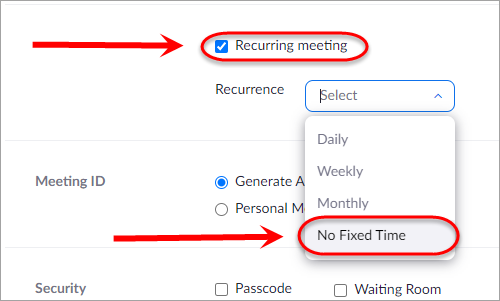
- Optionally, select the Recurring meeting checkbox and the appropriate settings.
Tip: Creating a Recurring meeting with No Fixed Time allows you to use the same meeting for the whole Semester instead of the link changing for each scheduled classroom session.
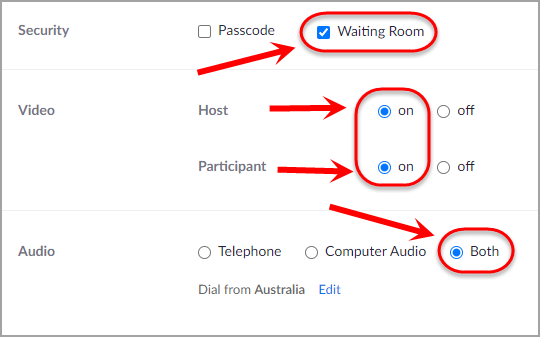
- Select the Waiting Room checkbox to ensure students are placed in the waiting room prior to their oral exam.
- Select the on radio button for both Host and Participant video to ensure all webcams are on when the meeting begins.
- Select Both in the audio options to allow students to join via both telephone and computer audio.
Tip: If you only want students presenting using a computer with a webcam then select the Computer Audio radio button.
- Select the Only authenticated users can join checkbox.
Note: If you have a guest examiner attending the meeting, do not check the Only authenticated users can join checkbox.
- Select the Automatically record meeting checkbox if you would like to record the oral exam automatically.
- Optionally, select the Enable additional data center regions for this meeting checkbox
- Enter any staff (i.e. tutors or co-lecturers) who will need to host or join the meeting in the Alternative Hosts textbox.
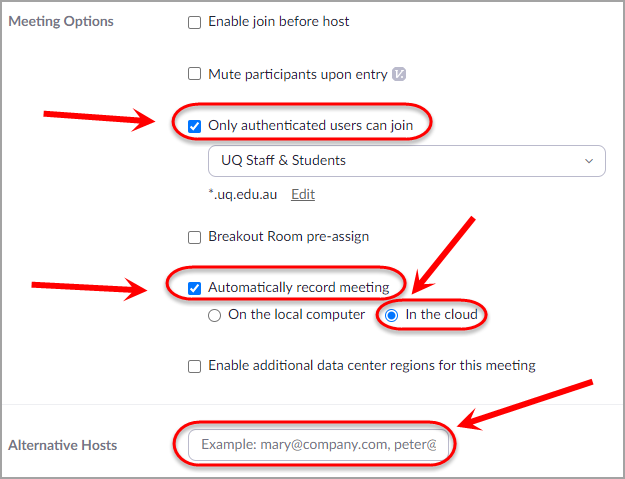
Note: In order to add a staff member as an alternative host, they will need to have activated their UQ Zoom account. This means that they will need to have logged into Zoom with their UQ credentials. For further information, refer to the Installing Zoom guide. When attempting to add an alternate host you will need to use a staff member's email address based off their name f.lastname@uq.edu.au, you will have to confirm with them exactly what this is as it may have their full first name or there may be a number at the end. You can not use school-specific email aliases such as @business.uq.edu.au.
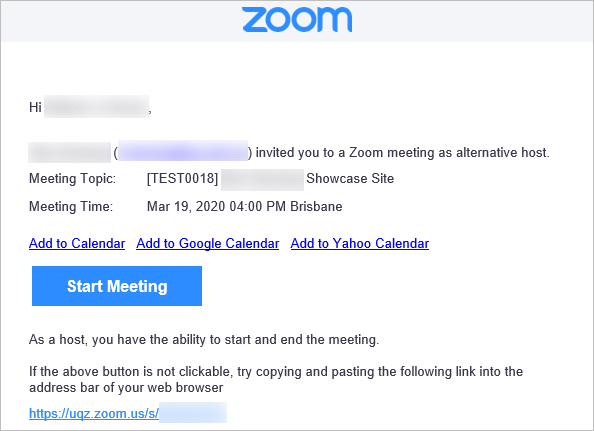
Warning: Alternate hosts will receive an email that will contain their access link and a calendar invite for the scheduled meetings, they should use the link in the email to start the meeting. Only the creator of the meeting and students will see all the meetings listed in the Zoom meeting area.
- Click on the Save button.

Schedule an oral exam via Learn.UQ
Warning: You may need to enable third party cookies in order to access Zoom via your Learn.UQ course site. For further information, refer to the Enabling Third Party Cookies guide.
Create a Zoom Meeting Area
- Navigate to the desired location within your Learn.UQ course site where you wish to place the Zoom Meeting Area.
Tip: Create a folder for the Oral Exam in the Assessment content are and place the Zoom Meeting Area in that folder.
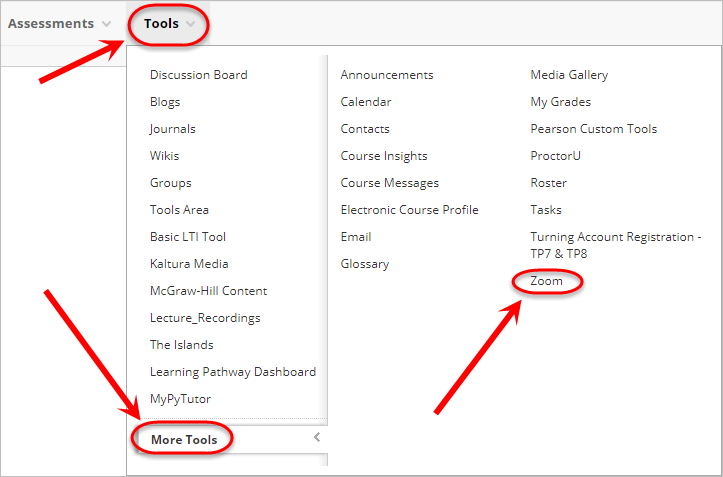
- Hover over Tools > More Tools and select Zoom from the drop-down menu.
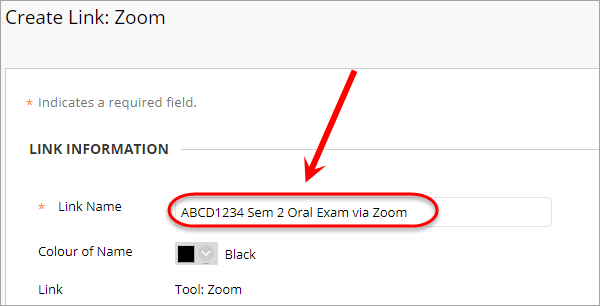
- Enter a Link Name with the format ABCD1234 Sem X Oral Exam via Zoom (i.e. ELSS1234 Sem 1 Oral Exam via Zoom).
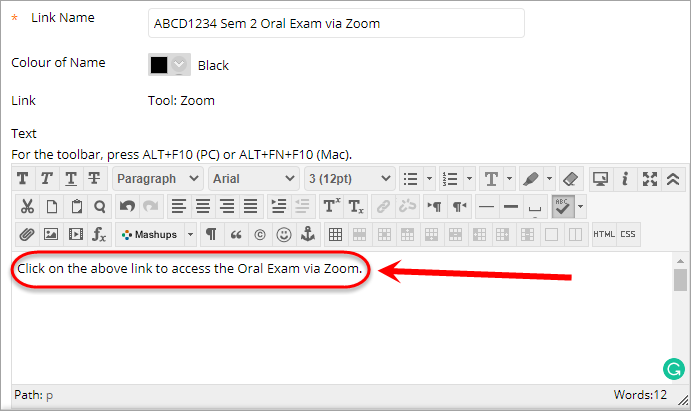
- Add a description in the Text textbox outlining what Zoom will be used for (i.e. Click on the above link to access the Oral Exam via Zoom).
- Click on the Submit button.

- Click and drag the Zoom Meeting Area link to the top of the Oral Exam folder.
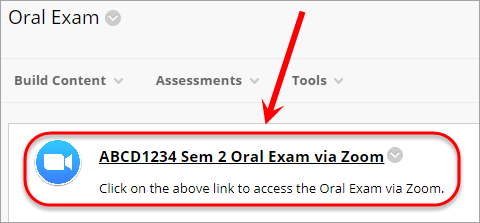
Schedule a Zoom Meeting
Click on the Zoom Meeting Area link in your Learn.UQ course.

- Zoom will launch automatically within Learn.UQ.
- Click on the Schedule a New Meeting button to schedule a single or recurring Zoom meeting within your Learn.UQ Course.
Note: Any meetings scheduled through the Zoom Meeting Area will have a unique ID based on your course.

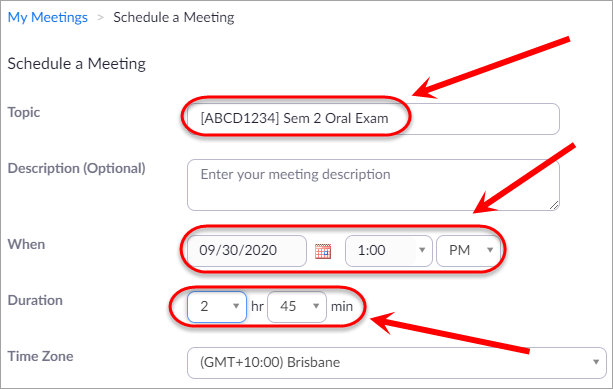
- Enter a title in the Topic textbox with the format [ABCD1234] Sem X Oral Exam (i.e. [ELSS1234] Sem 1 Oral Exam).
Tip: As the course code and title is automatically populated, simply delete the course title and add the Semester and Oral Exam after the course code.
- Select a time and date for the meeting.
- Select a duration for the meeting.
Tip: Set the meeting to 45 mins rather than an hour so that meetings don't sit back to back (i.e 1 hour 45 mins for a 2 hour scheduled exam). Do not stress if you select a shorter duration the meeting does not end automatically and you can go over time.
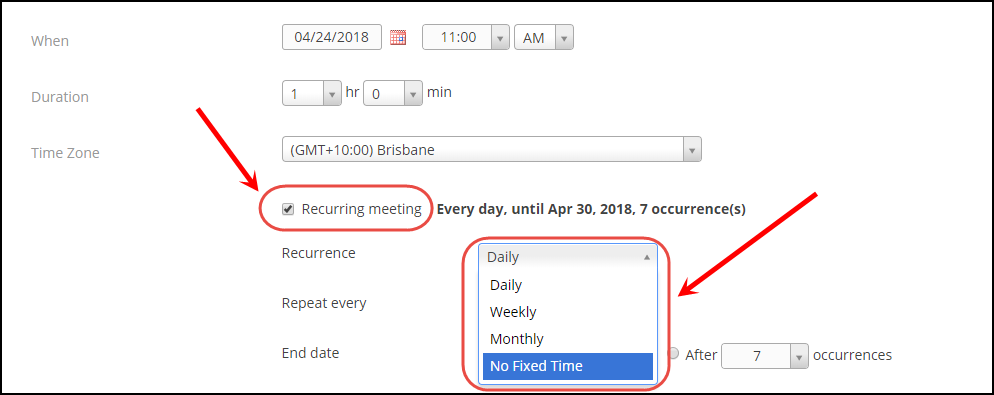
- Optionally, select the Recurring meeting checkbox and the appropriate settings.
Tip: Creating a Recurring meeting with No Fixed Time allows you to use the same meeting for the whole Semester instead of the link changing for each scheduled classroom session.
- Select the on radio buttons for both Host and Participant video to ensure all webcams are on when the exam begins.
- Select Both in the audio options to allow students to join via both telephone and computer audio.
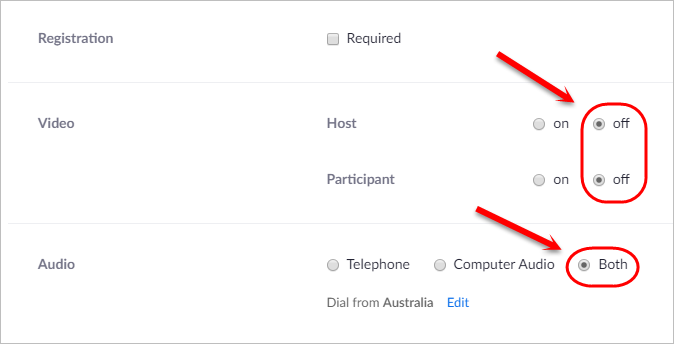
Tip: If you only want students presenting using a computer with a webcam then select the Computer Audio radio button.
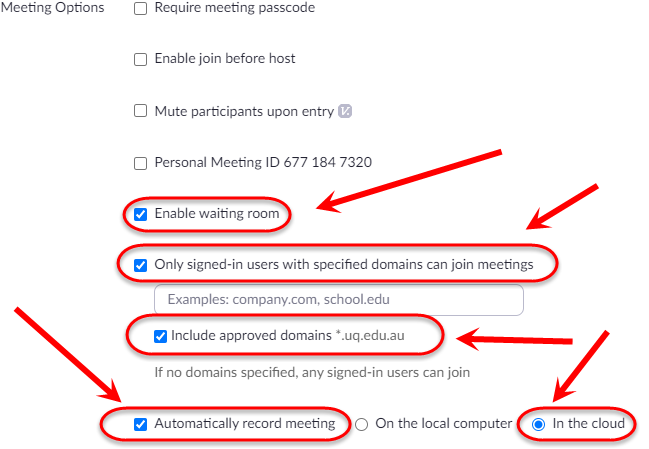
- Check the Enable waiting room checkbox to ensure students are placed in the waiting room prior to their oral exam.
- Check the Mute participants upon entry checkbox to ensure students' microphones are off when they join the meeting.
- Check the Only signed-in users with specified domains can join meetings checkbox.
Note: If you have a guest examiner attending the meeting, do not check the Only signed-in users with specified domains can join meetings checkbox.
- Optionally check the Automatically record meeting (to the cloud) if you would like to record the oral exam automatically.
- Enter any staff (i.e. tutors or co-examiners) who will need to host or join the meeting in the Alternative Hosts textbox.

Note: In order to add a staff member as an alternative host, they will need to have activated their UQ Zoom account. This means that they will need to have logged into Zoom with their UQ credentials. For further information, refer to the Installing Zoom guide. When attempting to add an alternate host you will need to use a staff member's email address based off their name f.lastname@uq.edu.au, you will have to confirm with them exactly what this is as it may have their full first name or there may be a number at the end. You can not use school-specific email aliases such as @business.uq.edu.au.
Warning: Alternate hosts will receive an email that will contain their access link and a calendar invite for the scheduled meetings, they should use the link in the email to start the meeting. Only the creator of the meeting and students will see all the meetings listed in the Zoom meeting area.

- Click on the Save button.
- The meetings will then be scheduled and can be accessed by students through the Zoom meeting link in your Learn.UQ course.
Note: Students will only be able to view any Zoom meetings you create within your Learn.UQ course using this method. Any other meetings scheduled separately through the Zoom application or web interface will not appear in this list for students. You can use the student preview tool to check the student view, for further information, refer to the Using the Student Preview Tool guide.

Managing a Zoom oral exam
For general Zoom meeting usage guides, refer to the Run a Zoom session section of the Virtual Classroom using Zoom guide.
ID check
- Students must have a student ID card or other government issued photo identity document (e.g. passport). Students should be advised of this requirement prior to the exam.
- The student should be asked to hold the ID up next to their face in order for the Invigilator to conduct identity verification.
- Compare ID to the list of students who are sitting the examination and mark attendance.
Environmental scan
All students should have a camera that allows the proctor to see that the student is not using outside materials or communicating with others but also not allow their individual test paper to be readable on the video. Students should use the microphone and speaker built into the computer and not a headset/earbuds.
Prior to beginning the exam, an environmental scan should take place with attention paid to the following:
- Students must show their workspace – including their desk, the room in which they are sitting, etc. Students have been advised of this requirement.
- The invigilator must be satisfied that the student is working alone.
- Students must not use a virtual background.
- Students cannot use headphones or mobile phones (exception: at the end of the exam, the mobile or other device may be used to scan and upload answers to Blackboard).
- Ensure each student can hear the invigilator.
- Items allowed in the work area may include:
- Pens, pencils, white out, erasers and a ruler
- Clear drink bottle (no labels)
- Student ID card
- Foam/disposable earplugs
- Exam permitted materials (hard copy only)
- Watch (may be placed on the desk in full view of the camera)
- Permitted calculator
Note: If during the exam the student's work area is not visible then the student can be asked to reposition the camera.
Request student shares their screen
You will need to ask your student to enable screen sharing for the duration of the exam. For the exam, the student will only be allowed to have one screen attached to their device (for a laptop this would be the screen on the laptop). The student will need to share the entire screen during the exam as well as their computer sound.
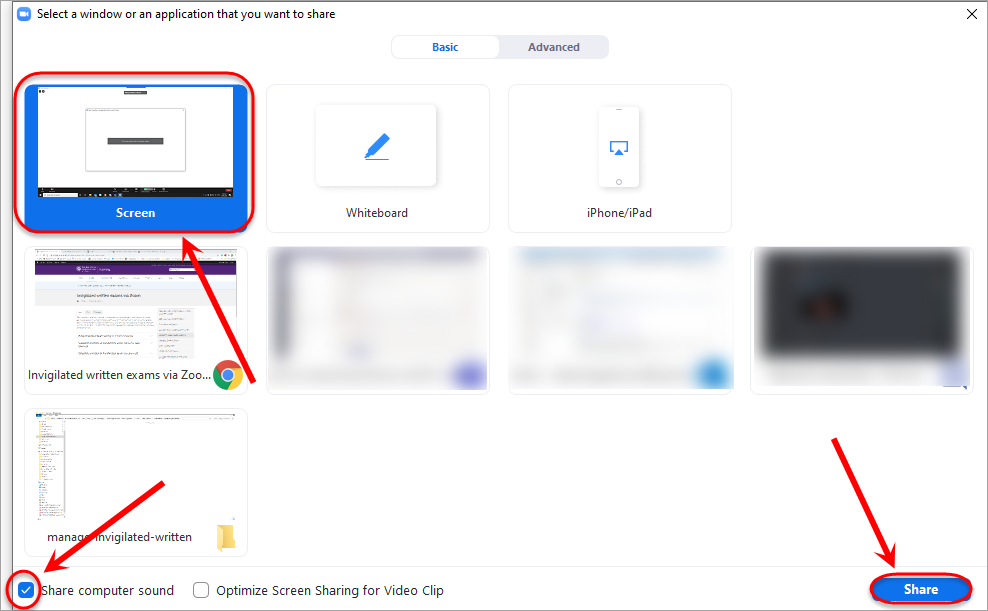
Refer students to the Virtual Classroom (Zoom) student guide for instructions on how to share their screen.
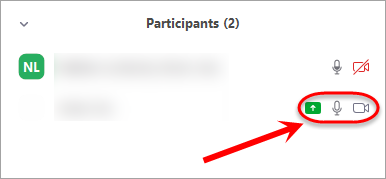
Confirm student is sharing the screen, microphone and webcam are on
- Click on the Participants button.
- Look for the green square with an up arrow next to each student that should be sharing their screen.
- The microphone and webcam icons should appear grey if they are turned on.
Managing breakout rooms
You may choose to place students into their own breakout room and then you just move between each room overseeing the exam. For further information, refer to the Moving between Breakout Rooms guide.
- Add a virtual background
- Customise your Zoom waiting room
- Generate report of meeting participants
- Live auto-transcripts in a Zoom meeting
- Live oral and practical assessment recording
- Meeting Timer, Agenda Timer & Clock Countdown in Zoom
- Moving between Breakout Rooms
- Oral Exams via Zoom
- Polling in a Zoom meeting
- Pre-assigning participants to breakout rooms
- Publishing a Zoom recording to Echo360
- Reactions in a Zoom meeting
- Running interviews via Zoom
- Scheduling privilege's in Zoom
- Using Zoom tips
- Virtual Classroom (Zoom) FAQ
- Virtual Classroom Tips and Tricks
- Zoom Meetings via Learn.UQ
- Zoom Recommended Settings
- Zoom waiting rooms for online exams
