Scheduling privileges in Zoom (Original)
You can:
- assign other UQ users to schedule meetings on your behalf
- schedule meetings on someone's behalf that has assigned you scheduling privilege
Assign scheduling privileges to another UQ staff member
- Login to https://uqz.zoom.us
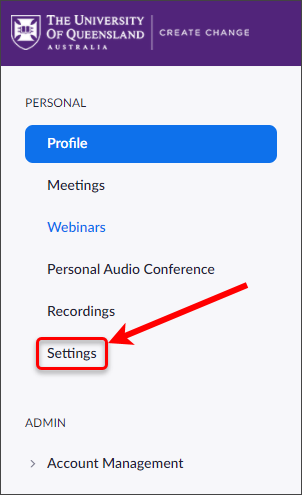
- Click on Settings.
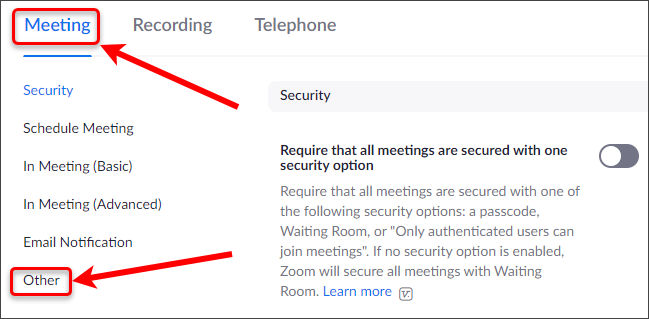
- In the Meeting tab, click on Other.
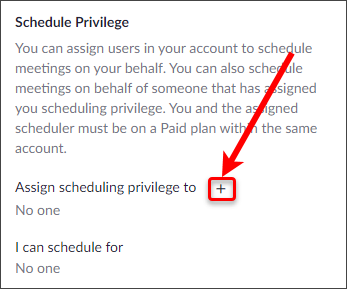
- Click on the + (plus) button next to Assign scheduling privilege to.
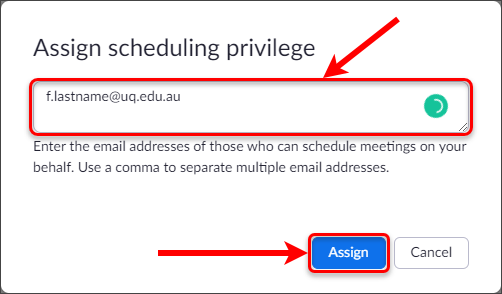
- Enter the email address of the UQ staff member you are assigning the privileges to.
Note: In order to assign a staff member scheduling privileges, they will need to have activated their UQ Zoom account; this means that they will need to have logged into Zoom with their UQ credentials. For further information, refer to the Installing Zoom guide. When attempting to assign a staff member scheduling privileges, use their email address based on their name i.e. rick.sanchez@uq.edu.au, but should confirm the email's accuracy as it may contain their full first name or there may be a number at the end. You cannot use school-specific email aliases such as @business.uq.edu.au.
Tip: You can assign scheduling privileges to multiple people by separating each email address with a comma.
- Click on the Assign button.
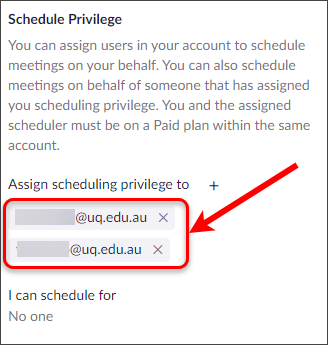
- A list of people you have assigned scheduling privileges will appear following the heading.
Checking scheduling privileges
- Login to https://uqz.zoom.us
- Click on Settings.

- In the Meeting tab, click on Other.

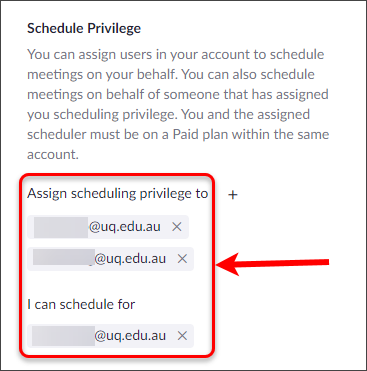
- Review any assigned scheduling privileges.
Removing scheduling privileges
- Login to https://uqz.zoom.us
- Click on Settings.

- In the Meeting tab, click on Other.

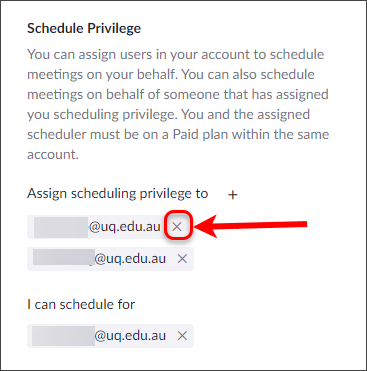
- Click on the X button next to the staff member's email address.
Schedule a Zoom meeting on behalf of another UQ staff member via Learn.UQ
In a content area of your Learn.UQ (Blackbaord) course site, click on the Zoom Meeting Area link.

- Zoom will automatically launch within Learn.UQ.
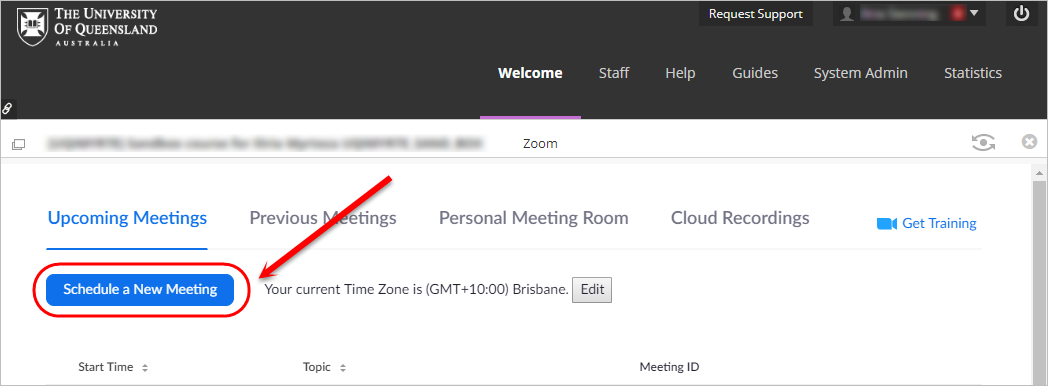
- Click on the Schedule a New Meeting button to schedule a single or recurring Zoom meeting within your Learn.UQ course.
Note: Any meetings scheduled through the Zoom Meeting Area will have a unique ID based on your course.
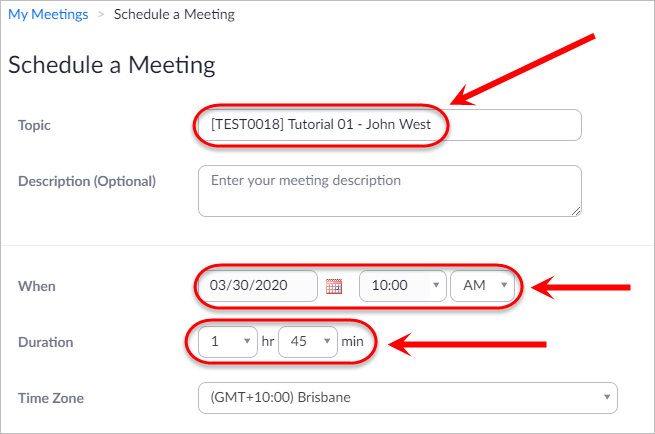
- Enter a title in the Topic textbox with the format [ABCD1234] Sem X Tutorial 01 - Tutor Name e.g. [ELSS1234] Sem 1 Tutorial 01 - John West.
Tip: As the course code and title is automatically populated, delete the course title and add the semester, tutorial and tutor name after the course code.
- Select a time and date for the meeting.
- Select a duration for the meeting.
Tip: Set the meeting to 45 minutes rather than an hour so that meetings are not following each other sequentially i.e 1 hour 45 minutes for a 2 hour scheduled tutorial. The meeting does not end automatically and can go over time.
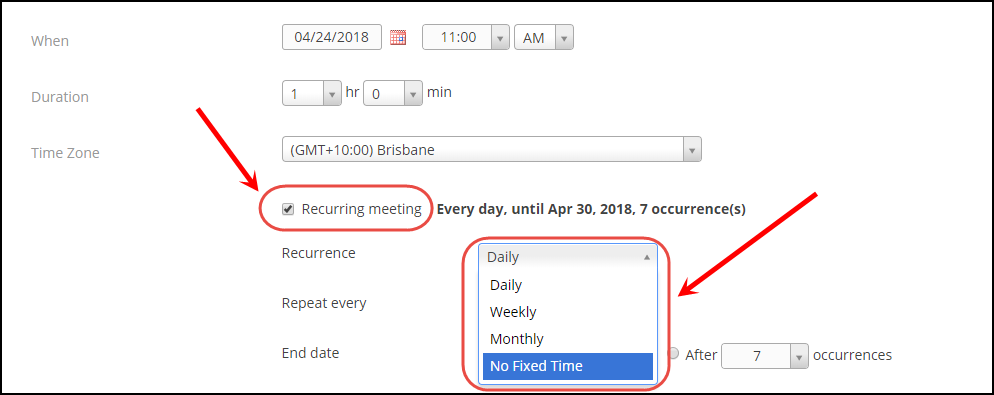
- Optionally, select the Recurring meeting checkbox and then check appropriate settings.
Tip: Creating a Recurring meeting with No Fixed Time allows you to use the same meeting for the whole semester instead of the link changing for each scheduled session.
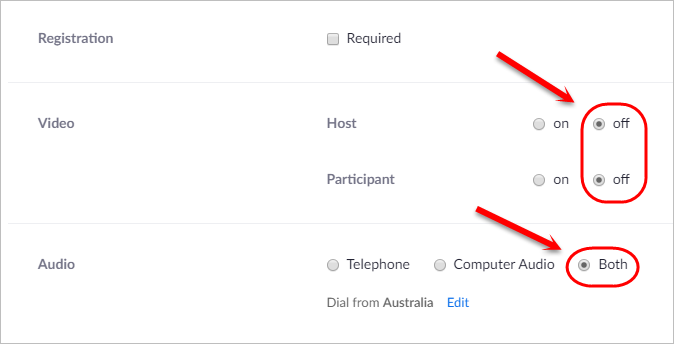
- In the Video section, select the off radio button for both Host and Participant. This ensures all webcams are off when the meeting begins.
- In the Audio section, select Both to allow students to join via both telephone or computer audio.
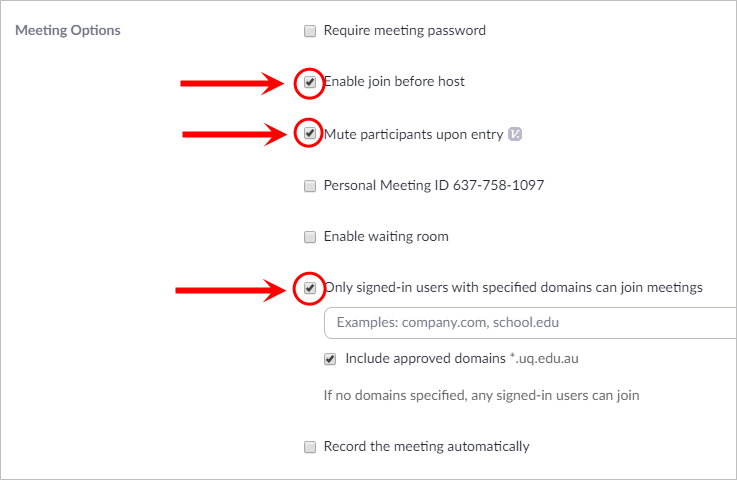
- Check the Allow participants to join checkbox to allow students to enter the meeting prior to the host.
- Check the Mute participants upon entry checkbox to ensure students' microphones are off when they join the meeting.
- Check the Only signed-in users with specified domains can join meetings checkbox.
Note: If you have a guest presenter attending the meeting, do not check the Only signed-in users with specified domains can join meetings checkbox.
- Optionally check the Record the meeting automatically (to the Cloud) if you would like to record your session.
Tip: Recording to the Cloud will enable automatic transfer to Echo360 so that you can make the recording available to your students. For further information, refer to the Publishing a Zoom recording to Echo360 guide.
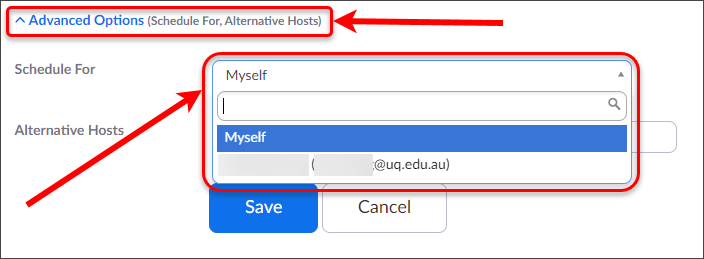
- Click on Advanced Options.
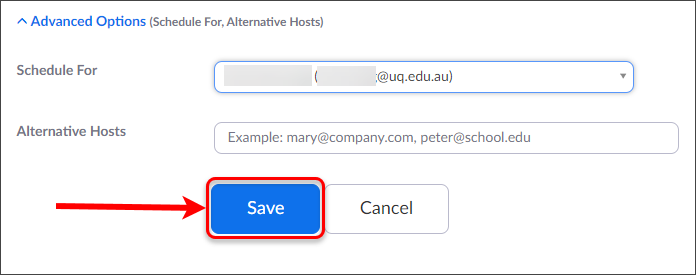
- Select the required staff member from the Schedule For drop-down menu.
- Click on the Save button.
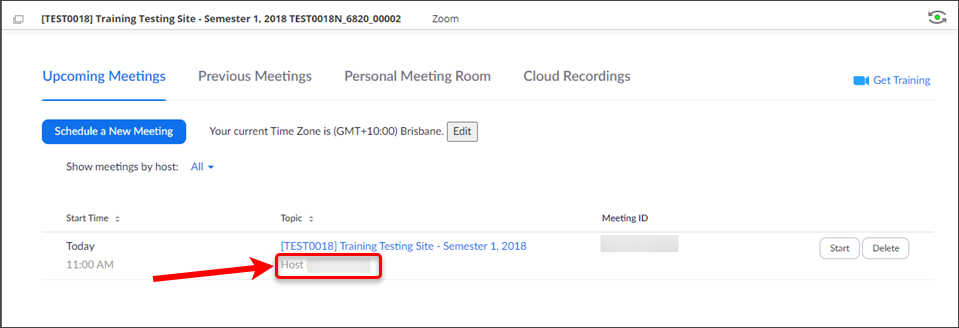
Tip: If you have scheduled a meeting for another UQ staff member via Learn.UQ you will be able to see these meetings listed under the upcoming meetings.
Schedule a Zoom meeting on behalf of another UQ staff member via Zoom web interface
- Go to https://uqz.zoom.us
- Login with your UQ username and password.
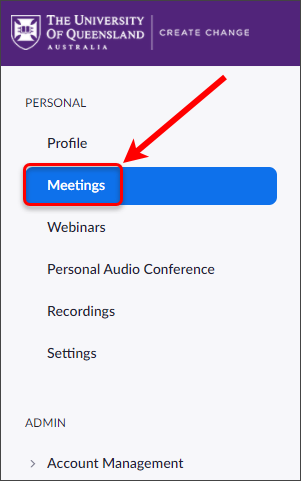
- Select Meetings from the side menu.
- Click on the Schedule a Meeting button.

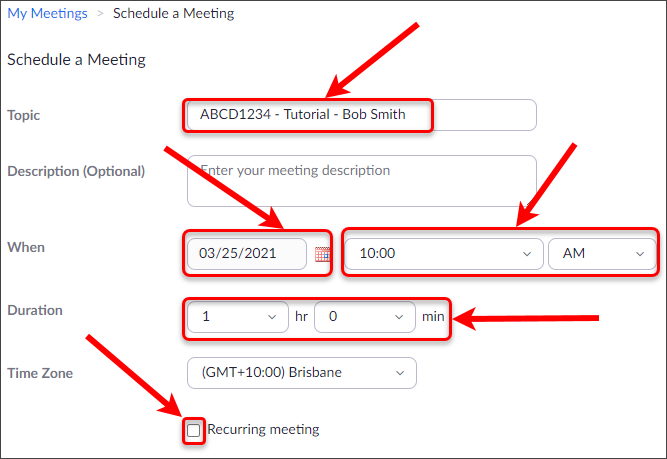
- Enter a title in the Topic textbox with the format [ABCD1234] Sem X Tutorial 01 - Tutor Name e.g. [ELSS1234] Sem 1 Tutorial 01 - John West.
Tip: As the course code and title is automatically populated, delete the course title and add the semester, tutorial and tutor name after the course code.
- Select a time and date for the meeting.
- Select a duration for the meeting.
Tip: Set the meeting to 45 minutes rather than an hour so that meetings are not following each other sequentially i.e 1 hour 45 minutes for a 2 hour scheduled tutorial. The meeting does not end automatically and can go over time.
- Optionally, select the Recurring meeting checkbox and then check appropriate settings.
Tip: Creating a Recurring meeting with No Fixed Time allows you to use the same meeting for the whole semester instead of the link changing for each scheduled session.
- Select the required staff member from the Schedule For drop-down menu.

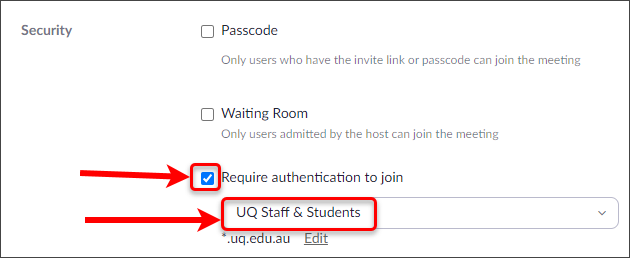
- Check the Require authentication to join checkbox.
- Select UQ Staff & Students from the drop-down list.
Note: If you have a guest presenter attending the meeting, do not check the Require authentication to join checkbox.
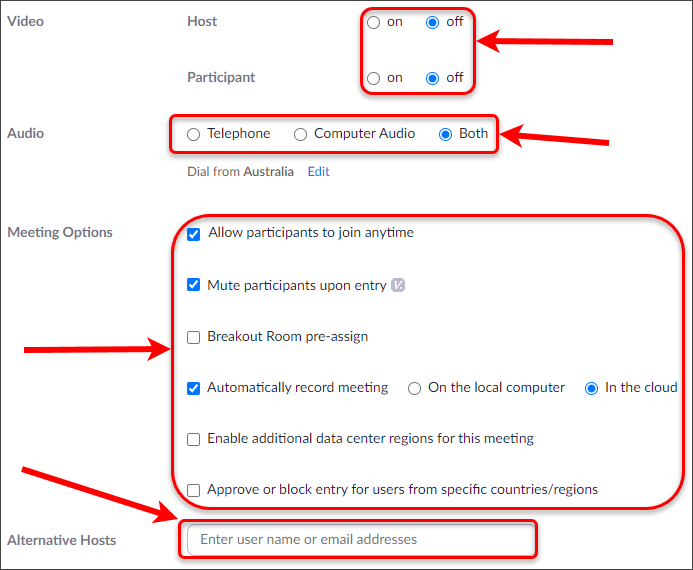
- In the Video section, select the off radio button for both Host and Participant. This ensures all webcams are off when the meeting begins.
- In the Audio section, select Both to allow students to join via both telephone or computer audio.
- Check the Allow participants to join checkbox to allow students to enter the meeting prior to the host.
- Check the Mute participants upon entry checkbox to ensure students' microphones are off when they join the meeting.
- Optionally check the Automatically record meeting (to the Cloud) if you would like to record your session.
- Optionally add any further Alternative Hosts.
Tip: Recording to the Cloud will enable automatic transfer to Echo360 so that you can make the recording available to your students. For further information, refer to the Publishing a Zoom recording to Echo360 guide.
- Click on the Save button.

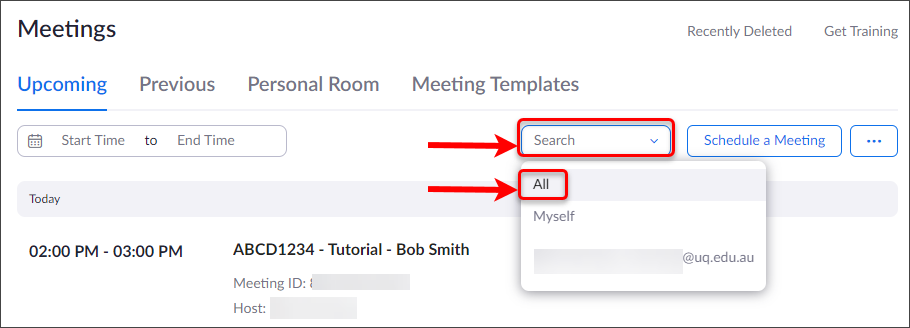
Tip: If you have scheduled a meeting for another UQ staff member via the Zoom web interface, you will be able to see these meetings listed in the Upcoming section by selecting All from the drop-down list.
- Add a virtual background
- Customise your Zoom waiting room
- Generate report of meeting participants
- Live auto-transcripts in a Zoom meeting
- Live oral and practical assessment recording
- Meeting Timer, Agenda Timer & Clock Countdown in Zoom
- Moving between Breakout Rooms
- Oral Exams via Zoom
- Polling in a Zoom meeting
- Pre-assigning participants to breakout rooms
- Publishing a Zoom recording to Echo360
- Reactions in a Zoom meeting
- Running interviews via Zoom
- Scheduling privilege's in Zoom
- Using Zoom tips
- Virtual Classroom (Zoom) FAQ
- Virtual Classroom Tips and Tricks
- Zoom Meetings via Learn.UQ
- Zoom Recommended Settings
- Zoom waiting rooms for online exams
