Create a Self or Peer Assessment (Original)
Adding a Self and/or Peer assessment is a 3 step process:
- Create a Self and Peer assessment, this is the shell the questions and criteria are added to .
- Add questions for the students to answer or as an area to upload file/s or as an area to submit links.
- Add criteria to each questions that the students will use when evaluating other students’ work.
Add a Self and Peer assessment
- Open the required content area (i.e. Assessment).
- Click on the Assessment button.
- Select Self and Peer Assessment from the drop down menu.
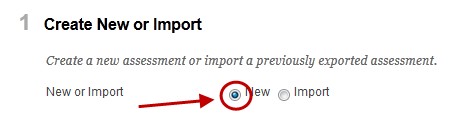
Create New or Import
- Leave the New radio button selected from New or Import.
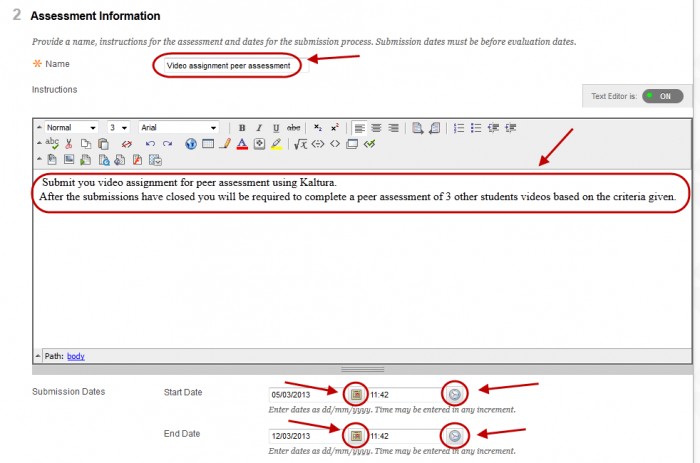
Assessment Information
- Enter a title for the assessment in the Name text box.
- Enter information on submission of the assessment and explain the peer evaluation task in the Instructions text box. Set the Submission Dates: i.e. The dates between which the assessment item can be submitted.
Note: The self and peer review cannot start until after the End Date for the submission.
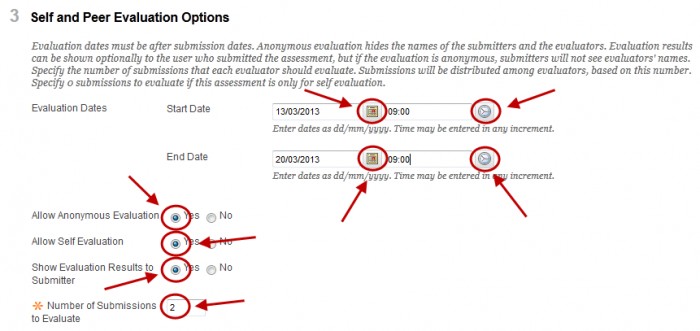
Self and Peer Evaluation Options
- Set the Evaluation Dates: i.e. The dates between which the assessment item can be peer reviewed.
- From Allow Anonymous Evaluation radio buttons:
- Yes, students will not know who completed the peer reviews on their work. This has the advantage of students being able to provide honest feedback and scores without any fear of reprisal.
- No, students will know who completed the peer reviews on their work. This has the advantage of forcing student to take responsibility for the feedback they are giving.
Note: You can view which student has given what feedback. You would of course need to teach students how to provide constructive feedback.
- From Allow Self Evaluation radio buttons
- Yes, select if you want the students to evaluation their own work (they can also do peer reviews)
- No, select if you only want students to complete peer reviews.
- Leave the Yes radio button selected from Show Evaluation Results to Submitter.
- Enter the number of peer reviews you want each student to do in the Number of Submissions to Evaluate textbox.
Note: Enter 0 if you only want students to complete a self evaluation.
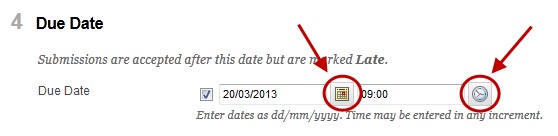
Due Date
- The Due date is information only for the students, it has no effect on the Evaluation due dates.
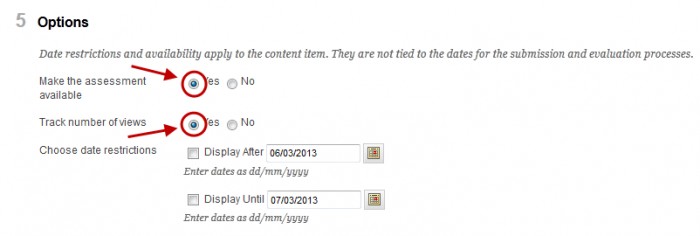
Options
- Optionally, if you do not want students to view the link to the self and peer assessment, select the No radio button from Make the assessment available.
- If you want to know how many times the link is accessed, leave the Yes radio button selected from Track Number of Views .
- Optionally, set Choose date restrictions.
Note: this only effect when the link to the self and peer assessment is display, it has no effect on the Submission or Evaluation due dates. If you do not want students to view their feedback from other students immediately after the Evaluation period closes you will need to set the date restrictions to ensure the link is not available.
Submit
- Click on the Submit button.
Add Assessment questions
- You can add an assessment question to allow students to submit a file or link to a multimedia resource. i.e. Insert a video uploaded to Echo360 or submit an essay.
- You may also want to add a number of assessment questions where the students need to type their answers in.
- Click on the Create Question button.
- Depending on your assessment follow the required instructions. Either:
- File submission or link multimedia file OR
- Assessment question
File submission or link multimedia file
- Add instructions for file submission or multimedia links in the Question Information textbox.
- Leave the Model Response textbox blank.
- Leave the Yes radio button selected from available.
- Click on the Submit button.
- Repeat the above steps to add additional questions.
Note: Students can submit multiple files to one Question.
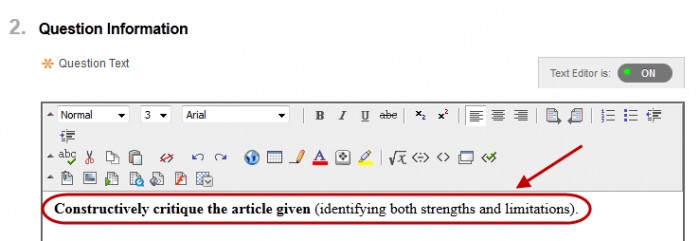
Assessment question
- Enter your assessment question in the Question Information textbox.
- Optionally, enter an example answer in the Model Response textbox.
- Leave the Yes radio button selected from available.
- Click on the Submit button.
- Repeat the above steps to add additional questions.

Add Assessment criteria
To each question you need to add criteria on which students will base their peer review on.
Hover over the question title.
Select Criteria from the drop down list.
You have three options for creating criteria:
- Create your own criteria.
- Create a word count criteria.
- Select a criteria that you have used before or select from sample criteria available.
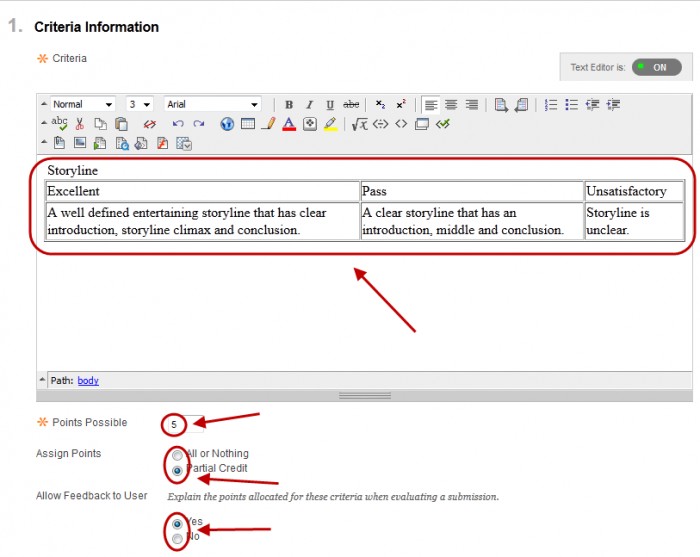
Create Criteria
- Click on the Create Criteria button.
- Enter the criteria descriptor in the Criteria textbox.
- Enter the mark the criteria is out of, in the Points Possible textbox.
- From Assign point radio buttons
- All or Nothing, students can only assign full marks or 0.
- Partial Credit, students can enter a mark up to the points possible.
- From Allow Feedback to User radio buttons
- Yes, students can add feedback as well as a mark when completing a peer review.
- No, students can only allocate a mark when completing a peer review.
- Click on the Submit button.
Repeat the above steps to add additional questions.
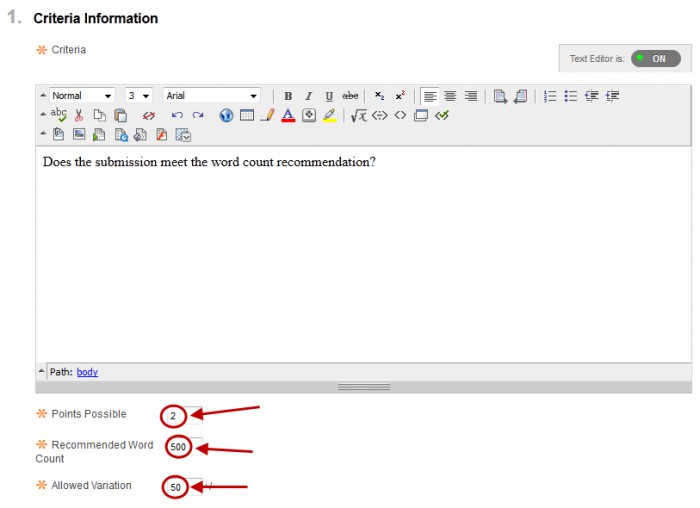
Word Count Criteria
- Click on the Word Count Criteria button.
- Enter the mark the criterion is out of, in the Points Possible textbox.
- Enter the specified word count Recommended Word Count textbox.
- Enter the acceptable lower and higher word number , in the Allowed Variation textbox.
- Click on the Submit button.
Search for Criteria
- This option allows you to search for and reuse criteria.
- Click on the Search for Criteria button.
- Enter keywords in the Search for Criteria textbox or leave blank to view all criteria.
- Click on the Go button.
- Check the checkboxes of the required criteria.
- Click on the Submit button.
