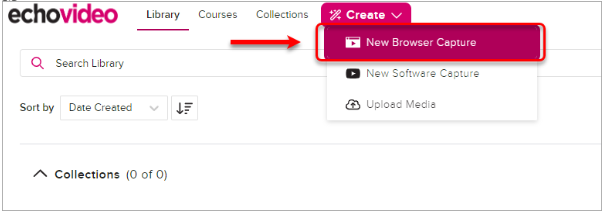
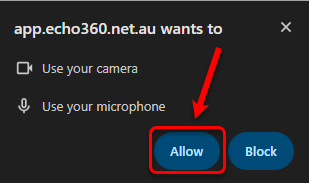
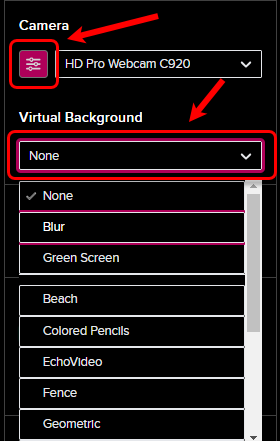
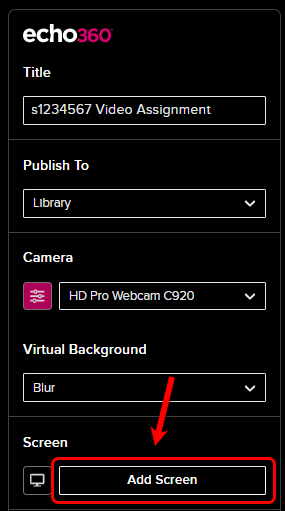
Screen & Webcam Recording

Note: In order to record with Screen and Webcam functions, both recording icons must be activated. Therefore, only having one screen will not be able to record the two functions.

  1. Plug in the microphone you will be using (if you are not using a microphone built into your computer) before you open Kaltura Capture.
  2. Click on Manage then the cog icon to check your settings.

Note: Refer to the Recording Options and Settings guide for more details.

manage option

  1. In the main interface, click the microphone icon to make it blue and enabled. Click on the down-arrow near the icon then select the appropriate microphone.

microphone icon and list of available microphones

  1. For the first recording function, select the appropriate screen/camera from the down-arrow menu.

Note: If you only have one webcam, it will automatically be selected.

drop-down menu for webcam and screen selection

  1. For the second recording function, select the appropriate screen/camera from the down-arrow menu.

Note: By default, the screen recording setting is set to Full Screen. If you are recording using Full Screen, proceed from Step 10.

Note: When recording both screen and webcam, only the screen recording size can be configured.

full screen option and record button

  1. If recording a specific area, select the Select Area radio button.

select area option

  1. Follow the prompt to click and drag over the area of your screen for recording by either:

  • Clicking and dragging over the dotted line to the desired size.

resizing using with dotted lines

  • Or select the size options from the drop-down menu.

Note: You may manually resize after selecting the size from the drop-down menu.

  1. Click on the Confirm button.

drop-down menu for resizing and confirm button

  1. red border will appear around your selection for recording.

Note: Resizing your selection can be modified at this stage. Refer to Step 6 for more details.

red border selection for recording

  1. Click on the Red recording button to begin recording.

Note: It will start recording after 3 seconds and can be cancelled by pressing cancel.

red record button

Tip: Clicking on the Red pause button ensures that recordings do not need to be completed in one take. Resume recording by clicking the Red pause button again.

red pause button

  1. Stop recording by clicking on the White stop button then Yes, Stop it.

white stop button and confirmation

  1. The recording entry will appear. Editing must be done via My Media after uploading.

Note: Refer to the Editing guide for more information.

  1. Enter a meaningful title, and/or description and tags for your recording then click Save & Upload to upload it My Media.

Note: Click Save to have the recording in your library in the event you want to make another recording and decide which is preferrable. Click Delete to delete the recording.

recording entry requirements to title, description, tags with save and upload, save and delete options