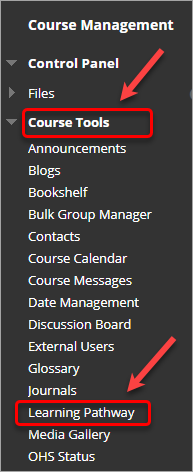
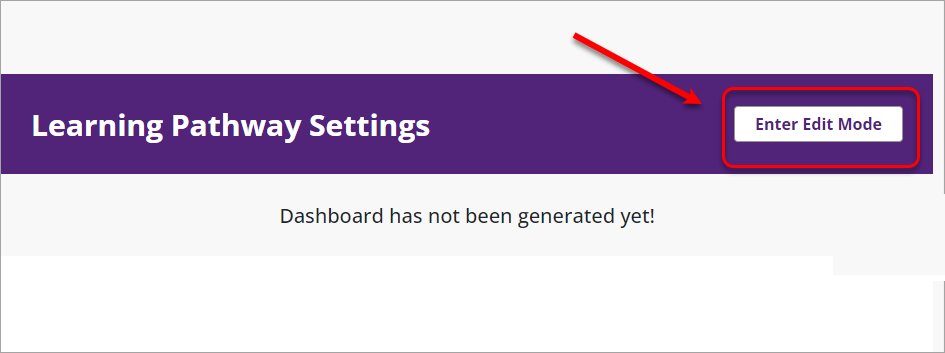
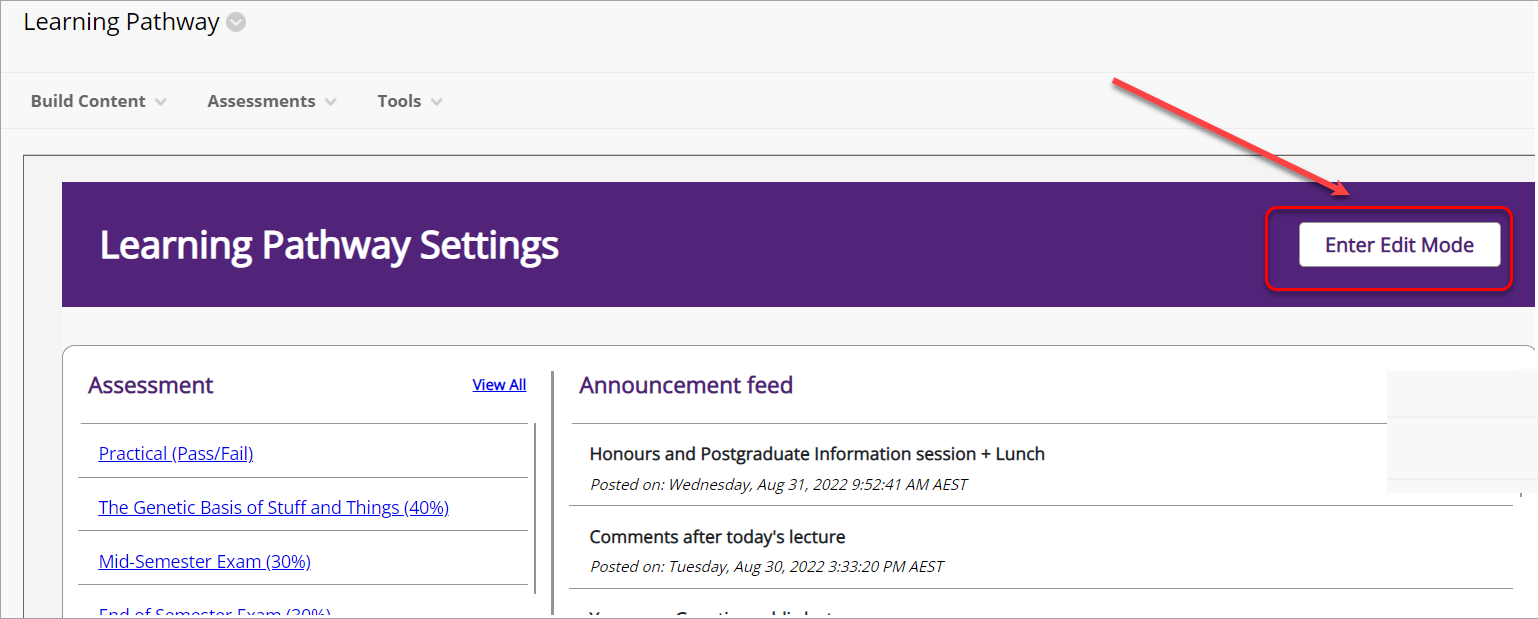
Learning Pathway (Original)
What is Learning Pathway?
The Learning Pathway is a navigational interface in Blackboard course sites that provides students with a clear visual roadmap through their course to help them stay on track.
Why would I use Learning Pathway?
Learning Pathway is a study guide for students with your recommendations on how they should work through the course. It serves as a scaffold to make the concepts and curriculum of a course transparent for students by organising resources and tasks in a way that learners can "see" a pathway to achieve the learning objectives. Complex learning and sequences (e.g. podcast, online formative quiz, on-campus laboratory workshop then online summative quiz) are broken down into manageable steps and just-in-time access to resources and support materials.
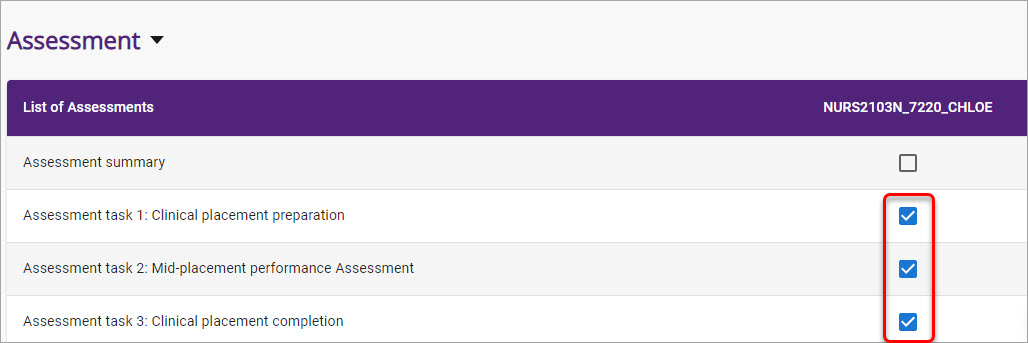
Assessment Panel
- From the List of Assessments check the checkboxes next to the assessment items to be displayed to students.
Note: It is recommended to create a separate folder for each piece of assessment and the folders will automatically be added to the Assessment panel.

Assessment due date
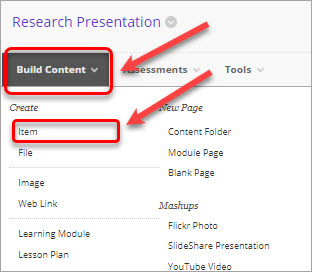
- In the individual assessment folder click on the Build Content button.
- Select Item.
- In the name textbox type Due date.
- In the Text textbox type the actual due date of the assignment in the following format: dd-Mmm-YYYY e.g. 25-Sep-2022, or the date range, e.g. 18-Aug-2022 to 25- Sep-2022.
- In Permit users to view this content select No radio button.
- Click on the Submit button.
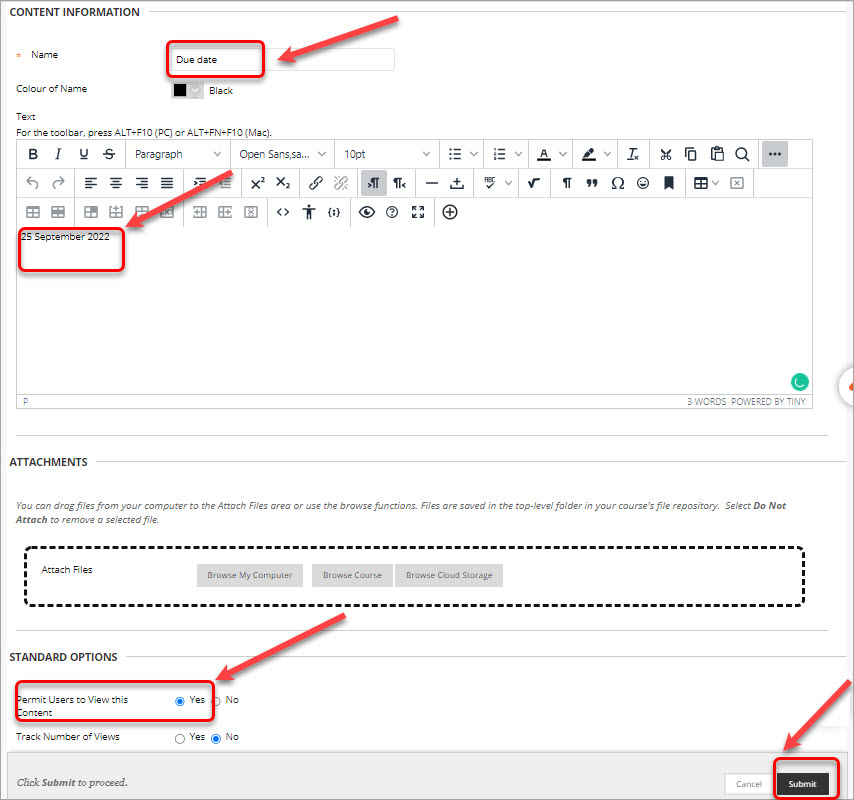
The item will not be displayed, but the folder will be placed in the date order in the Assessment panel.
Adaptive release
If an assessment uses adaptive release, please include all the releases in one assessment folder. The students will be directed to the same assessment folder, and adaptive release will work as usual.
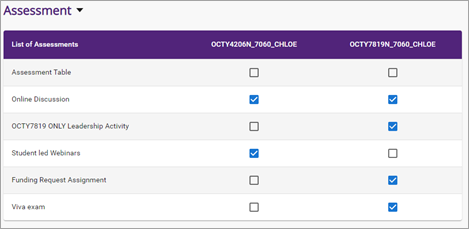
Double/Multi-badged course
Announcement Panel
The panel feeds of the Announcement section of the course. All announcements posted in Announcement section will automatically show in the Learning Pathway Announcement panel.
Note: announcements are sorted by date (newest at the top), therefore pinned announcements will NOT stay on the top in Learning Pathway.
Set up Learning Pathway
Learning Pathway section presents the students with a list of course activities with the breakdown by weeks/modules/topics. Please refer to Examples of course structures. Students can check off the activities they complete.
To set up Learning Pathway:
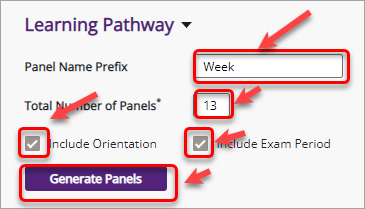
- In the Learning Pathway type Week in the Panel Name Prefix textbox if you are using a weekly structure or Module if you are using a modular structure.
- In the Total Number of Panels textbox (compulsory) type the number of weeks if you are using a weekly structure or the number of modules if you are using a modular structure.
- Check Include Orientation and Include Exam Period checkboxes if you wish to include these panels.
- Click on the Generate Panels button.
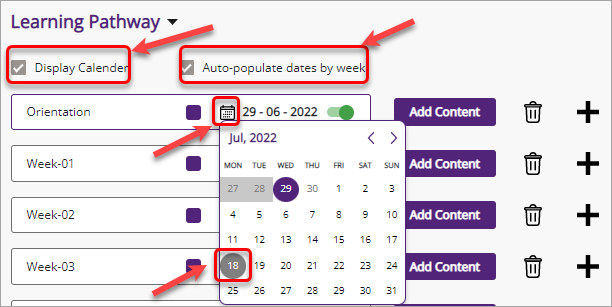
- Check Display Calendar checkbox to display panel dates to students.
- Check Auto-populate dates by week checkbox.
- Click on the calendar icon in the first panel and select the date. The date controls the active panel on display for students. If there is no need to highlight the active panel, leave the date as is and uncheck Display Calendar checkbox.
- The dates of all consecutive weeks will be adjusted accordingly.
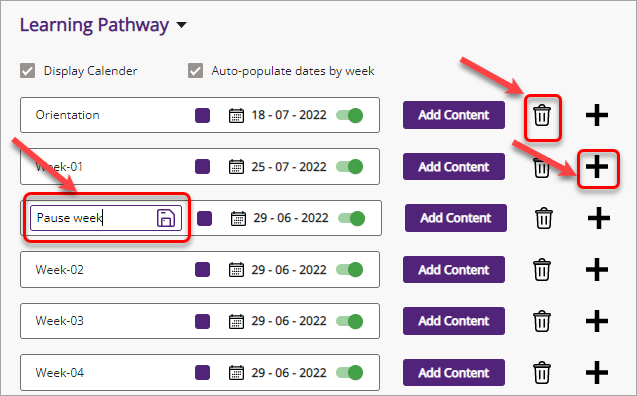
- To add a week (e.g. Pause/Flood week), click on the + plus button next to the required panel.
- To remove a week, click on the Delete icon.
Note: If you add/remove weeks, all dates from that week on will be reset to the current date. Change the date of the new panel (or the first panel after the deleted one) and the dates of all consecutive weeks will be adjusted automatically.
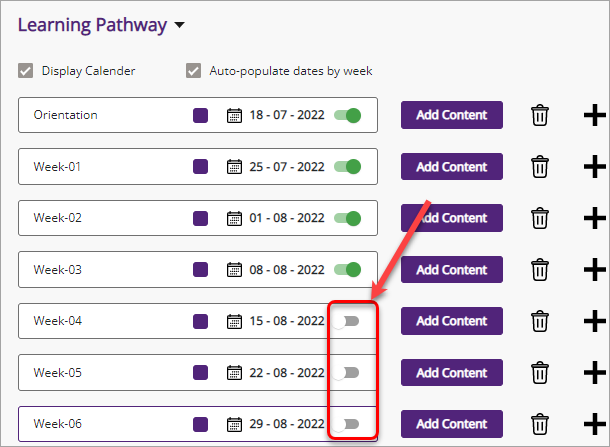
- To hide panel/s from students, deactivate the Visibility slider. Activate the slider once the panel is ready for student viewing.
Add content to Learning Pathway
- Make a plan of what you need to add to each panel by reviewing the course content in the relevant folders (e.g. Learning Resources, Assessment).
WARNING: You are not able to re-arrange the items within a panel (this functionality is currently under development). Please plan beforehand what content and in what order you will add to the panels.
- In the required panel click on the Add Content button.

- Click on the Add Sub Heading button.

- Type the title and click on the Save icon.

- Click on the Add item button.
- Type the content title/description.
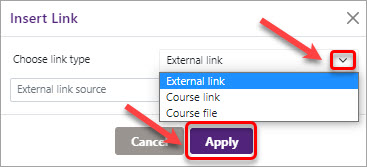
- (Optionally) Click on the Insert Link link. It becomes active only after the title/description is typed.

- Select from the following options:
- External (external websites, YouTube videos etc.)
- Course link (you can link to the whole folder or to an individual item within a folder)
- Course file (a particular file).
Tip: you can link to a course folder/item by selecting the External link and copy-pasting the direct link to the folder from the browser.
- Click on the Apply button.
- Click on the Save icon.
Set up Activities Overview
Activities Overview section displays the overview of activities for the whole course at a glance using icons. This panel is optional and if not generated, will not be displayed.
To set up Activities Overview:
- In the Total Number of Panels type the number of weeks to display.
- Check Include Orientation and Include Exam Period checkboxes.
- Click on the Generate button.
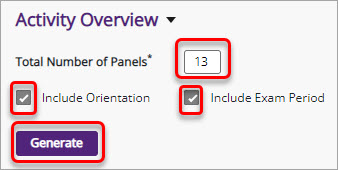
- To add activities, click on the plus button.
- Select the icon representing your activity. Refer to the Icons and their meaning guide.
- Type Activity Name, Due Date (optional), Weighting (optional), Link (optional) and Description. Click on the Save button.
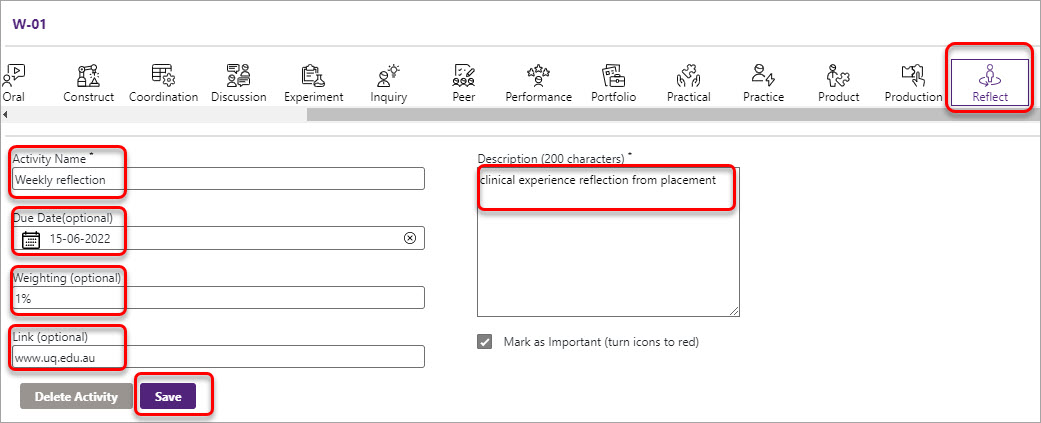
- (Optionally) check Mark as Important checkbox to make the icon displayed red.
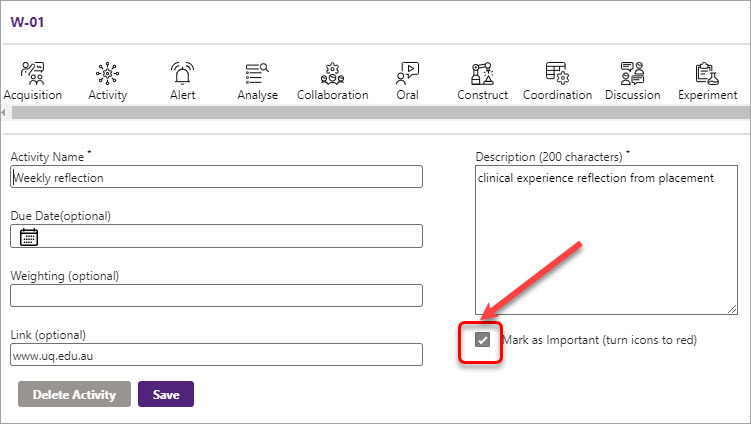
- Repeat the process to add more activities as required.
Note: the maximum number of activities per panel is 4 (four).
Icons and their meaning
Preview, Publish and Set Learning Pathway as the Homepage
- Click on the Preview button to preview Learning Dashboard.
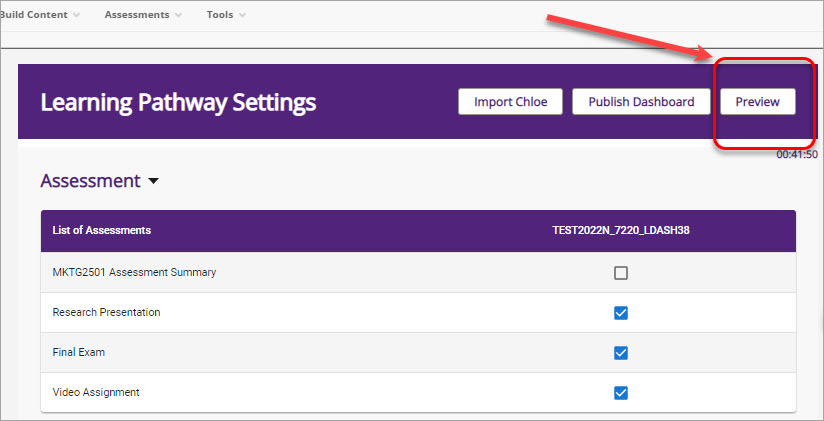
Note: do not use the Student Preview tool. To see Learning Pathway in student view, use the Preview button.
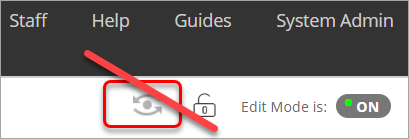
- Click on the Exit Preview button to exit preview.

- Click on the Publish Dashboard button to create Learning Pathway.

Warning: If you have an original Learning Pathway set up in your course, which is named "Learning Pathway", you will get the below error. Please either delete the original Learning pathway OR rename it.
![]()
- Learning Pathway is generated at the top of the Course Menu.
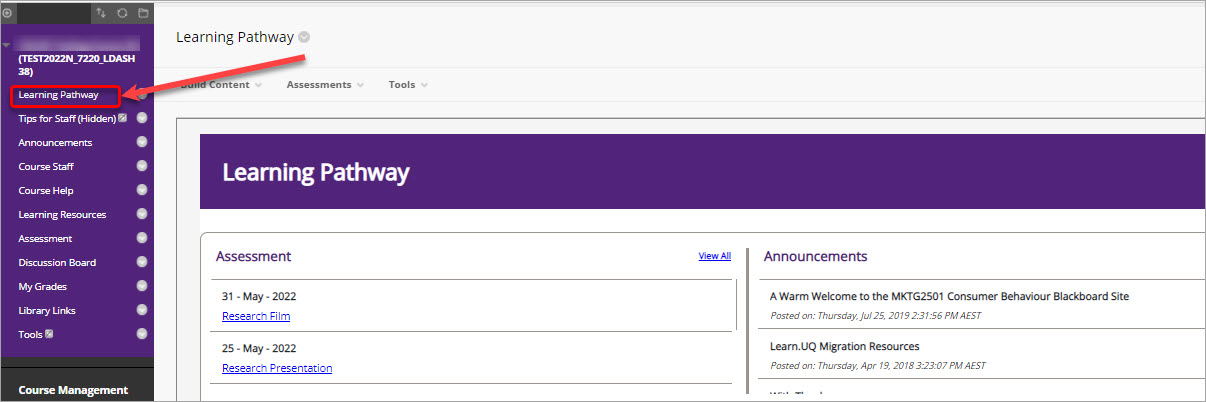
Note: once the Learning Pathway is published, any changes made to the Learning Pathway will be released to students. Panels can be hidden from students using the Visibility slider in the panel setting. Please refer to Set up Learning Pathway guide.
Warning: When you make any changes, do not re-publish Dashboard. After you publish Learning Pathway, this button (Publish Dashboard) should be used only if you accidentally deleted Learning Pathway.
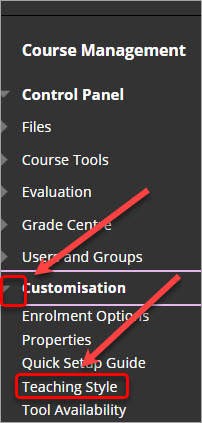
- From the Course Management menu, click on Customisation.
- Select Teaching Style.
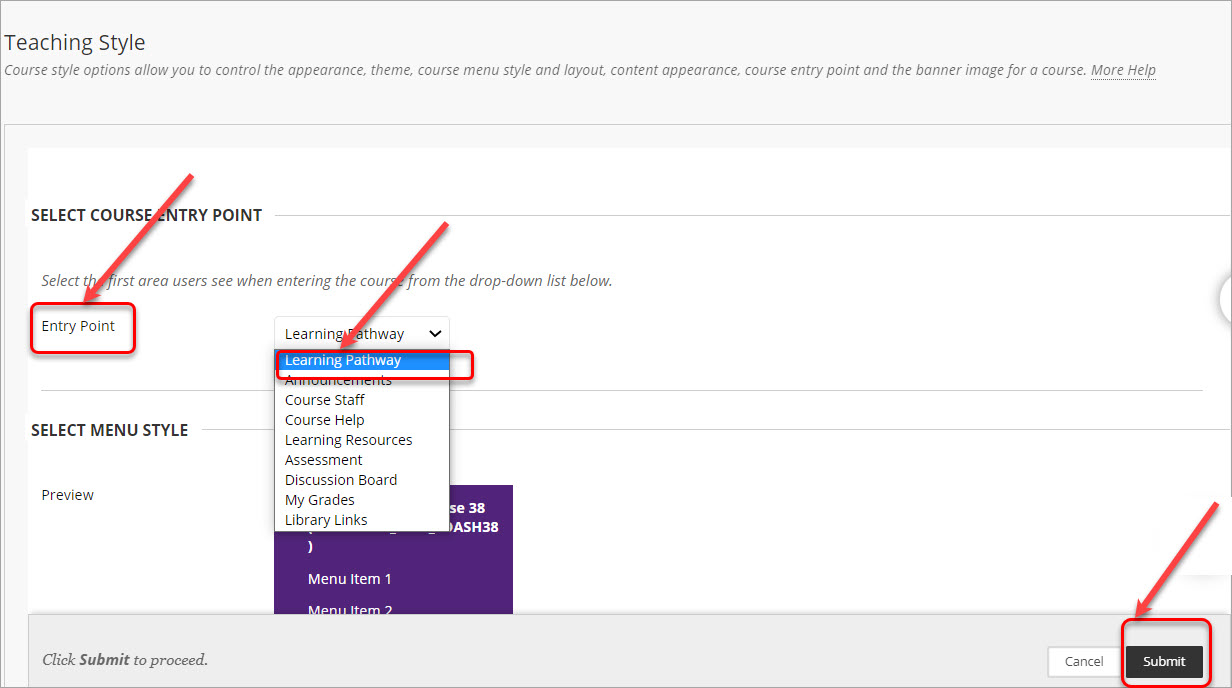
- From the Entry Point drop-down menu select Learning Pathway.
- Click on the Submit button.
If you used original Learning Pathway
If the original Learning Pathway was named "Learning Pathway", this will create an error when you try to generate the new Learning Pathway.

To rectify the issue, you will need to rename the original Learning Pathway link.
- In the course menu, click on the down arrow next to Learning Pathway.
- Click on the Rename Link button.
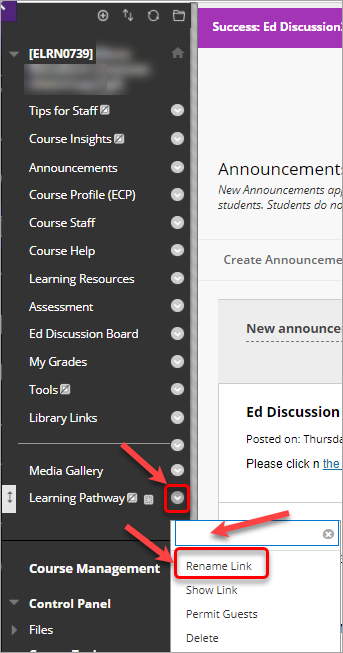
- Type another name, e.g. Learning Pathway 1.
- Click on the Save button.
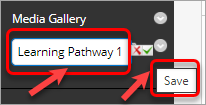
- Create Learning Pathway as per the instructions above.
Examples of course structures
- Weekly format: Course structure in weekly mode with a pre-defined date range, usually 13 weeks.
- Modules/Topics with a consistent date range: Course is structured in modules/topics with consistent date ranges (e.g. each module 1-3 weeks)
- Modules/Topics with an inconsistent date range: Course is structured in modules/topics with inconsistent date ranges (e.g. Module 1 - two weeks; Module 2 – three weeks; Module 3 – two weeks; Module 4 – one week)
- Modules/Topics without a date.
- Merged course with a variation in assessment: (e.g. undergrad+postgrad or several courses merged into one) each cohort will see only their assessment in Learning Pathway, but still will be able to see all assessments in the Assessment section in the left-hand side course menu.

